French Dip Sliders with Chuck Roast & Homemade Horseradish Sauce
French dip sliders with chuck roast transform one of America’s most beloved sandwiches into perfectly portioned, crowd-pleasing bites that deliver all the classic flavors in a convenient slider format. This recipe starts with a well-marbled chuck roast that gets seared to develop a deep caramelized crust, then braised low and slow in a richly seasoned beef broth until the meat becomes so tender it shreds with just a gentle pull of a fork. The braising liquid transforms into a concentrated, savory au jus that serves as the signature dipping sauce, while a homemade horseradish cream adds tangy, peppery heat that cuts through the richness of the beef and melted cheese.
What makes these beef sliders with au jus special is how the long, slow braising process breaks down the tough connective tissue in chuck roast into silky, gelatinous richness that keeps every bite moist and flavorful. The braised beef sliders get assembled with melted provolone cheese that adds creamy, mild flavor without overwhelming the beef, then baked until the cheese melts into the shredded meat and the buttered tops turn golden and slightly crispy. The horseradish sauce provides the perfect counterpoint – its sharp, nasal-clearing heat and tangy creaminess balance the deep, meaty flavors.
These chuck roast sliders work equally well for game day gatherings, holiday parties, casual weeknight dinners, or any occasion where you need to feed a crowd without spending hours in the kitchen on the day of serving. The beef can be braised one to two days ahead, making the final assembly quick and stress-free. The make-ahead French dip sliders approach means you can focus on your guests while still serving restaurant-quality food that looks and tastes like you spent all day cooking.
Understanding Chuck Roast and Why It’s Perfect for Braising
Chuck roast comes from the shoulder area of the cow, a heavily worked muscle group that develops intense beefy flavor but also contains significant connective tissue that makes it tough when cooked quickly. This same connective tissue becomes chuck roast’s greatest asset when braised properly. The collagen-rich sinew that makes chuck chewy when grilled transforms into rich, silky gelatin during long, moist cooking at low temperatures. This gelatin coats every strand of meat, creating the luxurious, melt-in-your-mouth texture that defines great braised beef.
The marbling in chuck roast – those white streaks of intramuscular fat – provides another layer of richness and moisture. As the roast cooks, this fat slowly renders, basting the meat from within while contributing deep, satisfying beef flavor. An 80/20 ratio of lean to fat is ideal – enough fat for flavor and moisture without making the finished sliders greasy. Leaner cuts like sirloin or round roast lack both the connective tissue and marbling needed to stay moist during long cooking, resulting in dry, stringy meat.
Chuck roast’s robust flavor stands up to bold seasonings and long cooking times without becoming bland or washed out. The Maillard reaction that occurs during the initial searing creates hundreds of new flavor compounds – roasted, caramelized notes that add complexity to the finished dish. These browned bits (fond) that stick to the pot become the foundation of the au jus, contributing concentrated beefy flavor that can’t be replicated with store-bought broth alone.
The size and shape of chuck roast makes it practical for feeding crowds. A three to three-and-a-half pound roast yields enough shredded beef for twelve generous sliders with some left over for seconds. The uniform thickness means even cooking throughout, unlike brisket which has a thick flat and thin point that cook at different rates. Chuck roast’s relatively affordable price point compared to premium cuts makes it economical for party cooking where you need volume without breaking the budget.
The Science of Braising: Low, Slow, and Moist
Braising is a combination cooking method that uses both dry heat (the initial sear) and moist heat (the liquid-based cooking) to transform tough cuts into tender, flavorful dishes. The science behind successful braising centers on collagen breakdown, which requires three specific conditions: moisture, moderate heat, and time. When all three factors work together, tough connective tissue gradually converts to gelatin while the meat fibers themselves become tender without drying out.
Collagen – the protein that forms connective tissue – begins breaking down into gelatin at temperatures around 160 degrees Fahrenheit, but this conversion accelerates between 180 and 210 degrees. The sweet spot for braising is around 300 degrees oven temperature, which maintains the liquid at a gentle simmer (around 195-205 degrees) rather than a rolling boil. Too high and the meat fibers contract violently, squeezing out moisture faster than the collagen can convert to gelatin, resulting in dry, tough meat despite long cooking. Too low and the collagen breakdown happens so slowly that you’d need to cook for eight to ten hours to achieve tenderness.
The liquid in braising serves multiple purposes beyond just providing moisture. It acts as a heat transfer medium, surrounding the meat with consistent, even temperature that penetrates from all sides. The liquid prevents the exterior from drying out while the interior cooks, and it dissolves the collagen as it breaks down, carrying those rich, gelatinous compounds throughout the cooking vessel. As the braising liquid reduces and concentrates, it becomes increasingly flavorful, enriched with dissolved proteins, rendered fat, and the aromatic compounds from the vegetables and seasonings.
The partially submerged method – where the roast sits in liquid that comes about halfway up the sides – creates the ideal braising environment. The portion in the liquid braises in direct contact with moisture, while the exposed top cooks in the humid, enclosed environment above the liquid. This combination prevents the roast from becoming waterlogged (which would dilute flavor) while still benefiting from the moist heat that drives collagen breakdown. The steam circulating in the covered pot bastes the exposed portions continuously.
Building Depth in Your Au Jus
The au jus – literally “with juice” in French – is far more than just the liquid left over from cooking meat. A properly developed au jus is a concentrated, intensely flavored sauce that captures the essence of the beef while adding aromatic complexity from vegetables, herbs, and umami-rich ingredients. The foundation begins with the fond – those deeply caramelized brown bits that form on the bottom of the pot during searing. These bits are pure concentrated flavor, created by the Maillard reaction between proteins and sugars at high heat.
Deglazing the pot after sautéing the onions lifts these precious flavor compounds into the braising liquid where they’ll contribute throughout cooking. The onions themselves add both sweetness and savory depth through their own caramelization and the breakdown of their sulfur compounds during long cooking. Garlic contributes pungent, aromatic notes that mellow into sweet, almost nutty character over hours of braising. Together, these aromatics create a flavor base that’s greater than the sum of its parts.
Beef broth and beef consommé provide the liquid foundation, but they serve different purposes. Standard beef broth adds volume and mild beef flavor, while consommé – which is clarified, concentrated stock – contributes intense, pure beef essence without cloudiness or excess fat. The combination creates a au jus with both body and clarity. Low-sodium broth is essential because the liquid will reduce during cooking, concentrating the salt. Starting with regular broth often results in an overly salty au jus that can’t be fixed.
Worcestershire sauce and soy sauce add umami – that savory, mouth-filling quality that makes food taste more satisfying and complete. Worcestershire contributes complex fermented notes along with subtle sweetness and acidity, while soy sauce provides glutamates (the compounds responsible for umami) and color depth. Together, they amplify the beef’s natural savory character without tasting like either ingredient individually. The thyme and rosemary add herbal, slightly piney notes that complement beef beautifully, while the bay leaf contributes subtle floral, almost menthol-like aromatics that round out the flavor profile.
Why Searing Matters (And When It Doesn’t)
The initial searing step serves critical purposes that directly impact the final flavor of both the beef and the au jus. When the dried, seasoned roast hits the hot oil, the surface proteins and sugars undergo the Maillard reaction – a complex series of chemical changes that create hundreds of new flavor compounds. These compounds taste roasted, caramelized, nutty, and deeply savory in ways that unseared meat simply cannot replicate. The visible brown crust is your evidence that these reactions occurred successfully.
Searing does not, contrary to popular belief, “seal in the juices.” This myth has been thoroughly debunked – meat doesn’t have pores that can be sealed, and seared meat loses just as much moisture during cooking as unseared meat. What searing actually does is create a flavorful crust that adds textural contrast and concentrated taste to the outer layer. When you shred the finished roast, these crusty bits distribute throughout, adding little pockets of intense flavor to every bite.

The fond left behind after searing is arguably more important than the crust on the meat itself. Those stuck-on brown bits contain concentrated flavor compounds that would otherwise be lost. When you deglaze the pot with the aromatics and liquid, you’re capturing all that flavor and incorporating it into the au jus. Without proper searing and fond development, your au jus will taste flat and one-dimensional no matter how long you cook it.
However, searing must be done correctly to be worthwhile. The meat must be completely dry – patted thoroughly with paper towels – because surface moisture prevents browning. The oil must be hot enough to sizzle immediately when the meat touches it, and the meat must remain undisturbed for three to four minutes per side to develop proper crust. Moving it too soon tears the developing crust and prevents proper browning. Each side should be deep mahogany brown before turning, not pale tan or gray.
The Role of Horseradish in Balancing Rich Flavors
Horseradish sauce serves as more than just a condiment for these sliders – it’s an essential component that provides sharp, pungent counterpoint to the rich, fatty beef and melted cheese. Fresh horseradish contains compounds called isothiocyanates that create that characteristic nasal-clearing heat and sharp, almost mustard-like bite. Unlike the capsaicin in chili peppers which burns the tongue, horseradish’s heat hits the nasal passages and dissipates quickly, providing intense sensation without lingering discomfort.
The acidity in horseradish sauce – from both the vinegar used to preserve prepared horseradish and the added lemon juice or vinegar – brightens the entire slider by cutting through fat and cleansing the palate between bites. Rich, fatty foods can become monotonous without acidic contrast. The tangy horseradish cream provides that brightness while the sour cream base adds cooling richness that tempers the horseradish’s aggressive heat. This creates a sauce that’s bold but balanced – sharp enough to be interesting without overwhelming the beef.
Dijon mustard in the horseradish sauce contributes additional complexity beyond simple heat. Mustard contains its own isothiocyanates (from mustard seeds) that complement horseradish while adding subtle bitter, tangy notes. The mustard also acts as an emulsifier, helping to bind the sauce components into smooth, creamy consistency. Worcestershire sauce adds another layer of umami and subtle sweetness that ties the horseradish sauce to the flavors in the beef and au jus, creating cohesion across all the slider’s components.
The make-ahead nature of horseradish sauce actually improves its quality. Allowing it to rest in the refrigerator for at least thirty minutes lets the flavors meld and marry. The sharpness of the horseradish mellows slightly while the other ingredients become more integrated. The cold temperature also thickens the sour cream base, creating better spreading consistency that won’t make the buns soggy. Day-old horseradish sauce often tastes even better than freshly made as the flavors continue to develop and harmonize.
Shredding vs. Slicing: Texture Considerations
The choice to shred rather than slice the finished roast isn’t arbitrary – it directly impacts both the eating experience and the practical assembly of sliders. Shredded beef creates more surface area than sliced beef, allowing the au jus and melted cheese to coat every strand rather than just the exterior of neat slices. This means more flavor in every bite and better moisture distribution throughout the filling. The irregular, varied texture of shredded meat also provides more interesting mouthfeel than uniform slices.
Shredding allows you to distribute the different textures within the roast more evenly across all the sliders. Chuck roast contains areas of pure meat, pockets of rendered fat, and sections where connective tissue has converted to gelatin. When sliced, one slider might get a fatty section while another gets pure lean meat. Shredding mixes everything together so every slider contains the same balanced combination of textures and flavors. This ensures consistent quality across all twelve sliders rather than some being better than others.
The shredding process itself should happen while the meat is still hot and the collagen is fully melted into gelatin. Two forks work better than pulling with your hands because they separate the meat along its natural grain rather than creating unnatural tears. The goal is irregular, varied-size strands – some thick, some thin – rather than uniform shreds. This textural variety keeps the sliders interesting rather than monotonous. Overly fine shredding creates mushy texture that can become compacted and dense, while leaving pieces too large makes the sliders difficult to eat.
Tossing the shredded beef with some of the strained au jus before assembling keeps it moist and adds concentrated flavor throughout the meat rather than just on the surface. The beef should be moist and glistening but not swimming in liquid – too much will make the buns soggy. The ideal ratio is just enough au jus to coat the strands with a glossy sheen. Reserve the remaining au jus for serving alongside the finished sliders as a dipping sauce.
Choosing the Right Buns and Building Structure
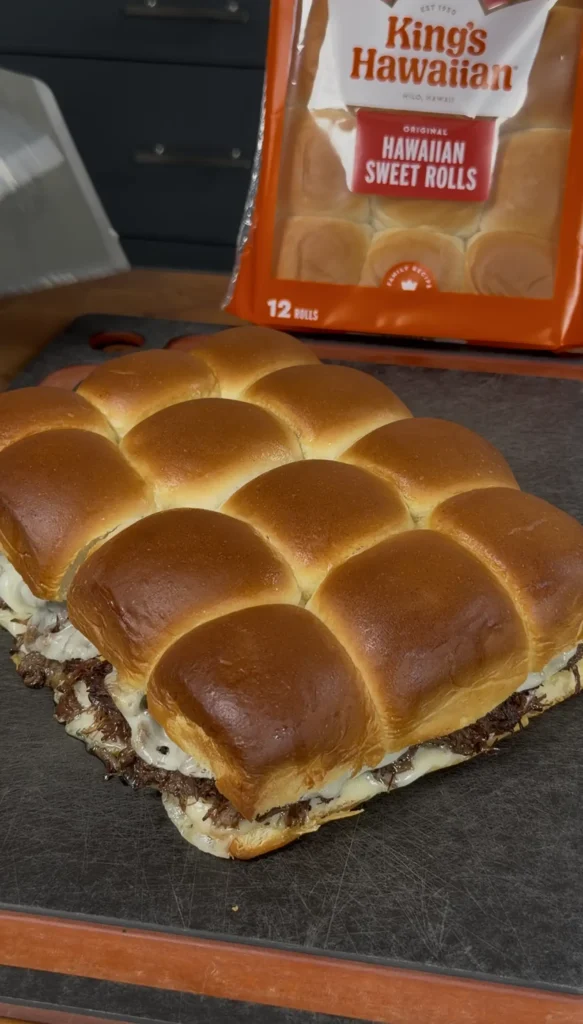
Slider buns or Hawaiian rolls provide the ideal base for these sandwiches because their size, texture, and slight sweetness all contribute to the final eating experience. Standard Hawaiian rolls measure about three inches across – the perfect size for generous beef portions without becoming unwieldy. Their soft, pillowy texture compresses slightly when bitten, creating satisfying give rather than the tough resistance of crusty bread. The subtle sweetness in Hawaiian rolls complements the savory beef without tasting like dessert, providing pleasant contrast to the salty, umami-rich filling.
The connected nature of slider buns makes assembly dramatically easier than working with individual rolls. You can slice an entire sheet of twelve connected buns horizontally in one smooth cut, creating perfectly even top and bottom halves that maintain their alignment during building. This saves significant time compared to individually splitting twelve separate rolls, and it ensures you don’t accidentally cut through individual buns at angles that would make them difficult to fill and eat.
Spreading the horseradish sauce on the bottom buns before adding beef serves a practical purpose beyond flavor. The sauce creates a moisture barrier that prevents the au jus-moistened beef from soaking directly into the bread and creating soggy bottoms. The fat in the sour cream-based sauce repels water, giving the buns some protection. However, the sauce layer must be thin and even – too much creates its own sogginess problem. A light schmear that covers the surface without pooling is ideal.
The buttered, seasoned top layer does more than just add richness – it creates a slight crust that helps the tops maintain structural integrity even as steam from the hot filling rises during baking. The butter browns slightly, adding nutty flavor and visual appeal. The garlic powder and dried parsley in the butter mixture contribute aromatic notes that complement the beef while making the baked sliders smell irresistible. Brushing must be thorough but not excessive – you want the buns glistening with butter but not dripping.
Melting Cheese: Temperature and Timing
Provolone cheese provides ideal characteristics for these sliders – mild, slightly tangy flavor that complements beef without competing, smooth melting properties that create creamy coverage, and subtle saltiness that enhances the overall savory profile. Provolone melts at relatively low temperatures (around 130-140 degrees Fahrenheit) and becomes fluid enough to flow between the beef strands rather than sitting on top in a solid layer. This integration of melted cheese throughout the filling creates richness in every bite rather than just on the surface.
The covered baking step – ten minutes with foil – creates a steamy environment that melts the cheese thoroughly without browning the tops prematurely. The trapped steam heats the sliders from all sides, ensuring the centers become hot and the cheese melts completely even in the middle of the pan where heat penetration is slowest. The foil also prevents the buttered tops from browning before the interiors are fully heated, which would result in cold centers with overdone exteriors.
Removing the foil for the final five to seven minutes allows moisture to escape while the tops develop golden color and slight crispness. This two-stage baking creates the ideal texture – soft, steamy interiors with slightly crusty, buttery tops. The timing is critical because over-baking dries out the beef and makes the buns tough, while under-baking leaves the cheese not fully melted and the buns pale and soft without any textural contrast.
Swiss cheese can substitute for provolone if preferred, though it changes the flavor profile slightly. Swiss has nuttier, more pronounced flavor with that characteristic mild sweetness. It also melts beautifully with excellent stretchy quality. American cheese melts most smoothly due to emulsifying salts but tastes processed and artificial compared to provolone. Avoid cheeses like cheddar or pepper jack which have strong flavors that can overwhelm the beef’s subtle braised character.
Ingredients
For the Chuck Roast:
- 3-3.5 lb chuck roast
- 2 tbsp olive oil
- 1 large yellow onion, thinly sliced
- 4 cloves garlic, minced
- 3 cups beef broth (low sodium)
- 1 cup beef consommé or extra broth
- 1 tbsp Worcestershire sauce
- 2 tbsp soy sauce
- 2 tsp kosher salt
- 1 tsp freshly ground black pepper
- 1 tsp dried thyme
- 1 tsp dried rosemary
- 1 bay leaf
For the Sliders:
- 12 slider buns or Hawaiian rolls
- 12 slices provolone or Swiss cheese
- 2 tbsp butter, melted
- 1 tsp garlic powder
- 1 tsp dried parsley (optional)
Homemade Horseradish Sauce:
- 1 cup sour cream
- 2 tbsp prepared horseradish (more for extra heat)
- 1 tbsp Dijon mustard
- 1 tsp Worcestershire sauce
- 1 tsp white wine vinegar or lemon juice
- Salt & pepper, to taste
- Optional: 1 tsp fresh chives or parsley, finely chopped
Step-by-Step Instructions
Sear the Chuck Roast for Maximum Flavor
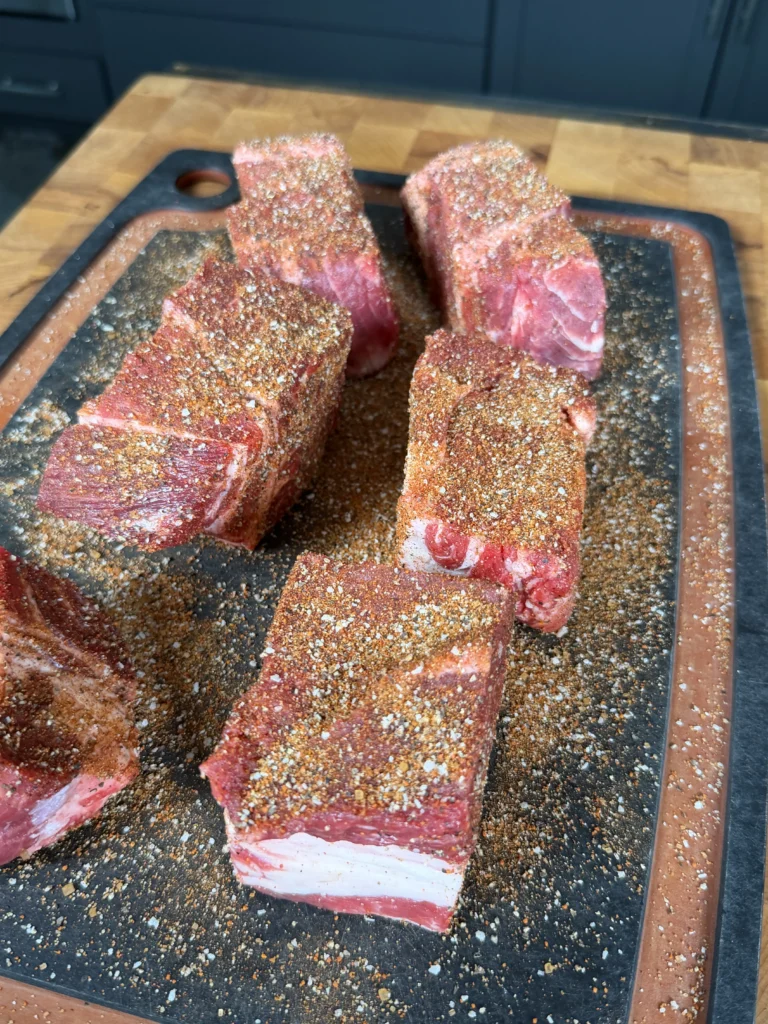
Remove the chuck roast from the refrigerator thirty minutes before cooking to bring it closer to room temperature, which promotes more even cooking. Pat the entire surface completely dry with paper towels – any surface moisture will prevent proper browning. Season generously with two teaspoons of kosher salt and one teaspoon of freshly ground black pepper on all sides. Don’t be shy with the seasoning – much of it will transfer to the braising liquid rather than staying on the meat.
Place a heavy Dutch oven or oven-safe pot over medium-high heat and add two tablespoons of olive oil. Let the oil heat until it shimmers and barely begins to smoke – this takes about two to three minutes. The oil must be hot enough that the meat sizzles immediately upon contact. Carefully lower the seasoned roast into the hot oil, laying it away from you to prevent splattering toward your body.
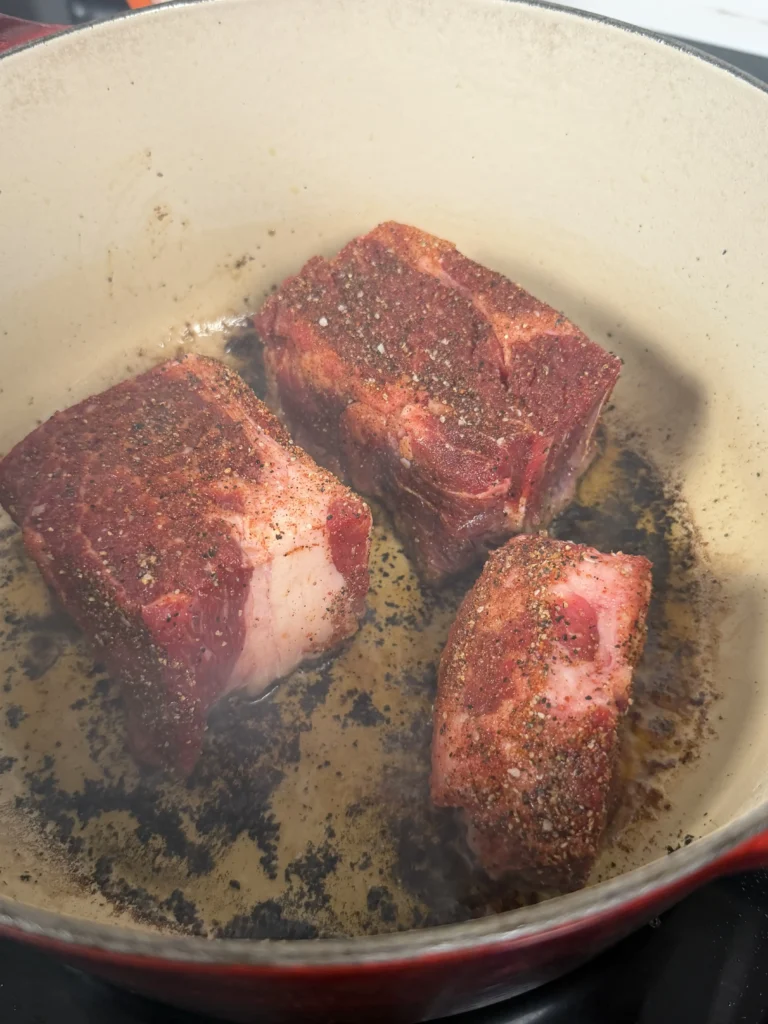
Let the roast sear completely undisturbed for three to four minutes on the first side. Resist the temptation to peek or move it – the meat needs time to develop proper crust. You’ll know it’s ready to turn when the crust releases easily from the pot bottom. If it’s sticking, give it another minute. Use tongs to turn the roast to the next side and repeat the searing process, working your way around all sides of the roast. The goal is deep mahogany brown crust on every surface – this takes twelve to fifteen minutes total for all sides.
Once completely seared, transfer the roast to a plate and set aside. Don’t clean the pot – those brown bits stuck to the bottom (the fond) are pure concentrated flavor that will form the foundation of your au jus. Lower the heat to medium and proceed immediately to building the braising liquid while the pot is still hot.
Build the Au Jus Base
With the pot still over medium heat, add the thinly sliced onion directly to the fond-covered bottom. The onions will immediately begin sizzling and releasing moisture that helps lift those brown bits. Use a wooden spoon to scrape the bottom of the pot as you stir, loosening all the stuck-on fond and incorporating it into the onions. Cook the onions, stirring occasionally, for five to seven minutes until they soften and develop golden edges. The onions should be tender and translucent with some browned spots but not completely caramelized.
Add the four minced garlic cloves and stir constantly for about one minute until the garlic becomes fragrant and aromatic. Don’t let the garlic brown or burn – it should just soften and release its oils. The residual heat from the onions will continue cooking the garlic even after you add the liquid, so you want it just barely cooked at this stage to avoid bitter, acrid flavor from overcooked garlic.
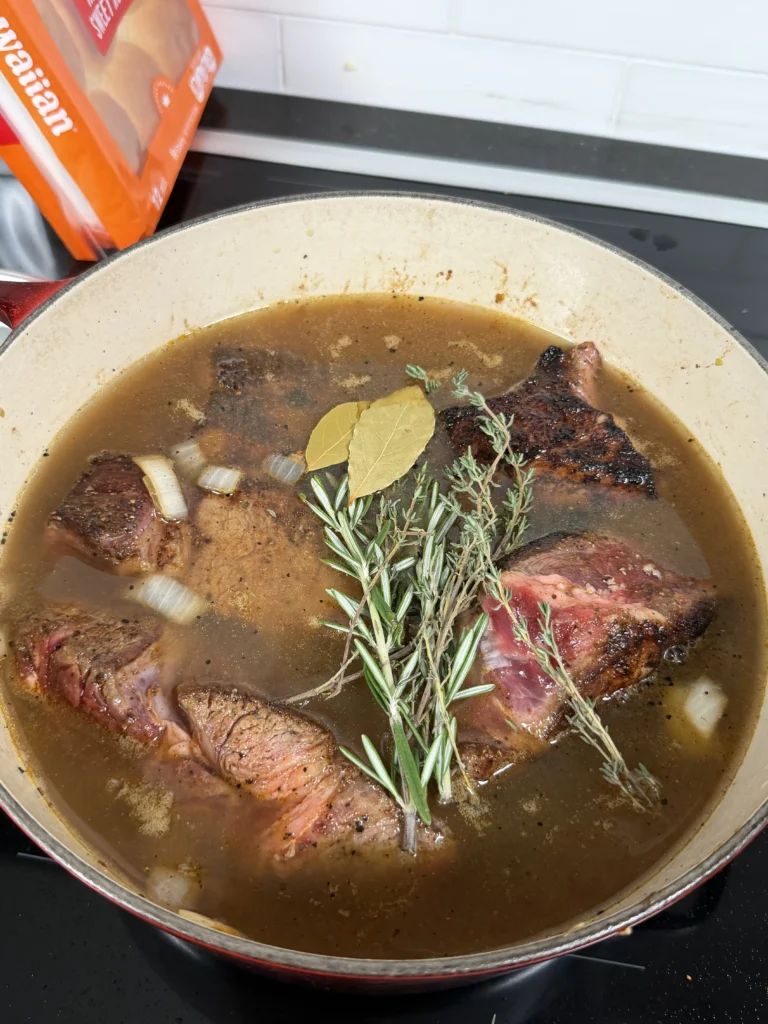
Pour in three cups of low-sodium beef broth and one cup of beef consommé, followed by one tablespoon of Worcestershire sauce and two tablespoons of soy sauce. Add one teaspoon of dried thyme, one teaspoon of dried rosemary, and nestle the bay leaf into the liquid. Stir everything together, making sure to scrape any remaining fond from the pot bottom. The liquid should come to a simmer relatively quickly since the pot is already hot.
Return the seared chuck roast to the pot, nestling it into the liquid. The liquid should come about halfway up the sides of the roast – not completely covering it. If your liquid level is too low, add a bit more broth. If it’s too high, ladle some out and reserve it for later (you can add it back if needed during cooking). The partially submerged method is key to proper braising.
Braise Low and Slow
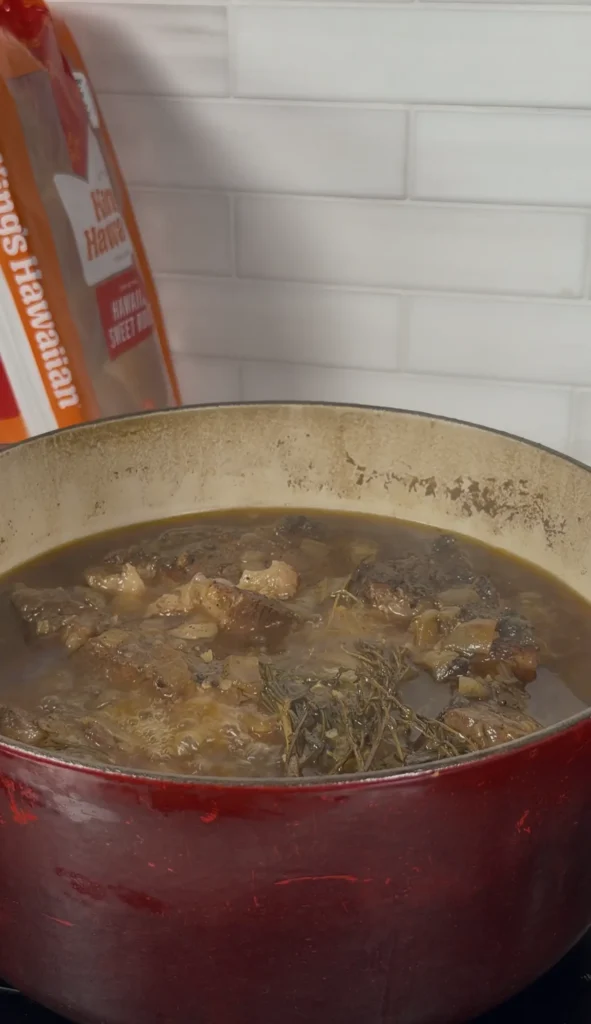
Cover the Dutch oven with its lid and transfer the entire pot to a preheated 300-degree Fahrenheit oven. The moderate temperature will maintain the liquid at a gentle simmer – around 195 to 205 degrees – which is ideal for collagen breakdown without violent boiling that would toughen the meat fibers. Set a timer for three and a half hours for a three-pound roast, or four to four and a half hours for a larger three-and-a-half-pound roast.
During braising, resist the urge to check on the roast frequently. Every time you remove the lid, you release heat and steam that need to be rebuilt, extending the cooking time. One check at the halfway point is sufficient – just to ensure the liquid is simmering gently rather than boiling hard or barely bubbling. If it’s boiling vigorously, reduce the oven temperature by twenty-five degrees. If it’s not simmering at all, increase by twenty-five degrees.
The roast is done when a fork slides into the meat with almost no resistance and the meat shreds easily when twisted. The texture should feel almost buttery rather than firm. If you encounter any resistance when probing with a fork, give it another thirty minutes and check again. Undercooked pot roast is tough and chewy no matter how you slice it, while properly cooked roast is tender even if slightly overcooked. It’s better to err on the side of more time than less.
Once the roast is fork-tender, carefully remove the pot from the oven and transfer the roast to a cutting board using two large forks or sturdy tongs. Let it rest for about ten minutes – this brief rest allows the meat fibers to relax and reabsorb some of their juices. While the roast rests, prepare the au jus by straining the braising liquid through a fine-mesh sieve into a large measuring cup or bowl. Discard the onions, herbs, and bay leaf. Let the liquid settle for a few minutes, then skim off and discard the layer of fat that rises to the top. You should have about two to three cups of rich, flavorful au jus.
Make the Homemade Horseradish Sauce
While the beef braises, prepare the horseradish sauce so the flavors have time to meld. In a medium bowl, combine one cup of full-fat sour cream with two tablespoons of prepared horseradish. Start with two tablespoons and taste – you can always add more heat but you can’t take it away. Prepared horseradish varies significantly in potency depending on brand and age, so adjust to your preference.
Add one tablespoon of Dijon mustard, one teaspoon of Worcestershire sauce, and one teaspoon of white wine vinegar or fresh lemon juice. Whisk everything together until completely smooth and uniform with no streaks of sour cream remaining. The sauce should be thick but pourable – similar to ranch dressing consistency. If it seems too thick, thin it with a teaspoon or two of milk or additional lemon juice.
Season with salt and freshly ground black pepper to taste. Start with about half a teaspoon of salt and a quarter teaspoon of pepper, taste, and adjust. The sauce should taste bold and bright with noticeable horseradish bite balanced by tangy creaminess. If using fresh herbs like chives or parsley, finely mince and stir them in now. Cover the bowl with plastic wrap pressed directly against the surface of the sauce to prevent a skin from forming, and refrigerate for at least thirty minutes or up to three days. The sauce will thicken as it chills and the flavors will deepen and integrate.
Shred the Beef and Assemble the Sliders
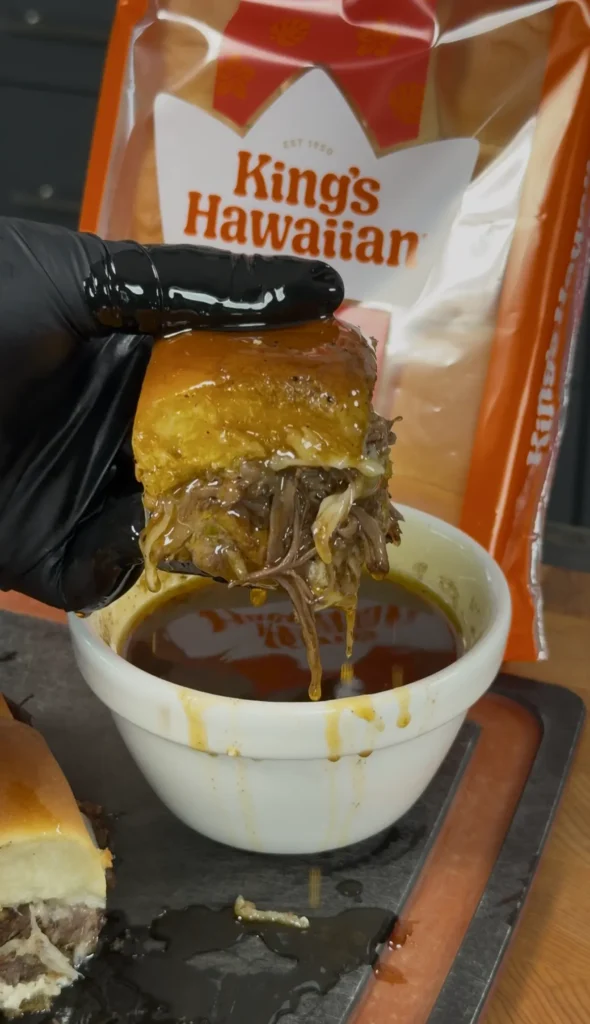
Once the roast has rested briefly, use two forks to pull it apart along its natural grain into irregular shreds. The meat should separate easily with minimal effort – if you’re having to work hard to shred it, it needed more cooking time. Mix the shredded beef with about one cup of the strained au jus, tossing to coat evenly. The beef should be moist and glossy but not swimming in liquid. Reserve the remaining au jus for serving.
Preheat your oven to 375 degrees Fahrenheit. While the oven heats, prepare the slider buns by slicing the entire connected sheet horizontally through the middle, creating one large bottom piece and one large top piece. Keep them connected – don’t separate into individual buns yet. Place the bottom half into a 9×13-inch baking dish or similar sized pan that holds all twelve connected buns snugly.
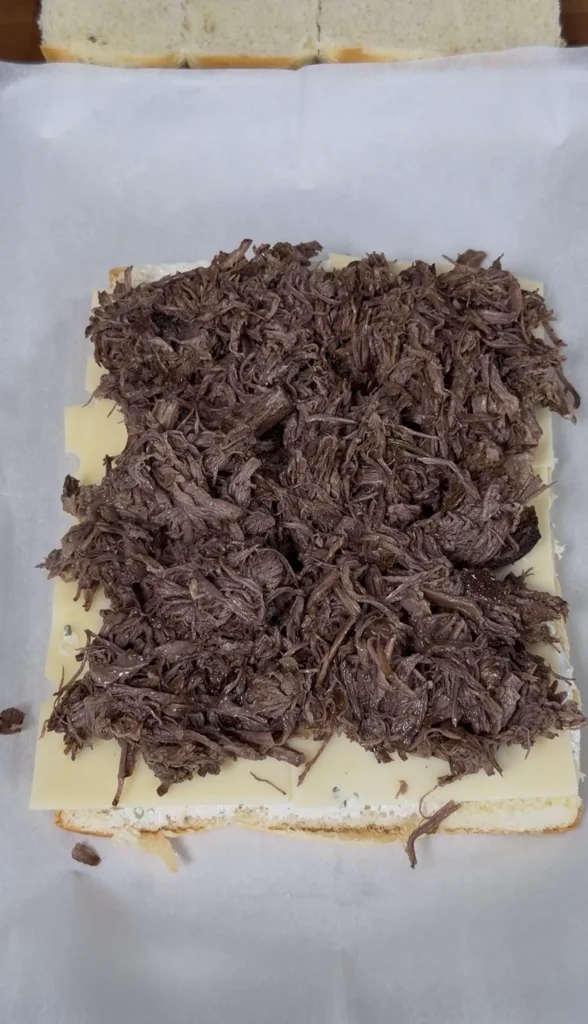
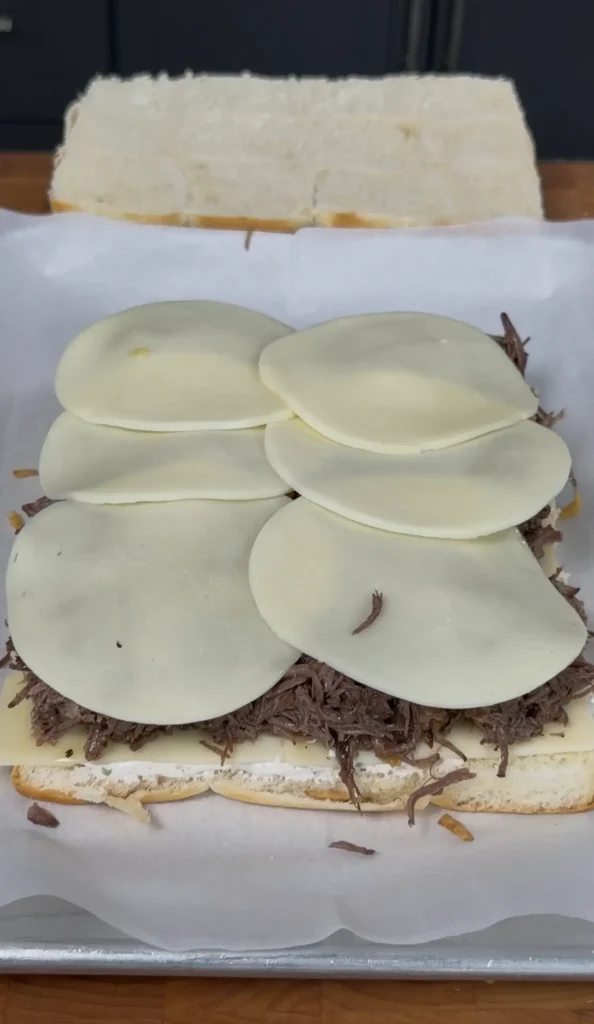
Spread a thin, even layer of horseradish sauce across the bottom buns using a butter knife or small offset spatula. You want just enough to taste in every bite – about two to three tablespoons total spread thin. Pile the au jus-moistened shredded beef evenly over the sauce-covered bottom buns, distributing it so every section gets roughly equal amounts. Lay the provolone cheese slices over the beef, overlapping them slightly to cover all the meat. Place the top buns over the cheese layer, aligning them carefully with the bottom layer.
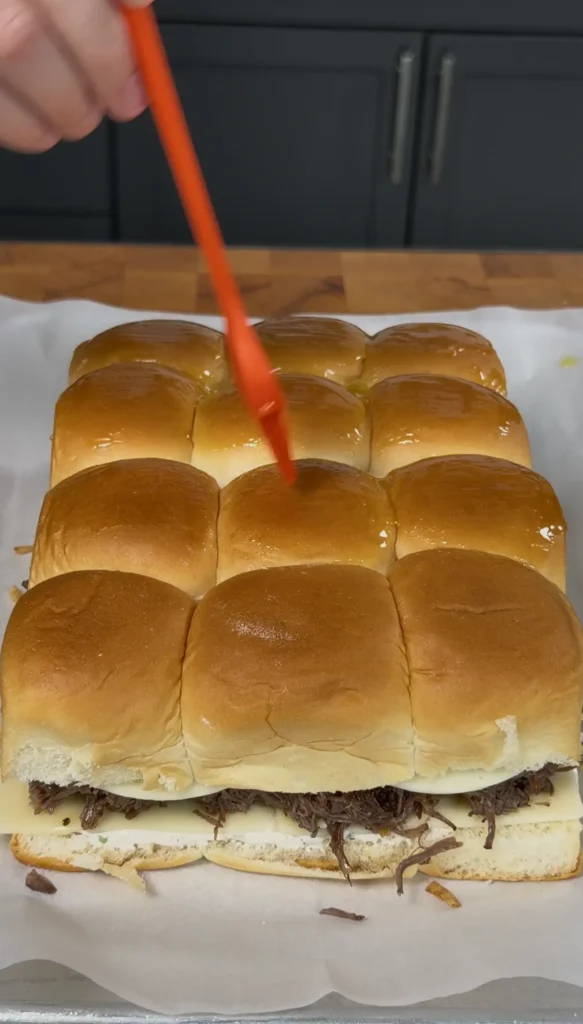
In a small bowl, mix two tablespoons of melted butter with one teaspoon of garlic powder and one teaspoon of dried parsley if using. Use a pastry brush to generously coat the entire surface of the top buns with the seasoned butter. Every section should glisten with butter – this creates the golden, slightly crispy top that makes these sliders so appealing.
Bake and Serve
Cover the baking dish tightly with aluminum foil and place in the preheated 375-degree oven. Bake covered for ten minutes – this steams the sliders and melts the cheese thoroughly without browning the tops. Remove the foil and continue baking uncovered for an additional five to seven minutes until the tops are golden brown and the cheese is fully melted and bubbling at the edges.
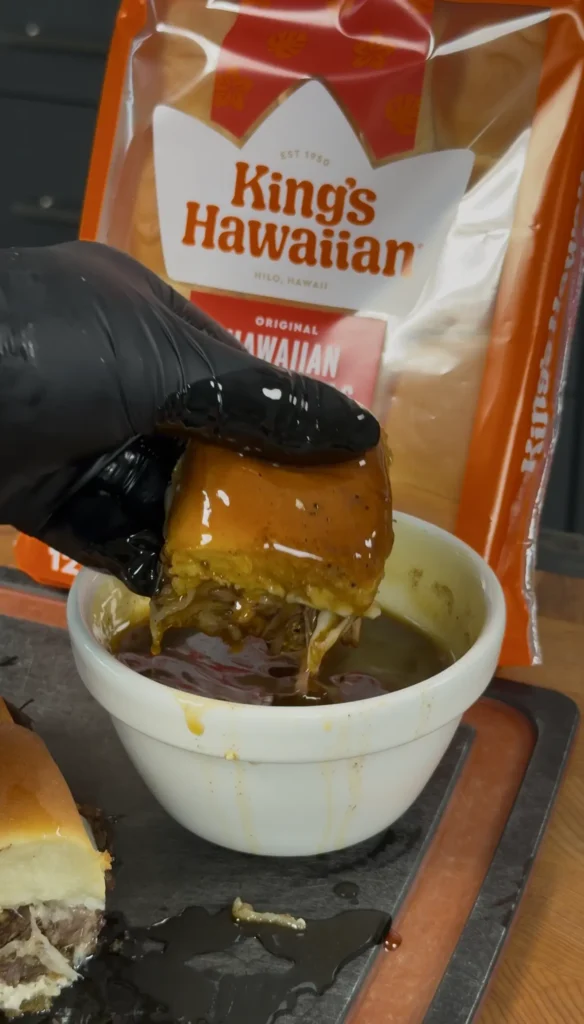
Remove from the oven and let rest for two to three minutes before slicing into individual sliders. Use a sharp serrated knife to cut through the spaces between buns, working gently to avoid squashing them. Transfer to a serving platter while still hot. Serve immediately with small bowls of the remaining warm au jus for dipping, extra horseradish sauce on the side, and plenty of napkins. The sliders are best enjoyed within thirty minutes of baking while the buns are still soft and the cheese is melted.
French Dip Sliders with Chuck Roast & Homemade Horseradish Sauce
Ingredients
For the Chuck Roast:
- 3-3.5 lb chuck roast
- 2 tbsp olive oil
- 1 large yellow onion thinly sliced
- 4 cloves garlic minced
- 3 cups beef broth low sodium
- 1 cup beef consommé or extra broth
- 1 tbsp Worcestershire sauce
- 2 tbsp soy sauce
- 2 tsp kosher salt
- 1 tsp black pepper
- 1 tsp dried thyme
- 1 tsp dried rosemary
- 1 bay leaf
For the Sliders:
- 12 slider buns or Hawaiian rolls
- 12 slices provolone cheese
- 2 tbsp butter melted
- 1 tsp garlic powder
- 1 tsp dried parsley
Horseradish Sauce:
- 1 cup sour cream
- 2 tbsp prepared horseradish
- 1 tbsp Dijon mustard
- 1 tsp Worcestershire sauce
- 1 tsp white wine vinegar
- Salt and pepper to taste
Instructions
- Pat chuck roast dry and season with salt and pepper. Heat olive oil in Dutch oven over medium-high heat. Sear roast 3-4 minutes per side on all surfaces until deep brown crust forms. Remove and set aside.
- Add sliced onions to the pot and sauté 5-7 minutes until soft and golden, scraping up browned bits. Add garlic and cook 1 minute until fragrant. Pour in beef broth, consommé, Worcestershire, soy sauce, thyme, rosemary, and bay leaf. Return roast to pot, nestling into liquid.
- Cover pot and transfer to 300°F oven. Braise 3.5-4.5 hours until fork-tender and shreds easily. Remove roast, strain liquid, and skim fat. Reserve au jus for dipping.
- While beef cooks, whisk together sour cream, horseradish, Dijon, Worcestershire, and vinegar. Season with salt and pepper. Refrigerate at least 30 minutes.
- Shred beef with two forks and toss with 1 cup of au jus. Preheat oven to 375°F. Slice slider buns horizontally and place bottoms in baking dish. Spread thin layer of horseradish sauce on buns.
- Pile shredded beef evenly over sauce, top with provolone slices, and add top buns. Mix melted butter with garlic powder and parsley, brush over tops.
- Cover with foil and bake 10 minutes. Remove foil and bake 5-7 minutes more until tops are golden and cheese is melted. Let rest 2-3 minutes, slice into individual sliders, and serve with warm au jus for dipping.
Notes
Don’t marinate or over-soak beef in au jus before assembly – just toss to coat
Roast can be braised 1-2 days ahead and refrigerated
For crispier beef, spread shredded meat on a sheet pan and broil 3-4 minutes before assembling
Horseradish sauce keeps refrigerated up to 5 days
Leftover beef freezes well for up to 2 months
For slow cooker: sear as directed, then cook on low 8 hours or high 5 hours
FAQ
Can I make the beef ahead of time?
Yes – this is actually ideal for party planning. Braise the chuck roast up to two days ahead, let it cool completely in the braising liquid, then transfer to an airtight container and refrigerate. The beef can sit in the strained au jus, which keeps it moist and adds even more flavor as it rests.
When ready to assemble, gently reheat the shredded beef in a covered pot with some of the au jus over low heat, stirring occasionally until warmed through. The horseradish sauce can also be made up to five days ahead and kept refrigerated. This make-ahead approach actually improves the flavor as the beef has more time to absorb the au jus seasonings.
What if I don’t have a Dutch oven?
Any heavy, oven-safe pot with a tight-fitting lid works perfectly – a large casserole dish, deep roasting pan covered tightly with foil, or even a slow cooker. For slow cooker preparation, sear the meat in a skillet first (don’t skip this step), then transfer everything to the slow cooker and cook on low for eight hours or high for five hours. The key is maintaining low, steady heat with moisture trapped inside. Avoid thin aluminum pots which create hot spots and don’t retain heat well enough for proper braising.
Can I use a different cut of beef?
Chuck roast is ideal because of its marbling and connective tissue, but other cuts work with adjustments. Beef brisket (flat or point cut) produces excellent results with similar cooking times and shreds beautifully. Bottom round roast or rump roast work but are leaner, so they require careful monitoring to avoid drying out – consider reducing cooking time by thirty minutes and checking earlier.
Avoid premium cuts like ribeye or strip loin which are meant for quick, high-heat cooking and become dry and stringy when braised. Short ribs can substitute but will need deboning after cooking and produce a richer, fattier result.
My au jus tastes too salty – how do I fix it?
This usually happens if you used regular (not low-sodium) broth or reduced the liquid too much during cooking. To fix oversalty au jus, dilute it with unsalted beef stock, water, or even a splash of red wine until the salt level tastes balanced. You can also add a peeled, quartered potato to the au jus and simmer for ten minutes – the potato will absorb some salt, then discard it before serving.
For future batches, always start with low-sodium broth since you can add salt but can’t remove it. Taste the au jus before serving and adjust seasoning then rather than relying on the recipe measurements alone.
The beef is tough even after four hours – what went wrong?
Tough beef after long cooking usually means the temperature was too low and collagen didn’t break down fully, or the roast needed more time due to its size or your oven’s temperature calibration. First, verify your oven temperature with an oven thermometer – many ovens run twenty-five to fifty degrees off. If the beef is close but not quite tender, return it to the oven for another thirty to sixty minutes and check again.
Larger roasts (over three and a half pounds) can take five hours or more. The liquid should maintain a gentle simmer throughout – if it’s barely bubbling, your temperature is too low. Better to cook longer than undercook, as properly braised beef becomes more tender with time up to a point.
Can I freeze the leftover beef?
Absolutely – braised beef freezes exceptionally well for up to three months. Let the shredded beef cool completely, then portion it into freezer-safe containers or bags with some of the au jus to keep it moist during freezing. Remove as much air as possible to prevent freezer burn.
To reheat, thaw overnight in the refrigerator, then warm gently in a covered pot over low heat with additional au jus or beef broth. You can also reheat directly from frozen – just add the frozen beef to a pot with some liquid, cover, and heat on low, stirring occasionally until completely thawed and heated through (about twenty to thirty minutes).
What’s the difference between au jus and beef gravy?
Au jus is the natural cooking liquid from braised or roasted meat, typically thin and clear with intense beefy flavor. It’s not thickened with flour or cornstarch. Beef gravy, on the other hand, is thickened with a roux (butter and flour) or slurry (cornstarch and water) to create a thick, coating consistency.
For French dip sliders, you want true au jus – thin enough to easily drip off the sandwich when dipping, but intensely flavored. If your au jus seems too thin or weak, simmer it uncovered for ten to fifteen minutes to reduce and concentrate the flavors, but don’t add thickeners or it becomes gravy rather than au jus.
Can I make these sliders in advance and reheat them?
Yes, but the texture won’t be quite as perfect as freshly baked. Assemble the sliders completely (except for the butter brush on top), cover tightly with foil, and refrigerate for up to twenty-four hours. When ready to serve, let them sit at room temperature for twenty minutes, brush with the garlic butter, then bake covered at 350°F for fifteen to twenty minutes until heated through.
Remove foil and bake another five minutes to crisp the tops. The buns will be softer than fresh-baked but still delicious. Alternatively, keep the components separate and assemble fresh sliders as needed – this produces better texture but requires more last-minute work.
Why is my horseradish sauce watery?
Watery horseradish sauce usually results from prepared horseradish that contains too much liquid or from adding too much vinegar or lemon juice. Drain prepared horseradish in a fine-mesh strainer for a few minutes before measuring it – this removes excess brine.
Use full-fat sour cream rather than low-fat, which has higher water content. If your sauce is already made and too thin, you can thicken it by stirring in a tablespoon of mayonnaise or cream cheese, or by refrigerating it for several hours which will thicken it naturally as it chills. For future batches, add liquids gradually and stop when you reach the desired consistency.
What sides pair best with French dip sliders?
Classic pairings include crispy french fries (regular or sweet potato), coleslaw for cool, crunchy contrast, or a simple arugula salad with lemon vinaigrette to cut the richness. Roasted vegetables like Brussels sprouts, asparagus, or green beans add color and nutrition.
For casual gatherings, serve with kettle-cooked potato chips, pickles, and olives for a deli-style spread. Creamy sides like mac and cheese or potato salad work well for heartier meals. Beer or red wine are traditional beverage pairings – the carbonation or tannins help cleanse the palate between rich, beefy bites.
If you’re looking for more recipes , click the link! Check out all of our grilling recipes here for more steak, seafood, and BBQ favorites that are perfect for your next cookout.
COMMON ITEMS USED IN THESE RECIPES
Hasty Bake Charcoal Grill and Smoker
Knitted Gloves
Food Processor
Cast Iron Skillet
Meater +
Upgrade Your Meat Game with Grill Nation x Linz Heritage Angus
If you really want to take your grilling and cooking to the next level, you need to check out our collaboration with Linz Heritage Angus. We’ve partnered with them to bring you some of the best beef you can get your hands on.
Linz Heritage Angus isn’t your typical grocery store meat. These guys are the real deal – they raise their cattle the right way, and you can taste the difference in every bite. We’re talking about beef that’s been dry-aged to perfection, with marbling that makes your mouth water just looking at it.
Check out these premium cuts that’ll change how you think about beef:
Premium Ribeye Steaks – Perfect for special occasions
Dry-Aged Beef Selection – Take your grilling to the next level
Ground Beef & Burger Blends – The foundation of great BBQ
Use code GN15 at checkout for 15% off your first order. Trust me, once you try Linz Heritage Angus, you’ll never want to go back to regular store-bought beef.