Crispy Chili-Loaded Potato Skins
Crispy Chili-Loaded Potato Skins (Fried Version)
Russet potatoes baked until tender, hollowed out and deep-fried until golden and crispy, then loaded with homemade beef chili, melted cheddar cheese, sour cream, and green onions for the ultimate game day appetizer
Ingredients
The Potato Skins:
- 6 medium russet potatoes
- 2-3 qt neutral oil (canola or peanut), for frying
- Salt, to taste
The Chili Topping:
- 1 lb ground beef (80/20)
- 1 small onion, diced
- 3 cloves garlic, minced
- 1 tbsp chili powder
- 1 tsp smoked paprika
- 1 tsp cumin
- 1 tsp kosher salt
- ½ tsp black pepper
- 1 tbsp tomato paste
- 1 cup crushed tomatoes
- ½ cup beef broth
- 1 (15 oz) can kidney or pinto beans, drained (optional)
For Assembly:
- 1½ cups shredded cheddar or pepper jack cheese
- ½ cup sour cream
- 3-4 green onions, thinly sliced
- Pickled jalapeños (optional)
- Hot sauce (optional)
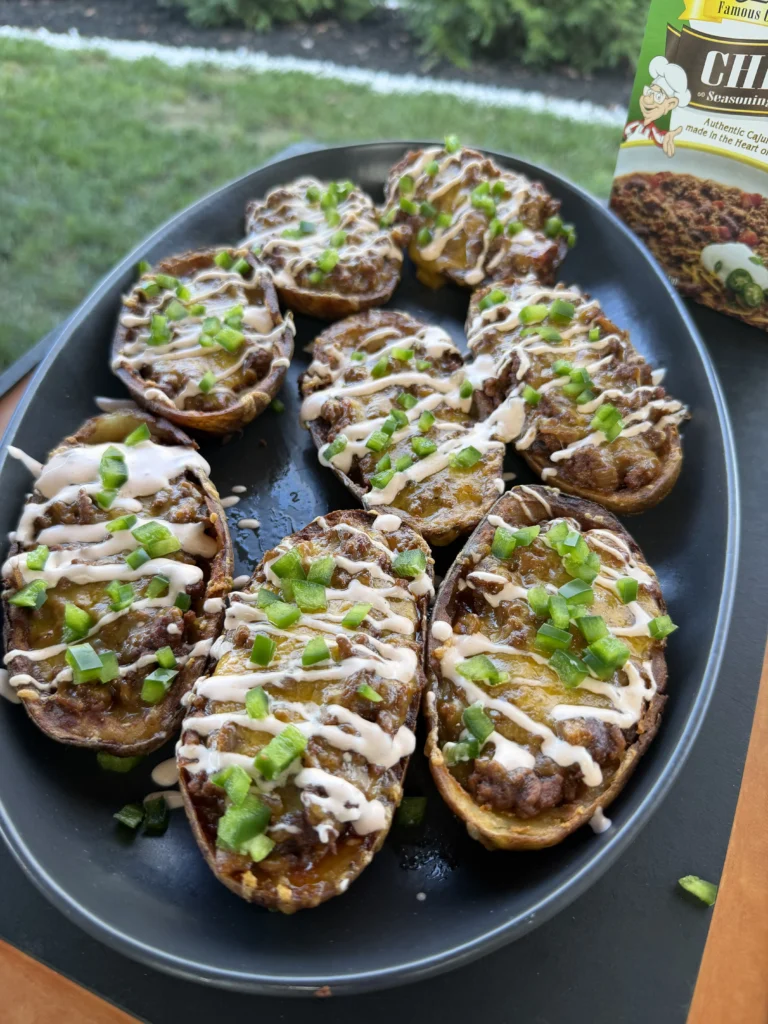
Crispy chili-loaded potato skins take the classic baked potato skin appetizer to an entirely new level by deep-frying the hollowed-out shells until they’re golden, crunchy, and impossibly crispy. This recipe starts with russet potatoes baked until tender, then carefully hollowed out leaving a quarter-inch shell of potato flesh inside the skin. These shells get plunged into hot oil at 365 degrees, transforming from soft and pliable into crispy, golden vessels that shatter when you bite into them. The fried skins get loaded with rich, smoky homemade beef chili made from ground beef, tomatoes, spices, and beans, then topped with melted cheddar cheese before finishing with cool sour cream and fresh green onions.
What makes these fried potato skins special is how the deep-frying creates textural contrast impossible to achieve through baking alone. Baked potato skins can be crispy on the edges but tend to stay somewhat leathery and chewy. Fried potato skins develop an all-over crunch similar to thick potato chips, with that satisfying shatter when you bite through to the creamy chili filling. The optional double-fry technique – frying once at lower temperature to cook through, resting briefly, then frying again at higher temperature to crisp – takes the texture even further into restaurant-quality territory. These chili-loaded potato skins deliver everything you want in game day food: crispy, cheesy, hearty, and finger-food friendly.
See How It’s Done
Why Russet Potatoes Are Essential
Russet potatoes are the only variety that works properly for fried potato skins because of their high starch content and thick skin. The starch in russets – approximately twenty percent compared to fifteen percent in waxy varieties like red or Yukon gold – creates the fluffy, dry interior texture that’s perfect for baking and scooping out. When fried, this high starch content promotes better crisping through dehydration and creates lighter, less dense texture. Waxy potatoes contain more moisture and less starch, making them gummy when fried rather than crispy.
Russet skins are also thicker and more robust than thin-skinned varieties, allowing them to hold their structure during hollowing out and frying without tearing or falling apart. The thick skin can support the weight of heavy chili topping without collapsing. Select medium-sized russets that are relatively uniform in size so they cook evenly and create consistent portions. Avoid potatoes with green spots, extensive eyes, or soft spots which indicate age or improper storage. The potatoes should feel firm and heavy for their size, indicating good moisture content that will steam out during baking and frying for maximum crispiness.
The Science of Double-Frying for Extra Crunch
The double-fry technique – frying at a lower temperature first, resting, then frying again at higher temperature – is the secret to achieving maximum crispiness that stays crispy even under heavy toppings. The first fry at 325 degrees cooks the potato shells through while beginning to dehydrate the exterior. At this moderate temperature, moisture evaporates from the surface without the exterior browning significantly. The brief rest period allows the interior of the potato skin to cool slightly while the exterior remains relatively dry.
The second fry at 375 degrees creates the final crispy texture through rapid moisture evaporation and Maillard reaction. The higher temperature causes the surface to brown and crisp dramatically while the already-cooked interior doesn’t overcook. The dehydration from the first fry means there’s less moisture to steam away during the second fry, allowing faster crisping. This technique is the same one used by high-end restaurants for french fries – it creates lighter, crispier results with better color than a single fry at one temperature. While the double-fry is optional and adds extra time, it produces noticeably superior texture that stays crispy longer under toppings.
Building Flavorful Homemade Chili
Homemade chili for potato skins needs to be thicker and more concentrated than regular chili since it’s functioning as a topping rather than a soup. The fifteen to twenty minute simmering time reduces the liquid, concentrating flavors and creating thick consistency that sits on the potato skins without running off. Starting with 80/20 ground beef provides the right fat content – enough to keep the chili moist and flavorful but not so much that it’s greasy. Leaner ground beef would make dry, crumbly chili while fattier beef would create excessive grease that makes the potato skins soggy.
The spice blend – chili powder, smoked paprika, cumin, salt, and pepper – creates classic chili flavor profile with emphasis on smokiness that complements the fried potato. Chili powder is typically a blend including ground dried chilies, cumin, garlic powder, and oregano, providing base chili character. Smoked paprika reinforces smokiness while adding vibrant red color. Cumin contributes earthy, warming notes that are essential to chili’s distinctive taste. Tomato paste gets stirred in before the crushed tomatoes, allowing it to caramelize slightly in the hot pan which develops deeper, more complex tomato flavor. The beef broth provides liquid for simmering while adding savory depth. Beans are optional – they add texture and make the chili more substantial, but some prefer all-meat chili for potato skins.
Proper Frying Temperature and Safety
Maintaining accurate oil temperature at 365 degrees Fahrenheit is critical for achieving properly fried potato skins. Too low and the skins absorb excess oil, becoming greasy rather than crispy. Too high and the exterior burns before the interior crisps properly. Use a deep-fry thermometer or instant-read thermometer to monitor temperature constantly, adjusting heat as needed. The oil temperature will drop when you add potato skins – this is normal. Add only three to four skins at a time to minimize temperature drop, and wait for the oil to recover to 365 degrees between batches.
Use a heavy pot or Dutch oven that retains heat well rather than a thin pan that allows rapid temperature fluctuations. Fill the pot no more than halfway with oil – three quarts in a six-quart pot is ideal. This leaves enough room for the oil to bubble up when food is added without overflowing. Never leave hot oil unattended and keep a lid nearby to smother any flames if oil ignites (never use water on an oil fire). Use a spider strainer or slotted spoon with a long handle to add and remove potato skins, keeping your hands at safe distance from hot oil. Have a sheet pan lined with paper towels or a wire rack ready before you start frying so you can immediately drain the fried skins.
The Importance of Thoroughly Drying

Patting the hollowed-out potato skins completely dry before frying is the single most important step for achieving maximum crispiness. Any moisture on the surface will cause the oil to splatter violently when the skins are added, creating a safety hazard. More importantly, surface moisture must evaporate before the skin can crisp, so starting with wet skins adds unnecessary time and results in less crispy texture. After scooping out the potato flesh, use paper towels to blot every surface – the inside, the outside, and the edges. Press firmly to absorb all moisture.
If you have time, let the hollowed-out skins sit uncovered at room temperature for fifteen to thirty minutes after drying. This air-drying further removes moisture and slightly firms up the potato, creating even better frying results. Some people place the dried skins in the refrigerator uncovered for an hour which works similarly to dry-brining meat – the cold, dry air removes surface moisture. However, if you’re short on time, thorough drying with paper towels is sufficient. The skins should feel dry to the touch rather than damp or tacky before they go into the oil.
Ingredients
The Potato Skins:
- 6 medium russet potatoes
- 2-3 qt neutral oil (canola or peanut), for frying
- Salt, to taste
The Chili Topping:
- 1 lb ground beef (80/20)
- 1 small onion, diced
- 3 cloves garlic, minced
- 1 tbsp chili powder
- 1 tsp smoked paprika
- 1 tsp cumin
- 1 tsp kosher salt
- ½ tsp black pepper
- 1 tbsp tomato paste
- 1 cup crushed tomatoes
- ½ cup beef broth
- 1 (15 oz) can kidney or pinto beans, drained (optional)
For Assembly:
- 1½ cups shredded cheddar or pepper jack cheese
- ½ cup sour cream
- 3-4 green onions, thinly sliced
- Pickled jalapeños (optional)
- Hot sauce (optional)
Step-by-Step Instructions
Bake the Potatoes
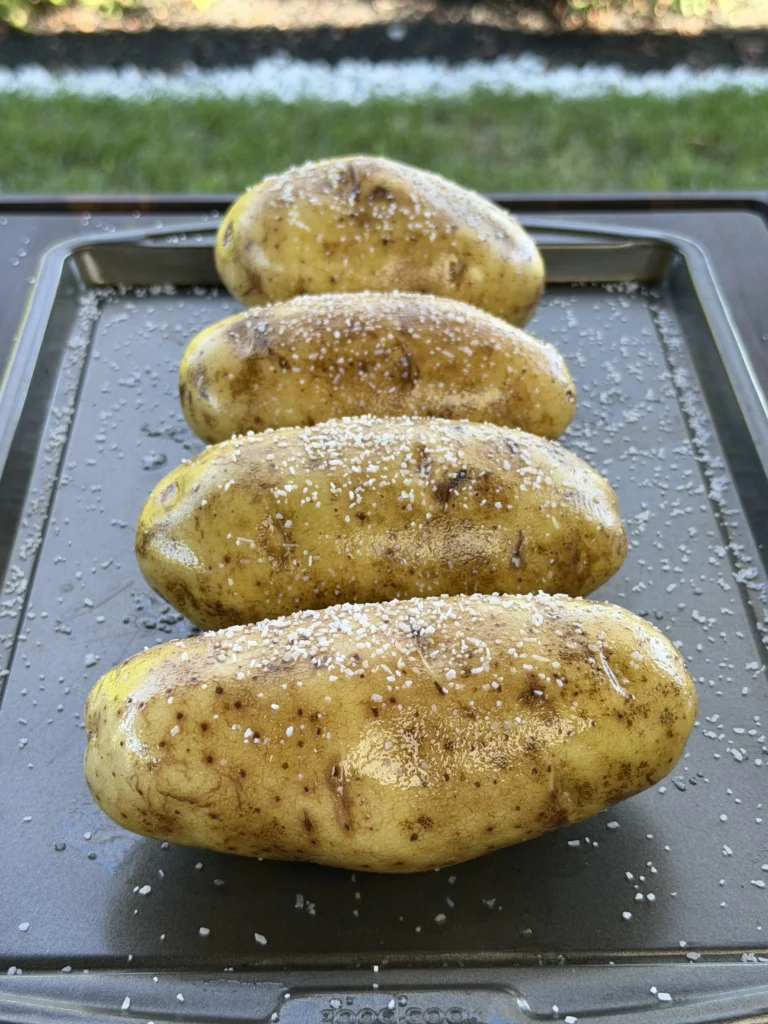
Preheat your oven to 400 degrees Fahrenheit. While the oven heats, scrub six medium russet potatoes under cold running water to remove any dirt or debris from the skins. Pat them completely dry with a towel. Using a fork, pierce each potato several times all over – these holes allow steam to escape during baking, preventing the potatoes from exploding in the oven. The holes also help the interior cook more evenly.
Place the potatoes directly on the middle oven rack – no baking sheet needed. Baking them directly on the rack allows hot air to circulate completely around each potato for even cooking and helps the skins dry out slightly. Bake for forty-five to fifty-five minutes depending on the potatoes’ exact size. They’re done when a fork or knife inserted into the center meets no resistance – the interior should be completely tender and fluffy. Remove from the oven and let cool for ten to fifteen minutes until comfortable to handle.
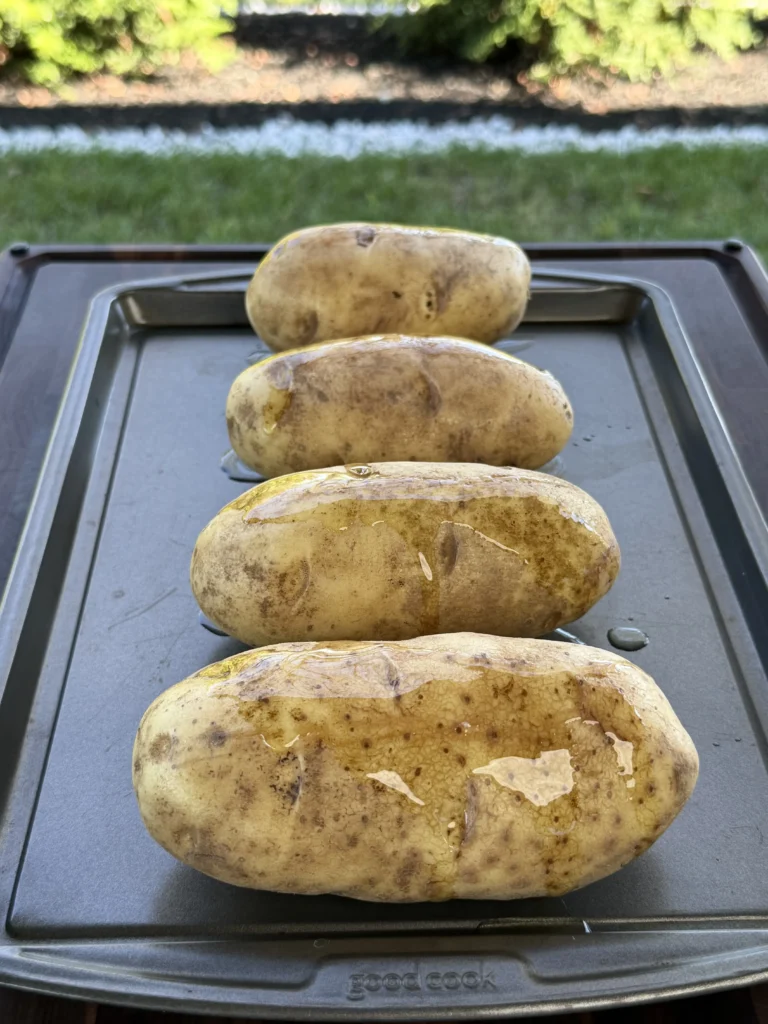
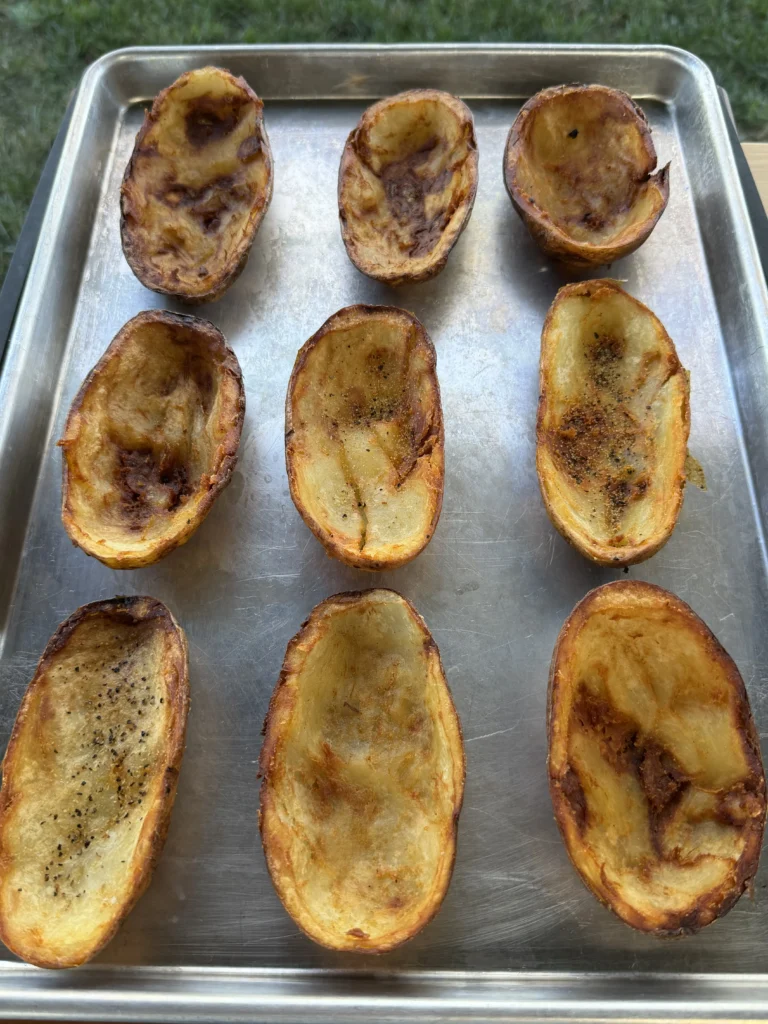
Once cooled slightly, cut each potato in half lengthwise, creating twelve potato halves total. Use a spoon to carefully scoop out most of the potato flesh from each half, leaving approximately a quarter-inch layer of potato attached to the skin. This remaining layer provides structure and some potato flavor while keeping the shell sturdy enough to hold toppings. Be careful not to tear the skins or scoop too aggressively near the edges. Save the scooped potato flesh for another use – mashed potatoes, potato croquettes, or potato soup are all excellent options.
Fry the Skins for Maximum Crisp
Heat two to three quarts of neutral oil (canola or peanut oil work best) in a heavy Dutch oven or deep pot over medium-high heat. Attach a deep-fry thermometer to the side of the pot, ensuring the probe is submerged in the oil but not touching the bottom. Heat the oil to exactly 365 degrees Fahrenheit, adjusting the burner as needed to maintain this temperature. While the oil heats, pat the hollowed-out potato halves completely dry with paper towels, pressing firmly on both the inside and outside surfaces.
Working in batches of three to four skins at a time to avoid overcrowding, carefully lower the potato halves into the hot oil skin-side down. The oil will bubble vigorously – this is normal. Fry for three to four minutes on the skin side, then use tongs or a spider strainer to carefully flip them over. Fry for another three to four minutes on the flesh side until both sides are golden brown and very crispy. The skins should look similar to thick potato chips in color and texture.
Use the spider strainer or slotted spoon to transfer the fried skins to a wire rack set over a sheet pan or to paper towels to drain. Immediately season with salt while still hot so it adheres to the oil coating. Repeat the frying process with remaining potato halves, allowing the oil to return to 365 degrees between batches. For next-level crunch, try the double-fry technique: first fry at 325 degrees for two minutes, remove and rest for five minutes, then fry again at 375 degrees for two to three minutes until deeply golden.
Make the Chili Filling
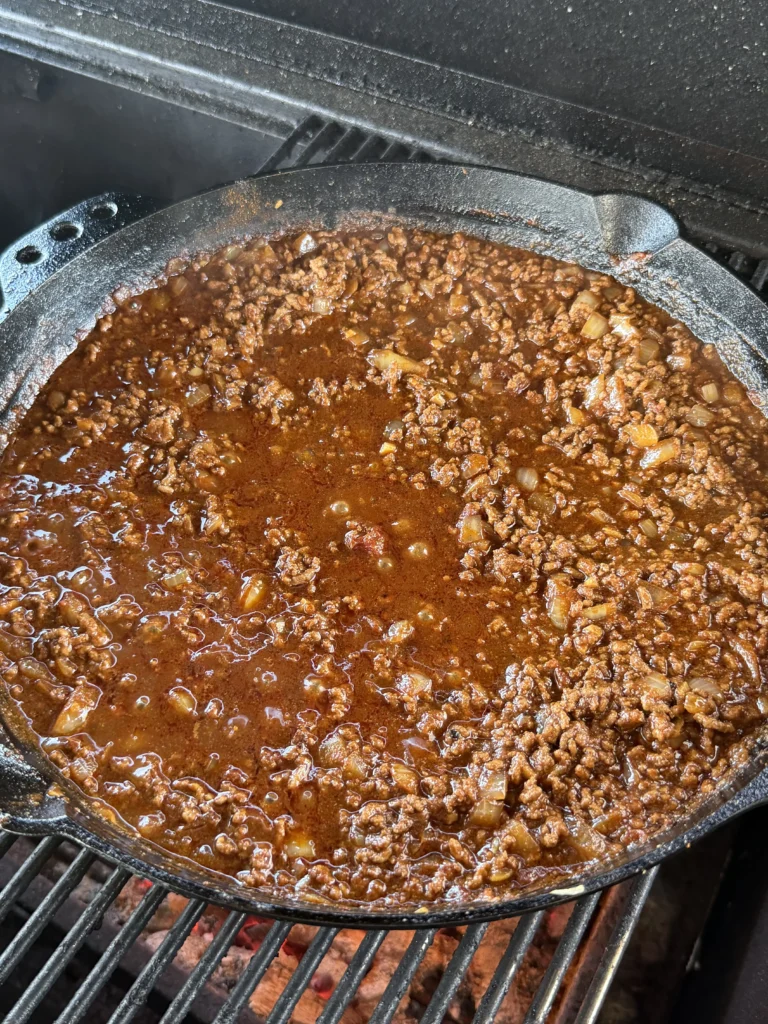
While the potato skins cool slightly after frying, prepare the chili filling. Heat a large skillet over medium-high heat and add one pound of 80/20 ground beef. Break it up with a wooden spoon or spatula and cook, stirring occasionally, until no pink remains and the beef is browned all over, about five to seven minutes. If excessive fat has rendered (more than two tablespoons), drain some off, but leave enough to sauté the vegetables.
Add the diced onion to the browned beef and cook, stirring frequently, until the onion softens and turns translucent, about five minutes. Add the three minced garlic cloves and cook for one more minute until fragrant. Don’t let the garlic burn – it should just soften and release its aroma. Stir in one tablespoon of chili powder, one teaspoon of smoked paprika, one teaspoon of cumin, one teaspoon of kosher salt, and half a teaspoon of black pepper. Cook the spices with the meat and onions for thirty seconds to one minute to bloom their flavors.
Add one tablespoon of tomato paste, stirring to coat the meat mixture evenly. Let the tomato paste cook for one to two minutes, stirring constantly, until it darkens slightly and becomes fragrant. This caramelization develops deeper tomato flavor. Pour in one cup of crushed tomatoes and half cup of beef broth, stirring to combine everything. Bring to a simmer, then reduce heat to medium-low and let the chili simmer uncovered for fifteen to twenty minutes, stirring occasionally. The liquid should reduce and thicken significantly – you want a thick, scoopable consistency rather than soupy chili.
If using beans, drain one fifteen-ounce can of kidney or pinto beans and add them to the thickened chili. Stir to combine and cook for an additional five minutes to heat the beans through and let them absorb flavors. Taste and adjust seasoning with additional salt, pepper, or chili powder if needed. The chili should taste bold and well-seasoned. Remove from heat and keep warm while you assemble the potato skins.
Assemble and Melt the Cheese
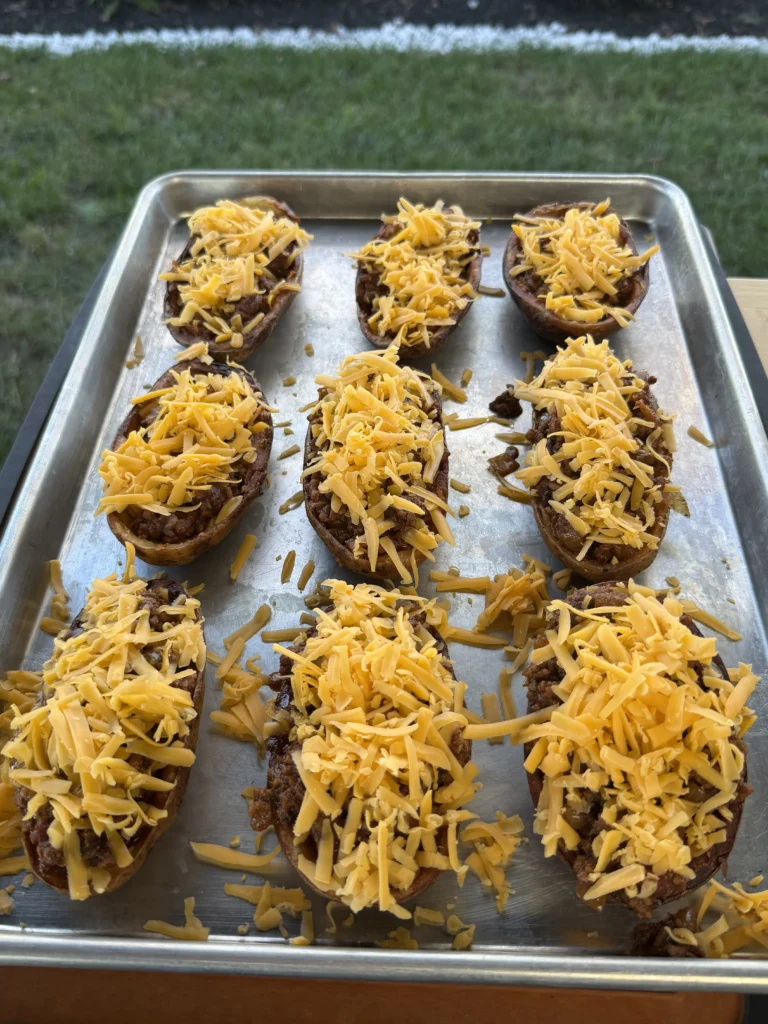
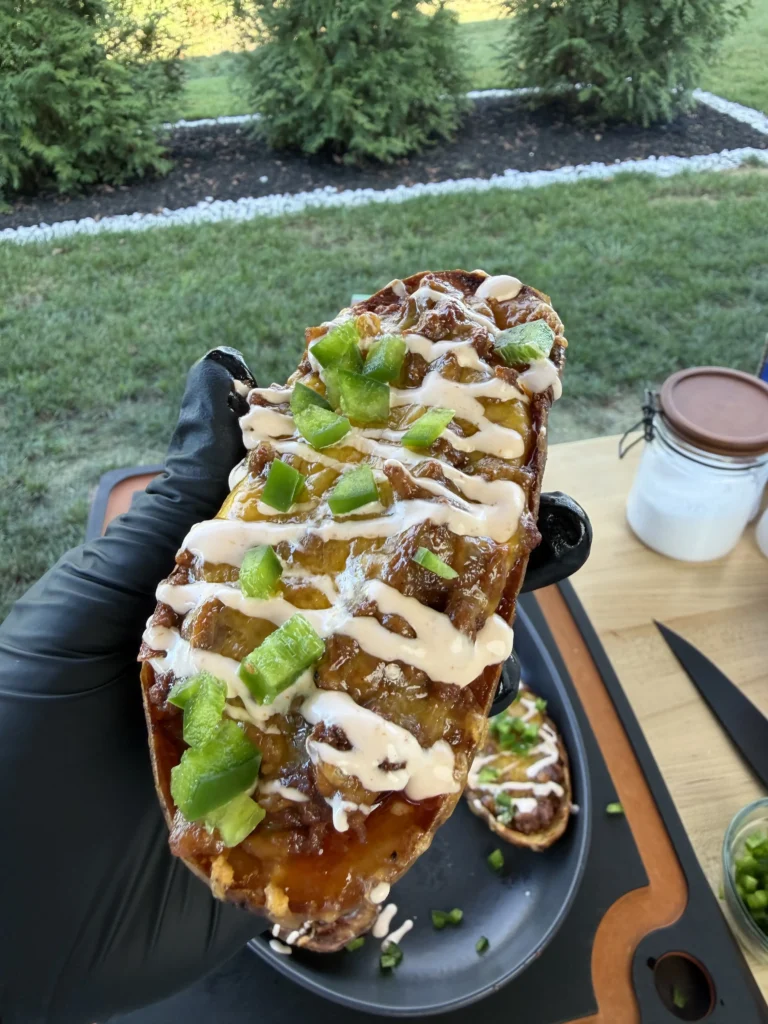
Position an oven rack in the top position and preheat your broiler to high. Arrange all twelve fried potato skins on a large baking sheet, placing them in a single layer with the hollowed-out side facing up. Spoon a generous amount of the warm chili into each fried shell – approximately three to four tablespoons per skin. The chili should fill the cavity without overflowing over the edges. Don’t be shy with the filling – these are meant to be loaded and hearty.
Sprinkle shredded cheddar cheese (or pepper jack for spicy kick) generously over the chili in each skin. Use approximately two tablespoons of cheese per skin, covering the chili completely. The cheese will melt down into the chili, so it’s fine if it looks like a lot initially. Place the baking sheet under the preheated broiler and watch carefully – broilers vary in intensity, so the cheese could melt in anywhere from ninety seconds to four minutes.
The cheese is ready when it’s completely melted, bubbling, and just starting to develop golden brown spots on top. Don’t walk away from the broiler – the cheese can go from perfectly melted to burnt in thirty seconds. If your broiler is particularly intense, position the rack one level lower or crack the oven door slightly to moderate the heat. Once the cheese is melted and bubbly, immediately remove the baking sheet from the oven.
Finish and Serve
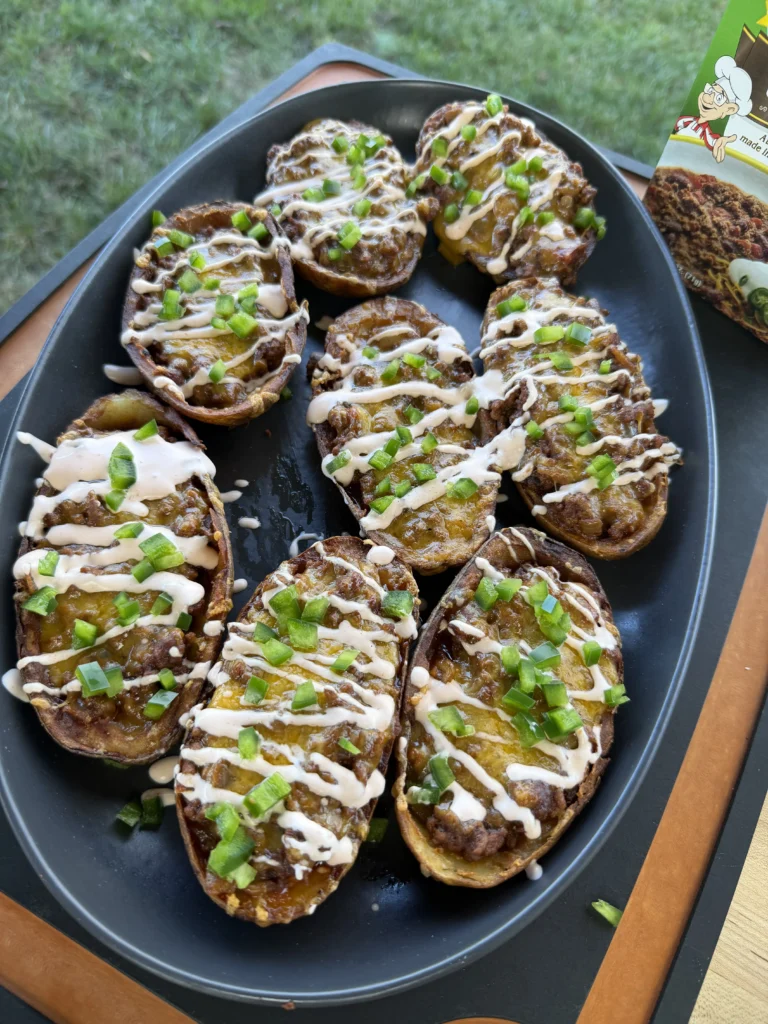
Working quickly while everything is still hot, add the finishing touches to each loaded potato skin. Place a dollop of sour cream (approximately one tablespoon) on top of the melted cheese in each skin. Sprinkle sliced green onions generously over everything – the bright green color and fresh onion flavor provide essential contrast to the rich, heavy toppings. If desired, add pickled jalapeño slices for heat and tang, and drizzle with your favorite hot sauce for extra kick.
Transfer the loaded potato skins to a large serving platter while they’re still hot. Serve immediately – these are best enjoyed within fifteen to twenty minutes of assembly while the shells are still maximally crispy and the cheese is hot and gooey. Provide plenty of napkins as these are gloriously messy to eat. Have extra sour cream, hot sauce, and green onions on the side for guests who want to customize their skins.

Crispy Chili-Loaded Potato Skins
Ingredients
The Potato Skins:
- 6 medium russet potatoes
- 2-3 qt neutral oil for frying
- Salt to taste
For the Chili:
- 1 lb ground beef 80/20
- 1 small onion diced
- 3 cloves garlic minced
- 1 tbsp chili powder
- 1 tsp smoked paprika
- 1 tsp cumin
- 1 tsp kosher salt
- ½ tsp black pepper
- 1 tbsp tomato paste
- 1 cup crushed tomatoes
- ½ cup beef broth
- 1 can beans optional
Assembly:
- 1½ cups shredded cheddar
- ½ cup sour cream
- 3-4 green onions sliced
- Pickled jalapeños optional
Instructions
- Preheat oven to 400°F. Pierce potatoes with fork and bake directly on oven rack 45-55 minutes until tender. Cool slightly, halve lengthwise, and scoop out flesh leaving ¼-inch shell.
- Heat oil in heavy pot to 365°F. Pat potato skins completely dry. Fry in batches skin-side down 3-4 minutes, flip and fry 3-4 more minutes until golden and crispy. Drain on wire rack and salt immediately.
- For double-fry: First fry at 325°F for 2 minutes, rest 5 minutes, then fry at 375°F for 2-3 minutes.
- Brown ground beef in skillet. Add onion and cook until soft. Add garlic and cook 1 minute. Stir in spices and cook 30 seconds.
- Add tomato paste and cook 1-2 minutes until darkened. Add crushed tomatoes and broth. Simmer 15-20 minutes until thickened. Add beans if using and cook 5 more minutes.
- Preheat broiler to high. Arrange fried skins on baking sheet. Fill each with 3-4 tbsp chili and top with shredded cheese.
- Broil 2-3 minutes until cheese melts and bubbles. Top with sour cream, green onions, jalapeños, and hot sauce. Serve immediately.
Notes
FAQ
Can I bake the potato skins instead of frying?
Yes, though they won’t be quite as crispy as fried. After hollowing out the baked potatoes, brush both sides with melted butter or oil and place on a baking sheet. Bake at 425°F for 20-25 minutes, flipping halfway, until golden and crispy. The texture will be crunchy on the edges but slightly leathery compared to the all-over shatter of fried skins. For best baked results, use convection setting if available and ensure the skins are well-coated in fat.
What’s the best oil for frying potato skins?
Neutral oils with high smoke points work best – canola, peanut, or vegetable oil are all excellent choices. These oils can safely reach 365-375°F without smoking or breaking down. Avoid olive oil (too low smoke point), butter (burns), or strongly flavored oils that would compete with the potato and chili flavors. Peanut oil creates the crispiest results and is preferred by many restaurants, but canola is more affordable and works nearly as well.
Can I make the components ahead of time?
Absolutely – this is an ideal make-ahead appetizer. Bake and hollow out the potatoes up to two days ahead, store covered in the refrigerator, and fry fresh when needed. The chili can be made two to three days ahead and refrigerated, or frozen for up to three months. Reheat gently before assembling. Don’t fry the skins until shortly before serving, as they lose their crispness within a few hours. Assemble and broil right before serving for best texture.
My potato skins are greasy instead of crispy – what went wrong?
Greasy potato skins usually result from oil temperature being too low. At temperatures below 350°F, the skins absorb oil rather than crisping. Always use a thermometer to verify temperature and maintain 365°F throughout frying. Also ensure the skins are completely dry before frying – any surface moisture prevents crisping and causes greasiness. Finally, don’t overcrowd the pot, which drops oil temperature significantly and causes soggy, greasy results.
Can I use different toppings instead of chili?
Yes, fried potato skins are incredibly versatile. Try pulled pork with BBQ sauce and coleslaw, buffalo chicken with blue cheese, taco meat with salsa and guacamole, or loaded baked potato style with bacon, cheddar, and sour cream. Breakfast-style with scrambled eggs, cheese, and breakfast sausage also works great. The crispy fried shells can support virtually any hearty topping. Just ensure the filling isn’t too wet or it will make the skins soggy.
How do I reheat leftover potato skins?
The best reheating method is in a 400°F oven for 8-10 minutes, which re-crisps the shells better than microwaving. Place them on a baking sheet and heat until the shells are crispy again and the toppings are hot throughout. You can also use an air fryer at 375°F for 5-7 minutes for excellent results. Microwaving makes the shells soft and chewy rather than crispy, so it’s not recommended. If reheating unfilled fried skins, a quick re-fry for 1-2 minutes works perfectly.
What can I do with the scooped-out potato flesh?
The potato flesh is perfect for mashed potatoes – just add butter, cream, salt, and pepper. You can also make potato croquettes by mixing the flesh with cheese and herbs, forming into balls, breading, and frying. Potato soup is another excellent use – add broth, cream, bacon, and cheese. The flesh can be refrigerated for three days or frozen for up to three months. Some people add it to bread dough or use it to thicken soups and stews.
Can I freeze fried potato skins?
Yes, though the texture won’t be quite as perfect as fresh-fried. Freeze unfilled fried skins in a single layer on a baking sheet until solid, then transfer to freezer bags for up to two months. Reheat from frozen in a 400°F oven for 12-15 minutes or re-fry for 2-3 minutes. Don’t freeze assembled potato skins with toppings as the chili and cheese don’t freeze and reheat well. Prepare fresh chili and add toppings after reheating the frozen shells.
Why do my potato skins fall apart during hollowing?
This usually happens when the potatoes are underbaked or when you scoop too aggressively. Ensure the potatoes are fully tender when baked – a knife should slide in with no resistance. Let them cool for 10-15 minutes before handling so they firm up slightly. Use a spoon with rounded edges rather than a sharp one, and scoop gently starting from the center and working toward the edges. Leave that full ¼-inch layer of potato – trying to go thinner makes tearing more likely.
What cheese melts best for potato skins?
Cheddar is classic and melts beautifully with great flavor. Use sharp cheddar for more flavor or mild for kids. Pepper jack adds spicy kick and melts well. Monterey jack melts extremely smoothly with mild flavor. Avoid pre-shredded cheese if possible as it contains anti-caking agents that prevent smooth melting. Grate cheese fresh from a block for best melt quality. You can also use cheese blends – cheddar and Monterey jack combination is particularly good.
Conclusion
Crispy chili-loaded potato skins represent the pinnacle of game day appetizers – combining everything people love about comfort food into one perfect, handheld package. The deep-frying technique transforms ordinary baked potato skins into golden, shatteringly crispy shells that provide textural contrast impossible to achieve through baking alone. The homemade beef chili adds hearty, satisfying substance with smoky, spicy flavor that complements rather than overwhelms the potato. The melted cheddar cheese, cool sour cream, and fresh green onions provide the finishing touches that make every bite a perfectly balanced combination of crispy, creamy, savory, and fresh.
What makes these fried potato skins so successful for entertaining is how they balance impressive results with practical execution. While they look and taste like restaurant-quality appetizers, the process is straightforward and much of it can be done ahead. Baking and hollowing the potatoes can happen days in advance, the chili can be made ahead and reheated, and only the final frying and assembly need to happen shortly before serving. The recipe scales easily for large crowds – simply bake more potatoes and make a larger batch of chili. The customizable nature means you can adjust toppings and heat levels to suit your specific guests.
These chili-loaded potato skins work beautifully for any casual gathering where you want food that wows people without requiring constant attention during the event. Whether you’re hosting a Super Bowl party, backyard BBQ, tailgate gathering, or casual weekend get-together, these potato skins consistently become the star of the spread. The combination of crispy, cheesy, meaty, and fresh makes them irresistibly crave-worthy. Make them once and they’ll become a requested staple for every future party.
If you’re looking for more recipes , click the link! Check out all of our grilling recipes here for more steak, seafood, and BBQ favorites that are perfect for your next cookout.
COMMON ITEMS USED IN THESE RECIPES
Hasty Bake Charcoal Grill and Smoker
Knitted Gloves
Food Processor
Cast Iron Skillet
Meater +
Upgrade Your Meat Game with Grill Nation x Linz Heritage Angus
If you really want to take your grilling and cooking to the next level, you need to check out our collaboration with Linz Heritage Angus. We’ve partnered with them to bring you some of the best beef you can get your hands on.
Linz Heritage Angus isn’t your typical grocery store meat. These guys are the real deal – they raise their cattle the right way, and you can taste the difference in every bite. We’re talking about beef that’s been dry-aged to perfection, with marbling that makes your mouth water just looking at it.
Check out these premium cuts that’ll change how you think about beef:
Premium Ribeye Steaks – Perfect for special occasions
Dry-Aged Beef Selection – Take your grilling to the next level
Ground Beef & Burger Blends – The foundation of great BBQ
Use code GN15 at checkout for 15% off your first order. Trust me, once you try Linz Heritage Angus, you’ll never want to go back to regular store-bought beef.