Honey Garlic Chicken Wings
Honey garlic chicken wings are seasoned chicken wings baked, grilled, or air-fried until crispy, then tossed in a sticky glaze made from honey, soy sauce, fresh garlic, and butter that creates a perfect sweet-savory balance. The wings get coated with baking powder before cooking, which raises the pH of the skin and helps it crisp up without deep frying, delivering that restaurant-quality crunch you normally only get from a fryer. You cook the wings at 425°F for 40 to 45 minutes on a wire rack to allow air circulation and fat drainage, creating golden-brown skin with a crispy texture all over. The honey garlic sauce simmers on the stovetop until it thickens into a glossy glaze that clings to every wing surface. These sticky honey garlic wings work perfectly for game day parties, backyard cookouts, or weeknight dinners when you want bold flavors without complicated techniques.
The whole process takes about 55 minutes from start to finish, including wing prep, baking time, and sauce preparation. You pat the wings dry with paper towels to remove surface moisture, toss them with baking powder and seasonings, then bake them on a rack while the sauce simmers. The wings come out of the oven crispy and golden, ready to be tossed in that sticky glaze that gives them their signature shine. This crispy honey garlic chicken wings recipe delivers maximum flavor with minimal effort, giving you wings that rival your favorite restaurant or sports bar.
Why Baking Powder Makes Wings Crispy Without Deep Frying
Baking powder creates crispy chicken wings through a chemical process that alters the surface of the skin, allowing it to dehydrate faster and brown more efficiently in the oven. Regular baking powder (not baking soda) is alkaline, and when you coat chicken wings with it, the alkalinity raises the pH level of the skin proteins. This higher pH breaks down the peptide bonds in the skin, which makes the proteins more susceptible to browning and allows moisture to escape more readily during cooking.
The moisture escape is the key mechanism here. Crispy skin requires dry skin, and baking powder accelerates the drying process that normally takes much longer in a standard oven. As the wings bake, the baking powder draws moisture from the skin surface through a process similar to dry brining. The escaping moisture evaporates in the hot oven air, leaving behind skin that can crisp up properly. Without baking powder, the skin stays wetter for longer and tends to steam rather than crisp, resulting in that rubbery texture nobody wants.
You need to use aluminum-free baking powder specifically because it provides consistent results without any metallic aftertaste. Standard baking powder contains aluminum compounds that can leave a bitter flavor on the wings, especially when used in the quantities needed for proper crisping. Use about 1 tablespoon of baking powder per 2½ pounds of wings, which is enough to achieve the pH change without over-seasoning or creating an unpleasant taste.
How to Get Sauce to Stick to Wings Without Making Them Soggy
Getting honey garlic sauce to coat wings properly while maintaining crispy skin requires controlling moisture content in both the sauce and the timing of when you apply it. The fundamental issue is that liquid sauce contains water, which softens crispy breading or skin when it sits too long. You solve this by making your sauce thick enough to cling rather than run off, and by adding the sauce only after the wings finish cooking completely.
The sauce needs proper viscosity to create that glossy coating without pooling at the bottom of your serving bowl. You achieve this thickness through reduction and optional thickening agents. Simmer your honey garlic sauce for 5 to 7 minutes to reduce the liquid content and concentrate the flavors. The honey naturally thickens as it reduces, creating a syrupy consistency that grabs onto the wing surface.
Timing is equally important. Never sauce the wings before they finish cooking or while they’re still in the oven. The high moisture content in the sauce creates steam when heated, which softens the crispy skin you worked to develop. Instead, pull the wings from the oven when they’re completely done and golden brown, let them rest for 1 to 2 minutes to allow excess moisture to evaporate, then immediately toss them in the warm sauce.
The tossing technique matters too. Transfer the hot wings to a large bowl, pour the warm sauce over them, and toss gently but thoroughly using tongs or by shaking the covered bowl. You want every wing surface coated evenly without breaking the skin or knocking off the crispy exterior.
Should You Sauce Wings Before or After Cooking
You should always sauce honey garlic chicken wings after they finish cooking, not before, because adding sauce during the cooking process creates steam that prevents proper crisping and can cause the sauce to burn before the wings cook through.
When you add honey-based sauce to raw or partially cooked wings, the moisture in the sauce immediately begins converting to steam in the hot oven. This steam saturates the wing skin, making it impossible for that skin to dehydrate and crisp properly. You end up with wings that have a soggy, rubbery texture rather than the crispy exterior that makes wings appealing. The sauce also prevents the baking powder from doing its job, since the liquid washes away the alkaline coating before it can alter the skin’s pH.
The sugar burning issue is equally problematic. Honey begins caramelizing around 320°F, but chicken needs to cook at 425°F to crisp properly and reach a safe internal temperature of 175°F to 185°F in the joints. When you sauce wings before cooking, the exposed sauce burns and turns black within 15 to 20 minutes, long before the chicken finishes cooking. You can’t solve this by lowering the oven temperature because then the wings won’t crisp at all, leaving you with both soggy and undercooked chicken.
Some grilling recipes suggest basting wings with sauce during the final minutes of cooking, and this can work on a grill where you have more temperature control. Even then, you should only add sauce during the last 5 to 7 minutes of cooking time, and you need to watch carefully for burning. The indirect heat zone on a grill creates a gentler environment than an oven’s direct radiant heat, giving the sauce time to caramelize without charring completely.
Best Cooking Method for Honey Garlic Wings: Oven vs. Grill vs. Air Fryer
Oven-baking gives you the most capacity and the easiest process. You can cook 2½ to 3 pounds of wings at once on a single baking sheet fitted with a wire rack, making this method ideal for parties or meal prep. Bake at 425°F for 40 to 45 minutes, flipping once at the halfway point, and you get evenly crispy wings with minimal attention required. The wire rack is critical because it elevates the wings above the pan, allowing hot air to circulate underneath and fat to drip away.
Air fryers produce the crispiest wings without any oil beyond what renders from the chicken itself. The rapid air circulation and concentrated heat create texture that’s nearly identical to deep-fried wings. Cook at 400°F for 22 to 25 minutes, flipping halfway through, and you get wings with shatteringly crisp skin and juicy meat. The main limitation is capacity since most air fryers only hold 1½ to 2 pounds of wings per batch, meaning you’ll need to cook multiple batches for larger groups. The wings also tend to cook slightly faster than in the oven, so watch the timing carefully to avoid drying out the meat.
Grilling adds smoky flavor that works beautifully with honey garlic sauce, though the technique requires more attention to prevent burning. Set up a two-zone fire with medium-high heat on one side and no heat on the other. Start the wings over indirect heat at 375°F to 400°F, cooking for 25 to 30 minutes until they’re nearly done. Move them to direct heat for the final 5 to 7 minutes to crisp the skin, watching carefully and moving them back to indirect heat if they start to char.
Honey Garlic Wings
Crispy Chicken Wings with Sticky Sweet-Savory Glaze
Ingredients
For the Wings
- 2½ pounds chicken wings (drumettes and flats separated)
- 1 tablespoon aluminum-free baking powder
- 1½ teaspoons kosher salt
- 1 teaspoon black pepper
- 1 teaspoon garlic powder
- ½ teaspoon smoked paprika (optional but recommended)
For the Honey Garlic Sauce
- ½ cup honey
- ¼ cup low-sodium soy sauce
- 6 cloves garlic, minced
- 1 tablespoon rice vinegar or apple cider vinegar
- 1 tablespoon unsalted butter
- 1 teaspoon sesame oil
- ½ teaspoon crushed red pepper flakes (optional)
- 1 teaspoon cornstarch + 1 tablespoon water (for thickening, optional)
The secret to restaurant-quality crispy wings without deep frying is baking powder, not baking soda. Baking powder raises the pH of the chicken skin, which breaks down proteins and allows moisture to escape more efficiently during cooking. This creates that shatteringly crisp exterior you want while keeping the meat juicy inside.
Step-by-Step Instructions
Step 1: Prep the Wings and Set Up Your Grill
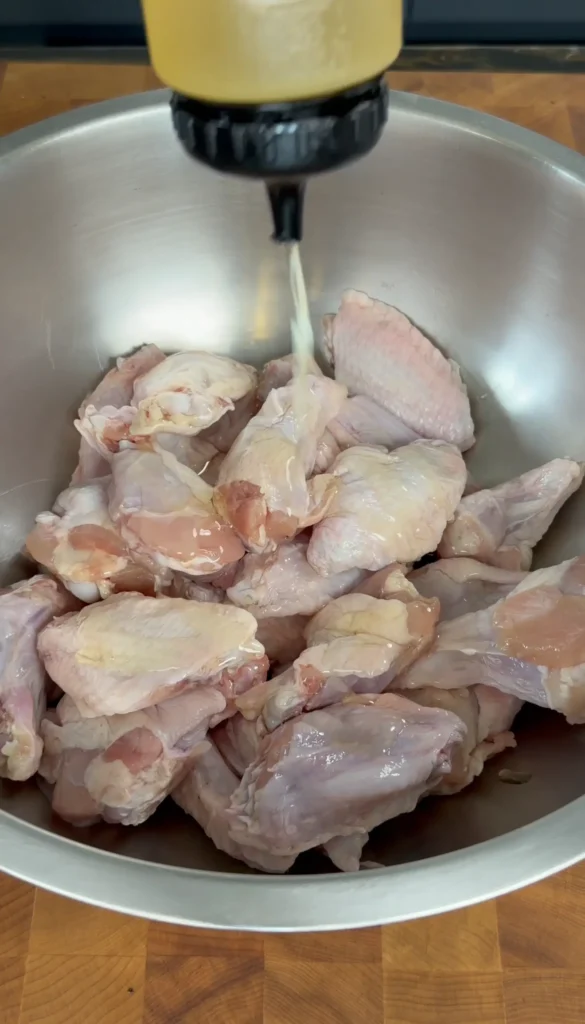
Remove the wings from the refrigerator and separate the drumettes and flats if they’re not already separated. Pat each wing piece completely dry using paper towels, pressing firmly to absorb as much surface moisture as possible. Any water left on the skin will create steam on the grill and prevent proper crisping.
Place the dried wings in a large bowl. Add 1 tablespoon aluminum-free baking powder, 1½ teaspoons kosher salt, 1 teaspoon black pepper, 1 teaspoon garlic powder, and ½ teaspoon smoked paprika. Toss thoroughly until every wing gets an even coating of the seasoning mixture. The baking powder coating will help the skin crisp up even over indirect heat.
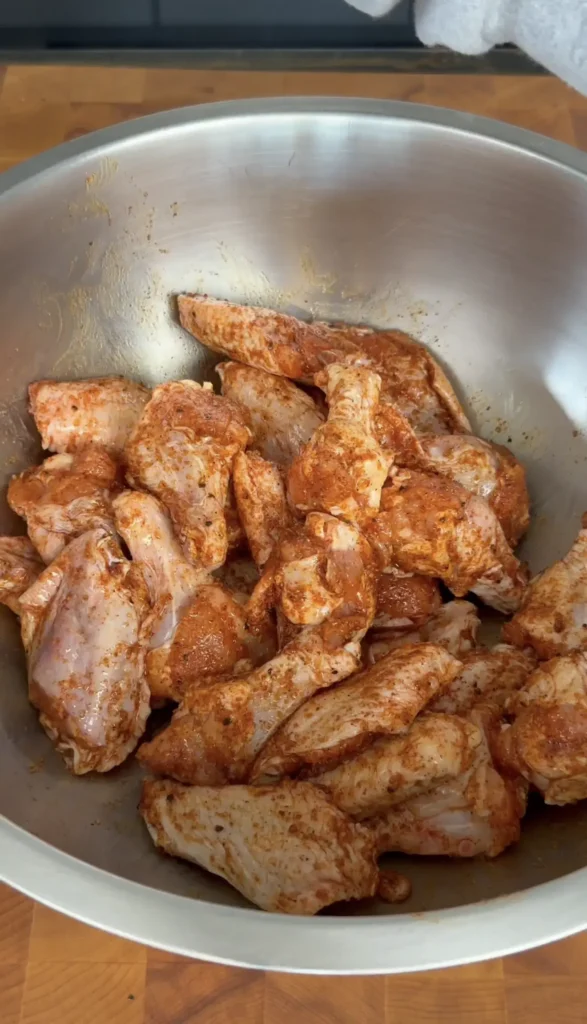
Let the coated wings rest at room temperature for 10 to 15 minutes while you prepare the grill. This resting period allows the baking powder to begin working on the skin proteins and ensures more even cooking since the wings won’t be ice cold when they hit the grates.
Step 2: Create a Two-Zone Fire for Indirect Cooking
Set up your grill for two-zone cooking, which gives you one hot area for searing and finishing, and one cooler area for the long indirect cook that crisps the wings without burning them. The setup differs slightly between gas and charcoal grills but the principle remains the same.
For gas grills, light the burners on one side only and leave the other side completely off. Set the lit burners to medium-high heat, aiming for a grill temperature of 375°F to 400°F on the indirect side when you close the lid. You can adjust the heat as needed once you start cooking.
For charcoal grills, light a full chimney of charcoal and let the coals burn until they’re covered with white ash, about 15 to 20 minutes. Pour all the hot coals on one side of the grill, creating a pile that covers roughly half the charcoal grate. Leave the other half completely empty. This gives you a hot direct zone and a cooler indirect zone. Place the cooking grate on the grill, close the lid, and let it preheat for 5 minutes. Adjust your bottom and top vents to maintain 375°F to 400°F.
If using a charcoal grill and you want subtle smoke flavor, add 2 to 3 chunks of hardwood like hickory, oak, or cherry to the hot coals just before placing the wings on the grill. Don’t use too much wood or the smoke flavor will overpower the honey garlic sauce.
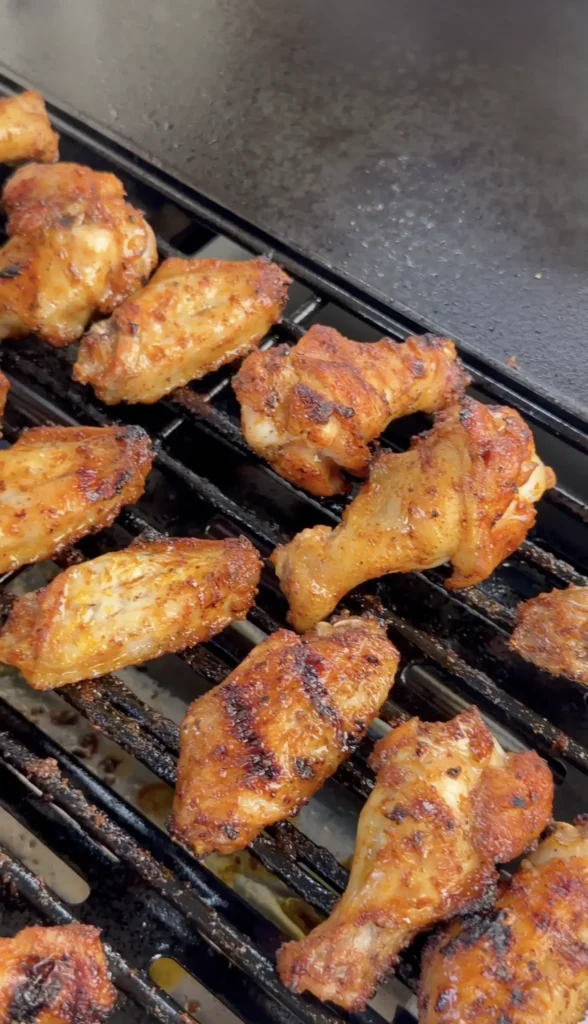
Step 3: Grill Wings Over Indirect Heat Until Nearly Done
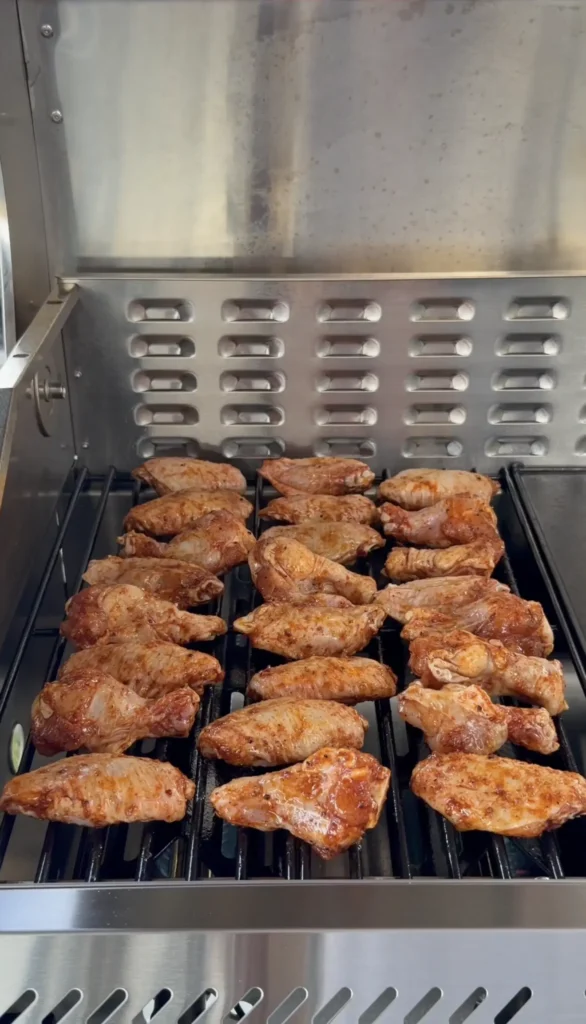
Oil the cooking grate on the indirect heat side using tongs and a paper towel dipped in neutral oil. This prevents sticking and makes flipping easier. Arrange the seasoned wings on the indirect heat side of the grill in a single layer with space between each piece. Don’t crowd them or they’ll steam instead of crisp.
Close the lid and cook for 15 minutes without opening the grill. The indirect heat slowly renders fat from the skin while the baking powder coating helps it crisp gradually. After 15 minutes, open the lid and flip each wing using tongs. Close the lid again and cook for another 15 to 20 minutes.
Check the wings at the 30-minute mark by inserting an instant-read thermometer into the thickest part of several pieces near the bone. You’re looking for an internal temperature of 165°F to 170°F at this stage. The wings should look golden with some darker brown spots, and the skin should feel firm and dry rather than wet or floppy. If they haven’t reached temperature yet, close the lid and continue cooking, checking every 5 minutes.
During this cooking phase, maintain grill temperature between 375°F and 400°F by adjusting burners on gas grills or vents on charcoal grills. If the temperature drops below 350°F, the wings will take longer and may not crisp properly. If it climbs above 425°F, you risk burning the skin before the meat cooks through.
Step 4: Make the Honey Garlic Sauce on the Stovetop
While the wings cook over indirect heat, prepare your honey garlic sauce inside on the stovetop since you need precise temperature control for proper sauce consistency. You can’t effectively make this sauce on the grill’s side burner because the heat fluctuates too much.
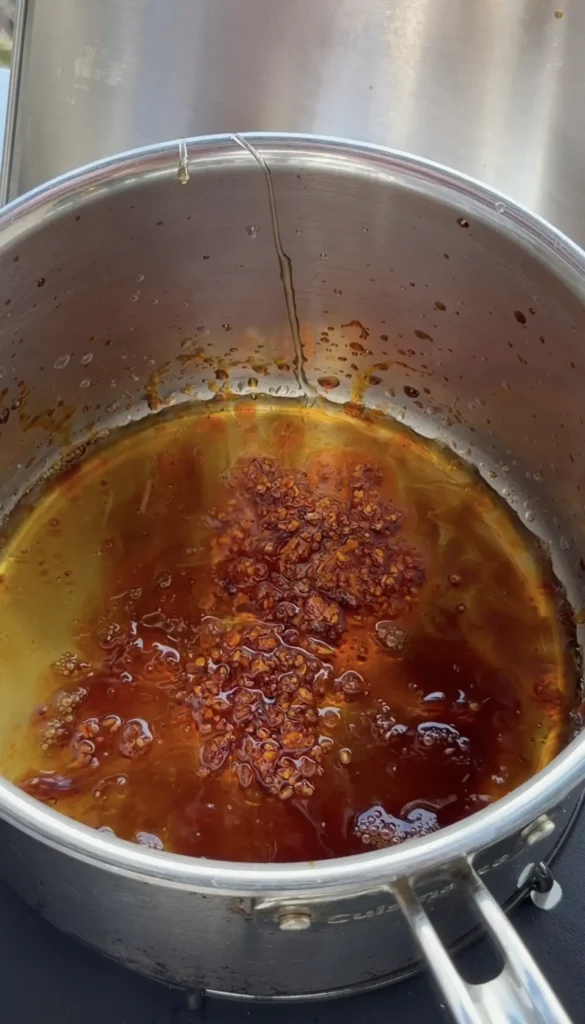
Combine ½ cup honey, ¼ cup low-sodium soy sauce, 6 cloves minced garlic, 1 tablespoon rice vinegar, 1 tablespoon butter, 1 teaspoon sesame oil, and ½ teaspoon red pepper flakes in a medium saucepan. Place over medium heat and bring to a gentle simmer, stirring frequently to prevent the garlic from sticking to the bottom and burning.
Simmer for 5 to 7 minutes until the sauce reduces slightly and thickens to a syrupy consistency that coats the back of a spoon. For extra thickness that really clings to the wings, whisk together 1 teaspoon cornstarch with 1 tablespoon water, stir this slurry into the simmering sauce, and cook for 30 to 60 seconds more until glossy and noticeably thicker.
Keep the sauce warm on low heat until your wings are ready. You want it fluid and pourable, not cooled and sticky, when you toss the wings.
Step 5: Finish Wings Over Direct Heat for Extra Char
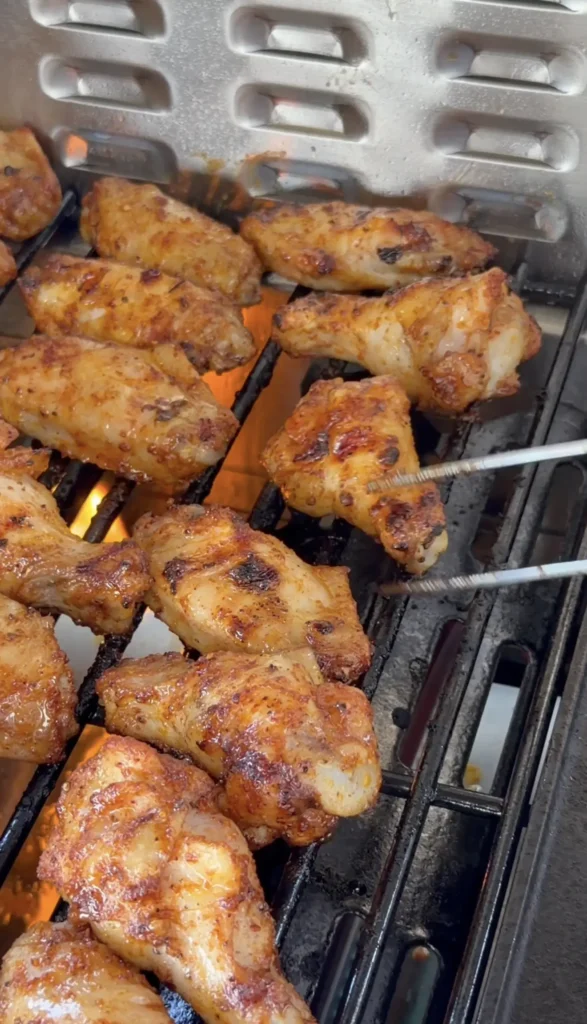
Once the wings reach 165°F to 170°F and have been cooking for about 30 to 35 minutes total, move them to the direct heat side of the grill. Arrange them directly over the hot coals or lit burners and cook for 2 to 3 minutes per side, watching constantly and flipping as needed to prevent burning.
This final blast of direct heat crisps the skin further, adds attractive grill marks, and develops some caramelization on the exterior that enhances flavor. The wings should reach a final internal temperature of 175°F to 185°F during this finishing phase. You’re looking for deep golden-brown skin with darker char marks from the grates and a surface that looks dry and crispy rather than wet.
If flames start licking up around the wings or you smell burning, move them immediately back to the indirect side. The rendered fat can cause flare-ups, especially on charcoal grills, and you don’t want burnt wings. Keep tongs in hand and stay attentive during this critical final stage.
The total cooking time should be 35 to 40 minutes from start to finish, including both the indirect cooking phase and the direct heat finishing. Larger wings may take closer to 45 minutes total.
Step 6: Toss Wings in Sauce Off the Grill
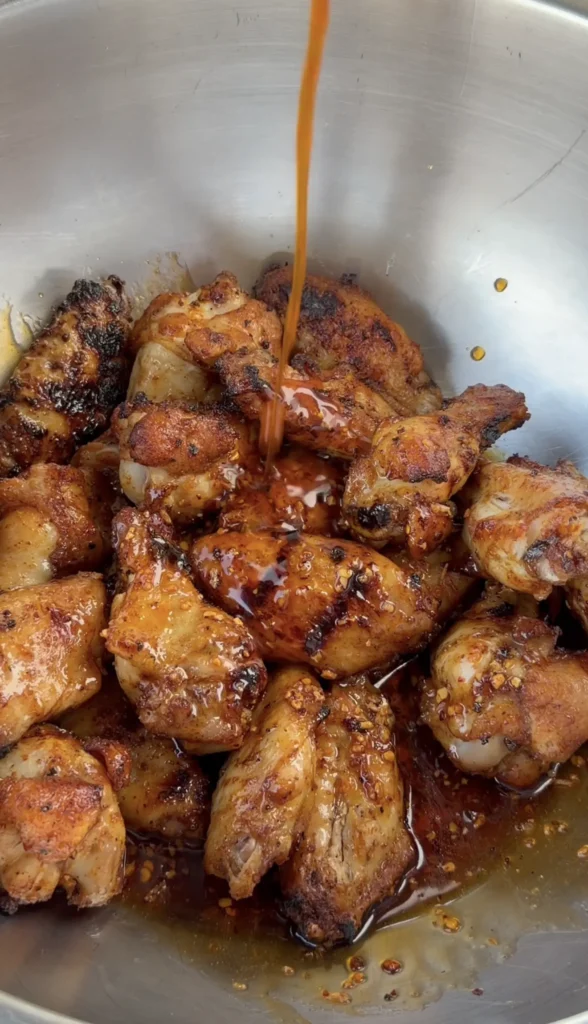
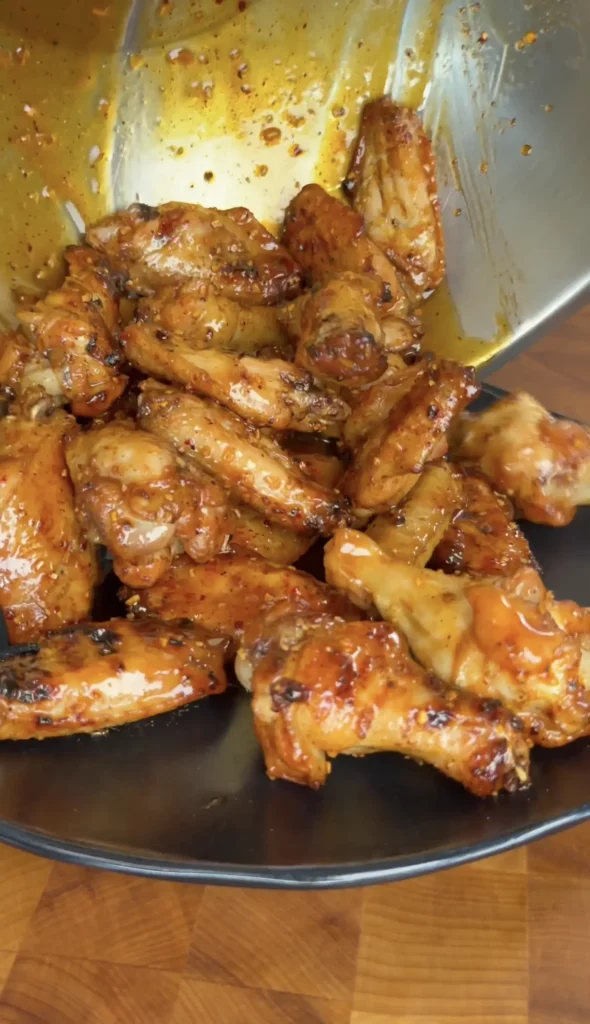
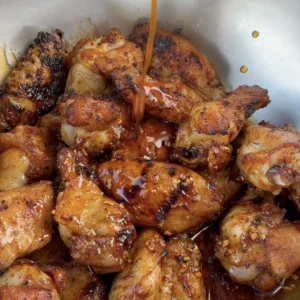
Transfer the hot, crispy wings from the grill directly into a large bowl. Don’t let them sit and cool or they won’t take the sauce as well. You want them steaming hot when you add the glaze.
Pour the warm honey garlic sauce over the wings and toss thoroughly using tongs, making sure every surface gets coated. The residual heat from the wings keeps the sauce fluid and spreadable. Work quickly and toss until you see that glossy coating covering all the wings evenly with no dry spots visible.
Some cooks prefer to baste the wings lightly with sauce during the last 3 to 4 minutes on the direct heat side, then toss them with more sauce after removing from the grill. This creates layers of caramelized sauce for extra flavor. If you try this approach, watch very carefully because the sugar in honey burns within seconds over direct heat. Brush on a thin layer, flip after 1 to 2 minutes when you see the sauce bubbling, brush the other side, and remove from heat before any black charring appears.
Step 7: Optional Grill Caramelization and Serving
For maximum stickiness with slight caramelization, you can return the sauced wings to the indirect heat side of the grill for 2 to 3 minutes with the lid closed. This gentle heat sets the sauce and creates that lacquered appearance without burning the sugar. You can also move them briefly to direct heat for 30 to 60 seconds per side if you want more char, but watch them like a hawk to prevent burning.
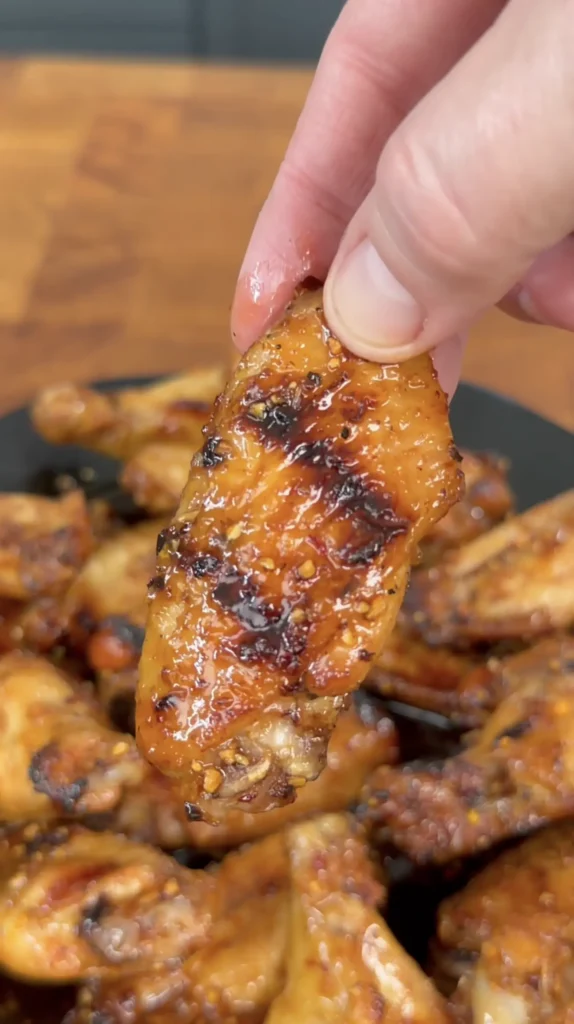
Remove the wings from the grill and transfer to a serving platter. Let them cool for 1 to 2 minutes so the sauce sets slightly and becomes sticky rather than running off. Garnish with toasted sesame seeds or sliced green onions if desired.
Serve these grilled honey garlic wings immediately while they’re still hot and the exterior maintains maximum crispiness. The combination of smoky grill flavor, crispy skin, and sweet-savory glaze makes these wings irresistible straight off the fire.
Honey Garlic Chicken Wings
Ingredients
For the Wings:
- 2½ pounds chicken wings drumettes and flats separated
- 1 tablespoon aluminum-free baking powder
- 1½ teaspoons kosher salt
- 1 teaspoon black pepper
- 1 teaspoon garlic powder
- ½ teaspoon smoked paprika optional
For the Honey Garlic Sauce:
- ½ cup honey
- ¼ cup low-sodium soy sauce
- 6 cloves garlic minced
- 1 tablespoon rice vinegar or apple cider vinegar
- 1 tablespoon unsalted butter
- 1 teaspoon sesame oil
- ½ teaspoon crushed red pepper flakes optional
Instructions
- Pat wings completely dry with paper towels, removing as much surface moisture as possible. In a large bowl, toss wings with baking powder, salt, pepper, garlic powder, and smoked paprika until evenly coated. Let rest 10 to 15 minutes at room temperature while preparing the grill.
- Set up grill for two-zone cooking. For gas grills, light burners on one side only and set to medium-high, leaving the other side off. For charcoal grills, pile all hot coals on one side of the grill, leaving the other side empty. Aim for grill temperature of 375°F to 400°F on the indirect side. Oil the cooking grate on the indirect side using tongs and an oil-soaked paper towel.
- While grill heats, make the honey garlic sauce on the stovetop. Combine honey, soy sauce, garlic, vinegar, butter, sesame oil, and red pepper flakes in a saucepan over medium heat. Simmer 5 to 7 minutes, stirring frequently, until sauce thickens to a syrupy consistency. For extra thickness, stir in cornstarch slurry and cook 30 to 60 seconds more. Keep warm on low heat.
- Arrange seasoned wings on the indirect heat side of the grill in a single layer with space between each piece. Close lid and cook for 15 minutes. Open grill, flip all wings with tongs, close lid, and cook 15 to 20 minutes more until wings reach 165°F to 170°F internal temperature and skin looks golden and dry.
- Move wings to the direct heat side of the grill. Cook 2 to 3 minutes per side, watching constantly and flipping as needed to prevent burning, until skin is deeply golden brown with visible grill marks and internal temperature reaches 175°F to 185°F. Total cooking time is 35 to 40 minutes from start to finish.
- Transfer hot wings immediately to a large bowl. Pour warm honey garlic sauce over wings and toss thoroughly with tongs until every wing is evenly coated and glossy. Let rest 1 to 2 minutes before transferring to serving platter. Garnish with toasted sesame seeds or sliced green onions if desired. Serve immediately while hot and crispy.
Notes
Frequently Asked Questions
Can You Make Honey Garlic Wings in an Air Fryer?
You can absolutely make honey garlic chicken wings in an air fryer, and many people prefer this method because it produces exceptionally crispy wings in less time than oven baking. The air fryer’s rapid circulation of hot air around the wings creates texture similar to deep frying without any added oil. Prep the wings exactly the same way by patting them dry and coating with baking powder and seasonings.
Preheat your air fryer to 400°F, then arrange the wings in a single layer in the basket without overcrowding. Most air fryers hold 1½ to 2 pounds of wings per batch, so you may need to cook in multiple batches depending on your air fryer size and how many wings you’re making. Cook for 22 to 25 minutes total, flipping the wings at the 11 or 12-minute mark to ensure even crisping on both sides.
The wings are done when they’re golden brown all over and reach an internal temperature of 175°F to 185°F in the thickest part. Air fryer cooking times can vary significantly between models, so check your wings a few minutes early the first time you make them to avoid overcooking. Some air fryers run hotter than others and may finish the wings in as little as 20 minutes.
After cooking, transfer the hot wings to a bowl and toss with your warm honey garlic sauce exactly as you would for oven-baked wings. You can return the sauced wings to the air fryer for 2 to 3 minutes at 400°F if you want to caramelize the sauce slightly, though watch them carefully since the concentrated heat can burn the sugar quickly. The air fryer method gives you slightly crispier wings than the oven with faster cooking time, making it ideal when you’re feeding smaller groups.
How Do You Prevent Honey from Burning on Grilled Wings?
Preventing honey from burning on grilled wings requires controlling when and how you apply the sauce, since the direct heat and high temperatures of grilling will caramelize and burn sugar much faster than oven cooking. The key is to grill the wings completely without sauce over indirect heat, then add the honey garlic glaze only during the final few minutes when the chicken is already cooked through.
Set up your grill with a two-zone fire, creating one area of medium-high direct heat and one area with no heat at all. Start the wings over the indirect heat zone where there are no flames directly underneath. Close the lid and cook at 375°F to 400°F for 25 to 30 minutes, flipping occasionally, until the wings are nearly done and register around 165°F internally. This initial cooking period crisps the skin and cooks the meat through without any sauce to burn.
Once the wings are almost finished, brush them lightly with honey garlic sauce and move them to the direct heat zone for 2 to 3 minutes per side. Watch them constantly during this phase because the sugar in the honey will caramelize and burn within seconds if you’re not careful. You’re looking for the sauce to bubble and develop a glossy sheen without turning black or producing smoke. If you see charring starting, move the wings immediately back to indirect heat.
What’s the Difference Between Honey Garlic Wings and Teriyaki Wings?
Honey garlic wings and teriyaki wings share some similar ingredients but create noticeably different flavor profiles, with honey garlic being sweeter and more garlicky while teriyaki has more umami depth and saltiness from additional soy sauce and mirin. Both sauces use honey and soy sauce as base ingredients, but the proportions and additional components create distinct tastes.
Honey garlic sauce emphasizes the combination of sweet honey and pungent fresh garlic, with soy sauce playing a supporting role for saltiness and color. The sauce typically contains a higher ratio of honey to soy sauce, making it sweeter overall. Fresh minced garlic is the star ingredient, providing that sharp, aromatic quality that defines the sauce. Butter and sesame oil add richness and a subtle nutty flavor, while rice vinegar provides acidity to balance the sweetness. The result is a sticky, sweet sauce with pronounced garlic flavor and moderate saltiness.
Teriyaki sauce focuses more on umami and savory depth, using roughly equal parts soy sauce and sweetener along with mirin (sweet rice wine), which adds complexity beyond simple sweetness. Traditional teriyaki often includes ginger along with or instead of garlic, changing the flavor profile significantly. The higher soy sauce content makes teriyaki saltier and more savory than honey garlic, with sweetness that’s more subtle and balanced rather than front-and-center. Some teriyaki recipes also include sake or rice wine for additional depth.
How Do You Store and Reheat Leftover Honey Garlic Wings?
Store leftover honey garlic chicken wings in an airtight container in the refrigerator for up to 4 days, though you should accept that the texture will never be quite as crispy as when they were freshly made. The sauce creates moisture that softens the skin during storage, and reheating can only partially restore the original crispiness. Let the wings cool to room temperature before refrigerating, but don’t leave them out longer than 2 hours to prevent bacterial growth.
For reheating, the air fryer produces the best results by far. Preheat your air fryer to 375°F, arrange the wings in a single layer without overcrowding, and heat for 5 to 7 minutes until they’re hot throughout and the exterior crisps up again. The concentrated hot air circulation revives the texture better than any other method. You don’t need to add any oil or spray; the fat that rendered from the wings during the initial cooking provides enough to help with re-crisping.
The oven works as a second choice if you don’t have an air fryer. Preheat to 375°F, place the wings on a wire rack set over a baking sheet, and reheat for 10 to 12 minutes until hot and sizzling. The rack allows air circulation and prevents the bottoms from steaming against the pan. You can briefly run them under the broiler for the final 1 to 2 minutes if you want extra crispiness, watching carefully to prevent burning.
Never microwave honey garlic wings if you care about texture. Microwaving steams the wings and makes the skin soft and rubbery while heating unevenly. The sauce can also get scorching hot in spots while the meat stays lukewarm. If microwaving is your only option, use 50% power and heat in 30-second intervals, but understand that the results will be disappointing compared to air fryer or oven reheating.
For freezing, honey garlic wings don’t freeze particularly well because the sauce separates and becomes watery when thawed, and the texture degrades significantly. If you must freeze them, do so without sauce, freezing just the cooked wings in a freezer bag for up to 3 months. Thaw in the refrigerator overnight, reheat using the air fryer or oven method above, then toss with freshly made sauce. This approach gives you better results than freezing already-sauced wings.
If you’re looking for more recipes like this recipe, click the link! Check out all of our grilling recipes here for more steak, seafood, and BBQ favorites that are perfect for your next cookout.
COMMON ITEMS USED IN THESE RECIPES
Hasty Bake Charcoal Grill and Smoker
Knitted Gloves
Food Processor
Cast Iron Skillet
Meater +
Upgrade Your Meat Game with Grill Nation x Linz Heritage Angus
If you really want to take your grilling and cooking to the next level, you need to check out our collaboration with Linz Heritage Angus. We’ve partnered with them to bring you some of the best beef you can get your hands on.
Linz Heritage Angus isn’t your typical grocery store meat. These guys are the real deal – they raise their cattle the right way, and you can taste the difference in every bite. We’re talking about beef that’s been dry-aged to perfection, with marbling that makes your mouth water just looking at it.
Check out these premium cuts that’ll change how you think about beef:
Premium Ribeye Steaks – Perfect for special occasions
Dry-Aged Beef Selection – Take your grilling to the next level
Ground Beef & Burger Blends – The foundation of great BBQ