Smoked Baconnaise Sliders with Caramelized Onions
Smoked baconnaise sliders are ground beef formed into a single rectangular sheet, smoked at 225°F on a wire rack for 60 to 75 minutes until it reaches 140°F to 145°F internal temperature, then assembled on connected Hawaiian rolls with homemade bacon mayonnaise, caramelized onions, and cheese. You finish the assembled sliders at 325°F to 350°F for 25 to 30 minutes until the cheese melts and tops turn golden. The wire rack allows smoke to penetrate both sides of the beef sheet. This creates bark on top and bottom.
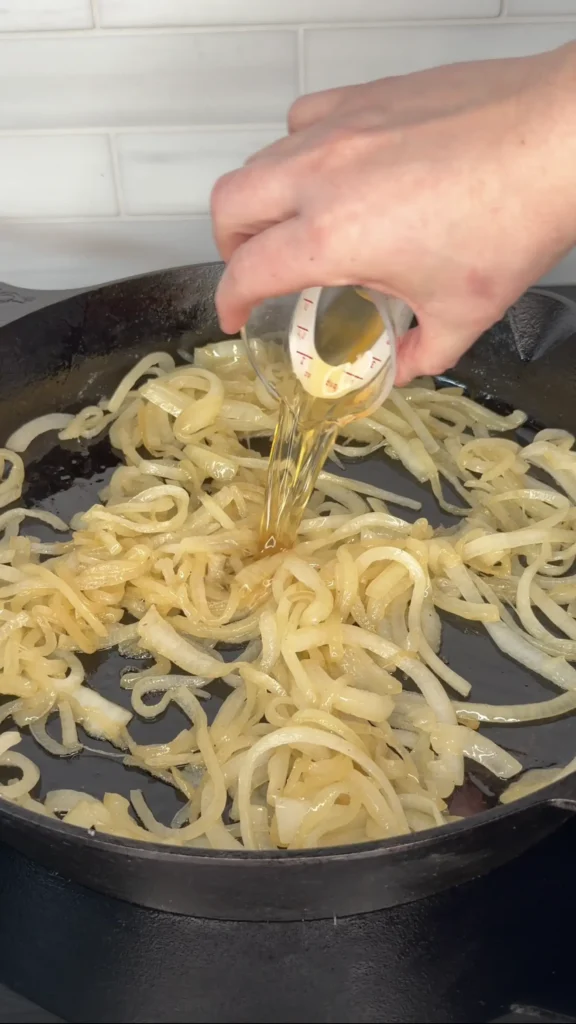
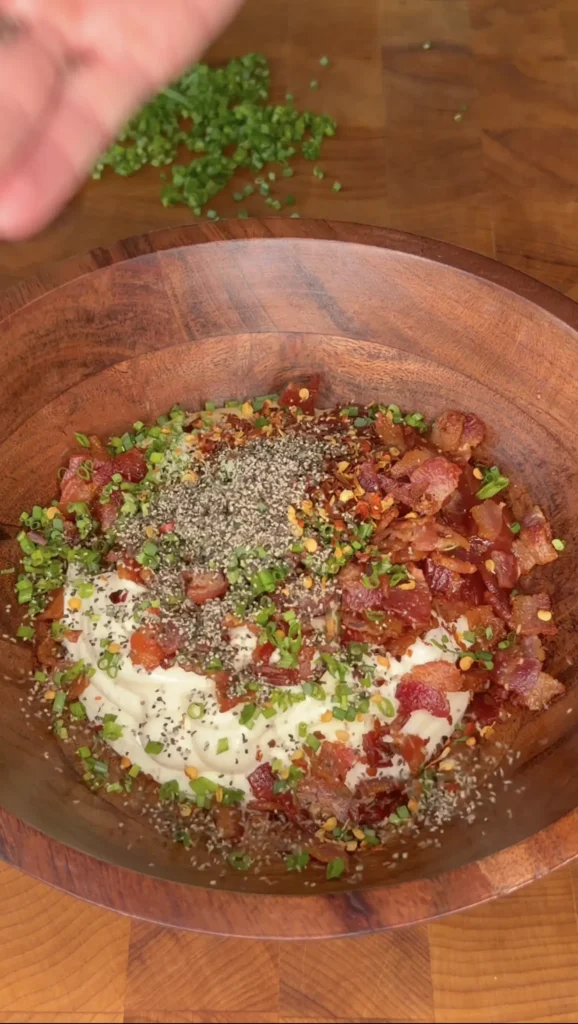
The baconnaise combines 1 cup mayonnaise with ¾ cup finely chopped cooked bacon, Dijon mustard, Worcestershire sauce, and black pepper. The bacon pieces add smoky, salty crunch. The mayo creates creamy base. You make it ahead and refrigerate. The caramelized onions cook in cast iron on the smoker at 275°F to 300°F for 45 to 60 minutes. You stir them every 10 to 15 minutes until jammy and sweet.
These Hawaiian roll sliders take about 2 hours total including smoking the beef sheet, caramelizing onions, and finishing the assembled sliders. The innovative beef sheet method creates uniform portions. Each slider gets equal beef distribution. You cut them after baking rather than forming individual patties. This saves time and creates cleaner presentation. Perfect for parties, game day, and gatherings where you need impressive sliders that feed a crowd.
Why the Wire Rack Method Creates Superior Smoked Sliders
The wire rack method produces better smoked baconnaise sliders because it allows smoke circulation around the entire beef sheet. When you place meat directly on smoker grates, the bottom surface makes contact with metal. This contact point doesn’t get smoke exposure. It steams rather than smokes. The bottom becomes pale and soggy instead of developing bark.
Elevating the beef sheet on a wire rack solves this problem completely. Smoke flows underneath and around the meat. Both surfaces get equal exposure. You develop bark on top and bottom. The entire beef sheet tastes smoked rather than just the top surface. This makes significant difference in flavor intensity.
The rack also promotes better heat circulation. Direct grate contact creates hot spots where the meat touches metal. These spots can overcook while other areas stay undercooked. The rack creates air gap between meat and heat source. Heat distributes more evenly. You get consistent doneness throughout the beef sheet.
Drippings fall through the rack into a pan below rather than pooling around the meat. This prevents steaming. When beef sits in its own juices, it braises instead of smokes. The texture becomes soft rather than crusty. The rack keeps the meat elevated above drippings. You maintain dry-heat cooking environment essential for bark formation.
The wire rack also makes transferring the beef sheet easier. Sliding a spatula under a large, thin sheet of ground beef is challenging. The meat can tear or fold. With the rack method, you transport the entire rack. The beef stays supported and intact. You minimize handling and reduce breaking risk.
Some pitmasters worry about the beef sticking to the rack. Light oil spray prevents this. Spray the rack before placing the beef sheet on it. The small amount of oil doesn’t affect smoke flavor. It creates non-stick surface. The beef releases cleanly when cooked.
The rack method works for various meats beyond sliders. Bacon, thin pork chops, chicken thighs, and fish fillets all benefit. Any thin cut that traditionally struggles with soggy bottoms improves dramatically. The wire rack is simple tool that elevates smoking technique significantly.
How Baconnaise Elevates Standard Slider Sauce
Baconnaise creates more complex flavor than plain mayonnaise or even bacon bits added separately. Chopping cooked bacon finely and mixing it into mayo distributes bacon flavor evenly throughout the spread. Every bite of slider gets bacon essence. Separate bacon pieces create uneven distribution. Some bites have lots of bacon. Others have none.
The bacon fat from the chopped bacon enriches the mayo. As you chop warm bacon, small amounts of rendered fat incorporate into the mayo. This bacon fat carries intense pork flavor. It also makes the mayo slightly thinner and more spreadable. Plain mayo can be thick and hard to distribute evenly. Baconnaise spreads smoothly.
The Dijon mustard in baconnaise adds sharp, tangy note that cuts through richness. Mayo and bacon are both fatty components. Without acid or sharpness, they taste one-dimensionally rich. Dijon provides necessary contrast. It also adds sophisticated flavor beyond yellow mustard’s simple tang.
Worcestershire sauce contributes umami depth and complexity. The sauce contains anchovies, tamarind, vinegar, and spices. These create savory background notes. Baconnaise tastes more sophisticated than bacon-mayo alone. The Worcestershire prevents it from tasting like a one-note condiment.
Black pepper provides subtle heat and aromatic quality. Freshly ground black pepper has more impact than pre-ground. The peppercorns’ essential oils remain potent when freshly cracked. This creates noticeable pepper flavor that enhances rather than overpowers.
Optional pickle juice brightens the baconnaise significantly. Just a splash (1 to 2 teaspoons) adds vinegar tang and dill flavor. This prevents the spread from tasting heavy. Pickle juice also thins the consistency slightly. The baconnaise spreads more easily on rolls.
Making baconnaise ahead allows flavors to meld. The bacon pieces hydrate slightly in the mayo. The seasonings distribute evenly. Fresh baconnaise tastes good. Day-old baconnaise from the refrigerator tastes better. Make it a day ahead for parties. The extra development time pays off in flavor.
Why Caramelizing Onions on the Smoker Adds Extra Dimension
Caramelizing onions on the smoker instead of the stovetop infuses them with smoke flavor while they cook. Standard caramelized onions taste sweet and rich. Smoked caramelized onions taste sweet, rich, and smoky. This triple threat of flavors makes them more complex and interesting. They complement smoked beef better than stovetop versions.
The cast iron skillet on the smoker provides consistent heat similar to stovetop cooking. Cast iron retains and distributes heat evenly. The onions cook gradually in butter and olive oil. The fat prevents sticking and adds richness. The smoker’s ambient temperature (275°F to 300°F) is perfect for caramelization without burning.
Stirring every 10 to 15 minutes prevents burning while allowing proper browning. The onions release moisture as they cook. This moisture evaporates. The natural sugars concentrate and caramelize. The stirring redistributes the onions so all pieces caramelize evenly. It also scrapes up fond (browned bits) from the pan bottom and incorporates them.
The 45 to 60 minute cooking time transforms sharp, pungent raw onions into sweet, jammy spread. The onions break down completely. They become soft and spreadable. The color changes from white to deep golden brown. The flavor mellows dramatically. The sharp bite disappears. Sweet, complex flavors emerge.
Using yellow onions works best for caramelizing. Yellow onions have good sugar content and balanced flavor. Sweet onions like Vidalia caramelize well but can be too sweet. Red onions work but have sharper flavor even when caramelized. White onions are acceptable but less flavorful. Yellow onions are the reliable choice.
The butter and olive oil combination provides ideal fat profile. Butter adds rich flavor and helps browning. Olive oil prevents the butter from burning. Butter alone can scorch at smoker temperatures. Oil alone lacks butter’s flavor contribution. The combination delivers best results.
Salting the onions at the start draws out moisture. This helps them cook down faster. Salt also seasons them throughout rather than just on the surface. The pinch of salt is minimal. The onions will get additional seasoning from the overall slider but the initial salt is important.
What Makes 80/20 Ground Beef Essential for Slider Sheets
80/20 ground beef is essential for beef sheet sliders because the fat content prevents drying during extended smoking. Lean ground beef (90/10 or 93/7) lacks sufficient fat. When formed into thin sheets and smoked for 60+ minutes, lean beef becomes dry and crumbly. The 20% fat in 80/20 beef keeps the meat juicy even when cooked to 160°F internal temperature.
The fat also creates better texture for slider sheets. As the beef smokes, fat renders gradually. It bastes the meat from inside. This creates tender, moist beef rather than dense, dry patties. The rendered fat also contributes to bark formation on the surface. Fat-rich surfaces develop better crust than lean surfaces.
Ground beef sheets are more prone to drying than thick burgers. A ¾-inch thick sheet has more surface area relative to volume than a 1-inch thick burger patty. More surface area means more moisture exposure and evaporation. The higher fat content compensates for this increased drying potential.
The 80/20 ratio also provides optimal flavor. Fat carries and concentrates beefy taste. Lean ground beef tastes less intensely “beefy.” Even with smoke, seasoning, and toppings, lean beef sliders taste somewhat flat. The fat in 80/20 beef creates rich, satisfying flavor that makes these sliders craveable.
Binding is another consideration. When you press ground beef into a sheet, you need it to hold together. Fat acts as natural binder. It helps the beef particles stick. Lean beef is more crumbly and can fall apart when transferred or flipped. The 80/20 blend stays cohesive.
Some people worry about grease with 80/20 beef. The wire rack addresses this. Rendered fat drips through the rack into the pan below. The beef doesn’t sit in grease. You get the benefits of fat (flavor, moisture, texture) without the downside (greasy finished product).
Standard ground chuck is typically 80/20 and widely available. You don’t need premium or specially ground beef. Regular supermarket ground chuck produces excellent results. This makes the recipe accessible and affordable for feeding groups.
Smoked Baconnaise Sliders
Wire Rack Method with Caramelized Onions
Ingredients
Beef Patty
- 2 pounds ground beef (80/20)
- 1½ teaspoons kosher salt
- 1 teaspoon black pepper
- 1 teaspoon garlic powder
- 1 teaspoon onion powder
- ½ teaspoon smoked paprika (optional)
Baconnaise
- 1 cup mayonnaise
- ¾ cup finely chopped cooked bacon
- 1 teaspoon Dijon mustard
- 1 teaspoon Worcestershire sauce
- ½ teaspoon black pepper
- Splash of pickle juice (optional)
For the Caramelized Onions
- 3 yellow onions, sliced thin
- 2 tablespoons butter
- 1 tablespoon olive oil
- Pinch of salt
For Assembly
- 1 package King’s Hawaiian Rolls (12 connected rolls)
- 8 to 10 slices American cheese or cheddar
- 6 tablespoons butter, melted
- BBQ rub or everything bagel seasoning
The wire rack method is essential for these sliders. It allows smoke to hit both the top and bottom of the beef sheet simultaneously. Direct grate placement creates a steamed, soggy bottom that lacks bark. The rack elevates the meat, promotes even cooking, and creates superior crust on all surfaces. This technique transforms standard sliders into competition-quality BBQ.
Step-by-Step Instructions
Step 1: Caramelize the Onions on the Smoker
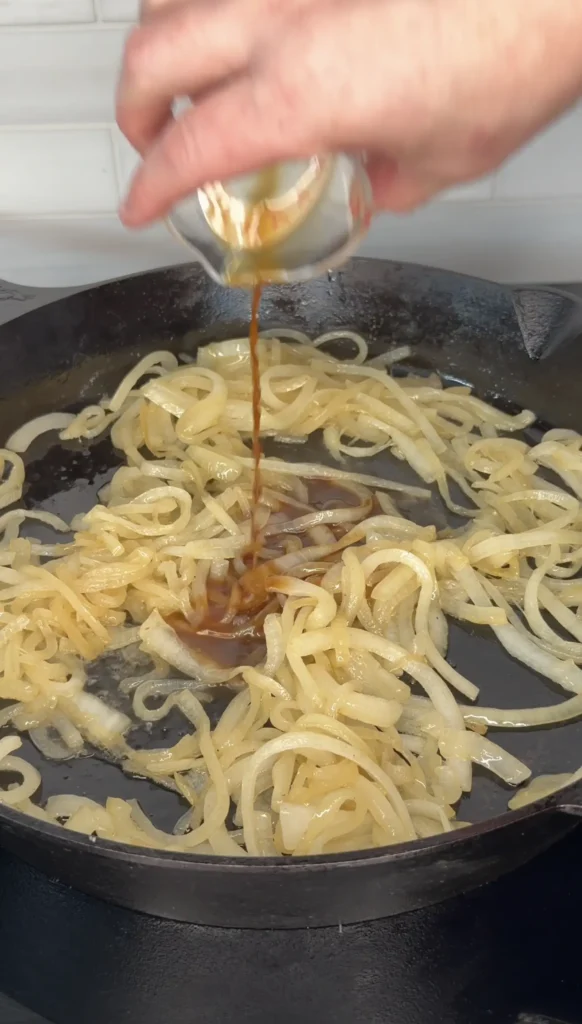
Preheat your smoker to 275°F to 300°F. Place a large cast iron skillet directly on the smoker grates. Add 2 tablespoons butter and 1 tablespoon olive oil to the cold skillet. Let them melt as the skillet heats.
Add 3 thinly sliced yellow onions to the skillet. Sprinkle with a pinch of salt. Stir to coat the onions in the butter-oil mixture. Spread them evenly in the skillet.
Close the smoker lid and cook for 45 to 60 minutes, stirring every 10 to 15 minutes. The onions will gradually soften, brown, and reduce in volume. They’re done when jammy, sweet, and deep golden brown.
Remove the skillet from the smoker and set aside. The onions can sit at room temperature while you smoke the beef. If making ahead, refrigerate them for up to 3 days.
Step 2: Make the Baconnaise
Cook ¾ cup bacon (about 6 to 8 slices) until very crispy. Drain on paper towels and let cool slightly. Chop the bacon very finely. You want small pieces, not large chunks.
In a medium bowl, combine 1 cup mayonnaise, the finely chopped bacon, 1 teaspoon Dijon mustard, 1 teaspoon Worcestershire sauce, and ½ teaspoon black pepper. Add a splash of pickle juice if using (1 to 2 teaspoons).
Mix thoroughly until all ingredients are evenly distributed. The bacon should be suspended throughout the mayo rather than clumped. Taste and adjust seasoning if needed.
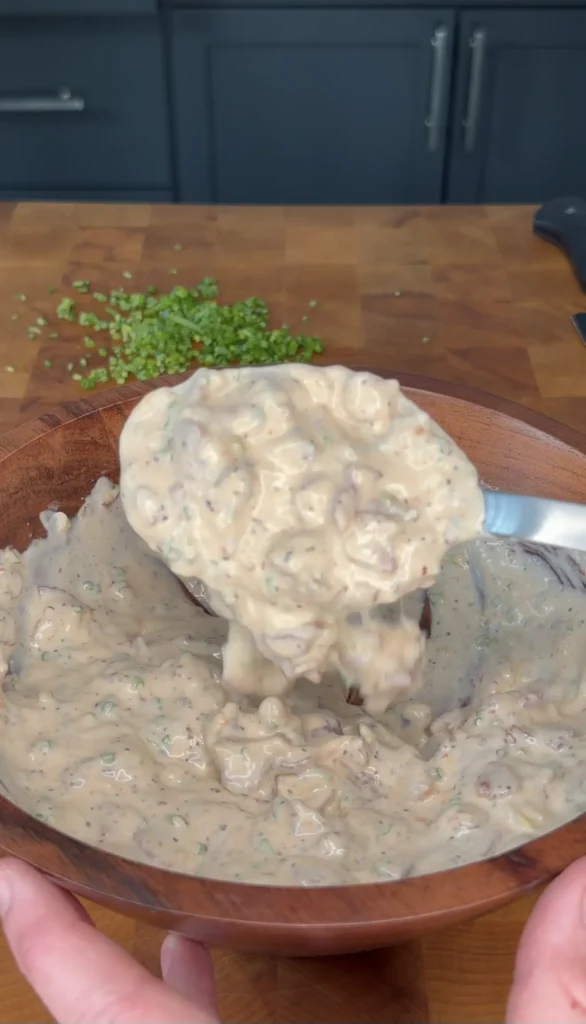
Cover and refrigerate until ready to assemble. The baconnaise improves with time. Make it several hours ahead or even the day before for best flavor.
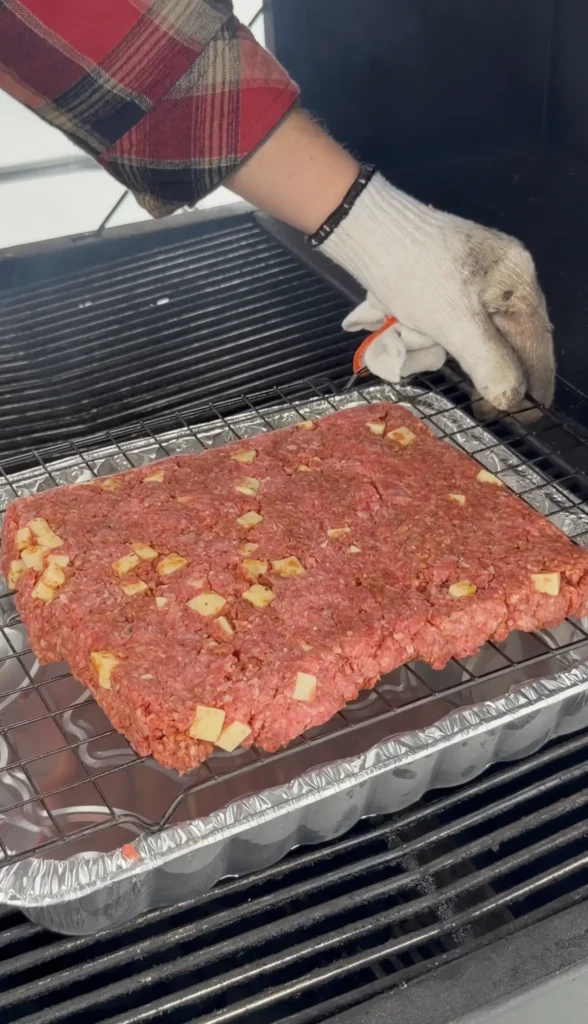
Step 3: Form the Beef Sheet
Place a large piece of parchment paper on your counter. The paper should be slightly larger than your connected Hawaiian rolls.
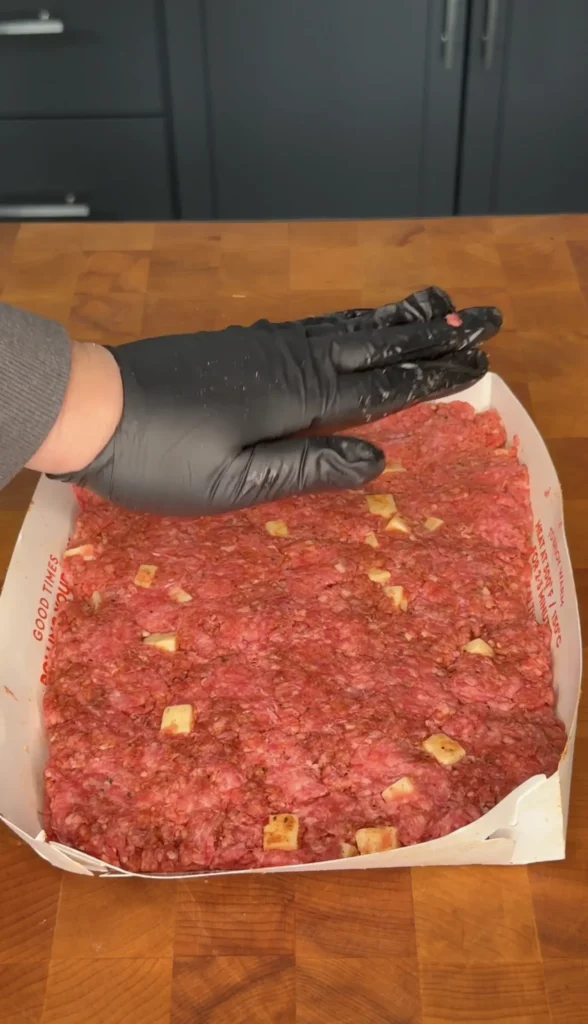
Place 2 pounds of 80/20 ground beef on the parchment. Using your hands, gently press and shape the beef into a rectangle roughly the same dimensions as your connected Hawaiian rolls (about 9×13 inches). The beef should be about ¾ inch thick.
Don’t pack the meat tightly. Use light pressure to form the shape. Overworking creates dense, tough texture. Loose packing creates tender, juicy sliders.
Season both sides of the beef sheet generously with 1½ teaspoons kosher salt, 1 teaspoon black pepper, 1 teaspoon garlic powder, 1 teaspoon onion powder, and ½ teaspoon smoked paprika if using.
Optional: refrigerate the formed, seasoned beef sheet for 20 minutes. This firms it up slightly and makes transferring easier. This step isn’t required but helps prevent cracking.
Step 4: Transfer to Wire Rack
Spray a large wire cooling rack lightly with cooking oil. This prevents sticking. Place the rack over a rimmed baking sheet for transport.
Carefully slide the beef sheet from the parchment onto the oiled wire rack. Use the parchment to help transfer if needed. Position the beef in the center of the rack with space around all edges.
For extra insurance against sticking, you can leave the parchment under the beef for the first 30 minutes of smoking. After 30 minutes, carefully peel it away. The beef will have firmed up enough to release from the parchment.
Step 5: Smoke the Beef Sheet
Preheat your smoker to 225°F. Use hickory, pecan, or apple wood. Hickory provides classic BBQ smoke. Pecan adds nutty sweetness. Apple is milder and fruity.
Place the wire rack (with beef sheet) directly on the smoker grates. Position it away from direct heat if using an offset smoker. Close the lid.
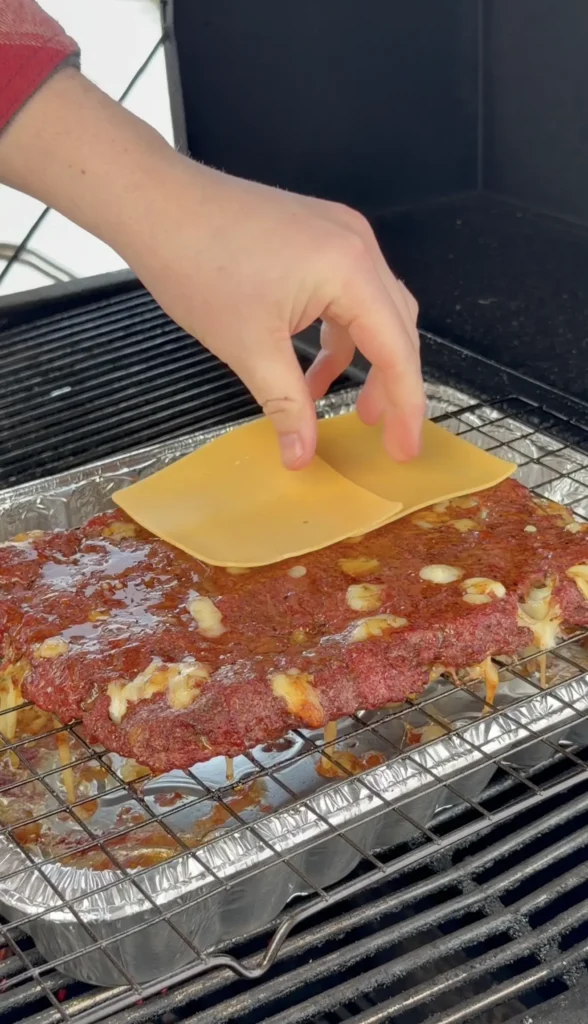
Smoke for 60 to 75 minutes until the internal temperature reaches 140°F to 145°F. Insert an instant-read thermometer into the thickest part to check. The beef should have developed visible bark on both top and bottom.
Optional: flip the beef sheet once at the 40-minute mark for even bark development. Use two large spatulas to flip carefully. This step is optional. The wire rack method creates good bark on both sides without flipping.
When the beef reaches 140°F to 145°F, remove it from the smoker (leave it on the rack). It will continue to cook during the finishing phase.
Step 6: Prepare the Hawaiian Rolls
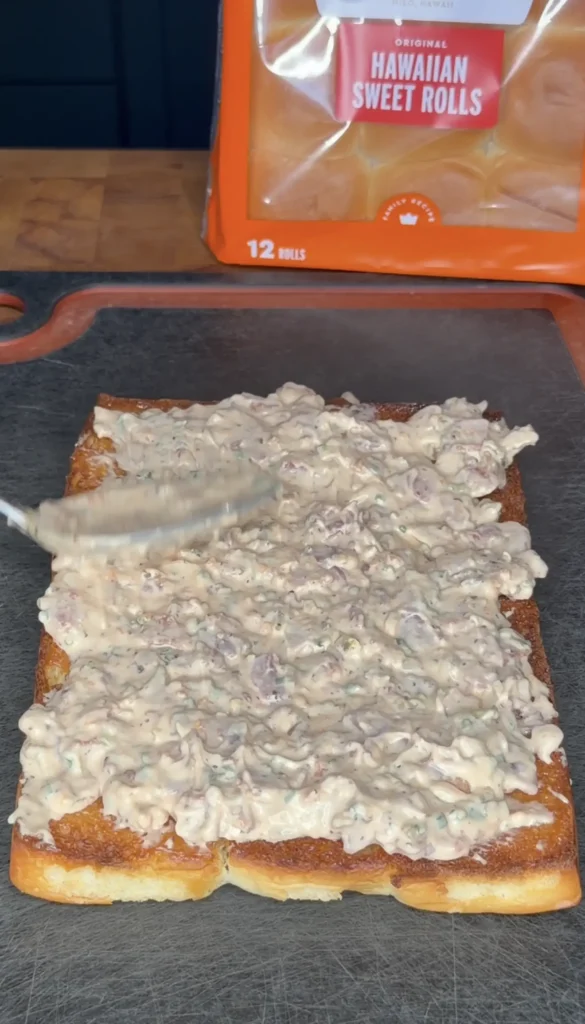
While the beef smokes, prepare the rolls. Using a large serrated knife, slice the entire package of connected Hawaiian rolls horizontally. Keep all 12 rolls connected. You’ll have one large bottom layer and one large top layer.
Place the bottom layer of rolls in a 9×13-inch disposable aluminum foil pan or baking dish. Brush the cut side lightly with some of the melted butter (about 2 tablespoons).
Set aside the top layer. You’ll add it after assembly.
Step 7: Assemble the Sliders
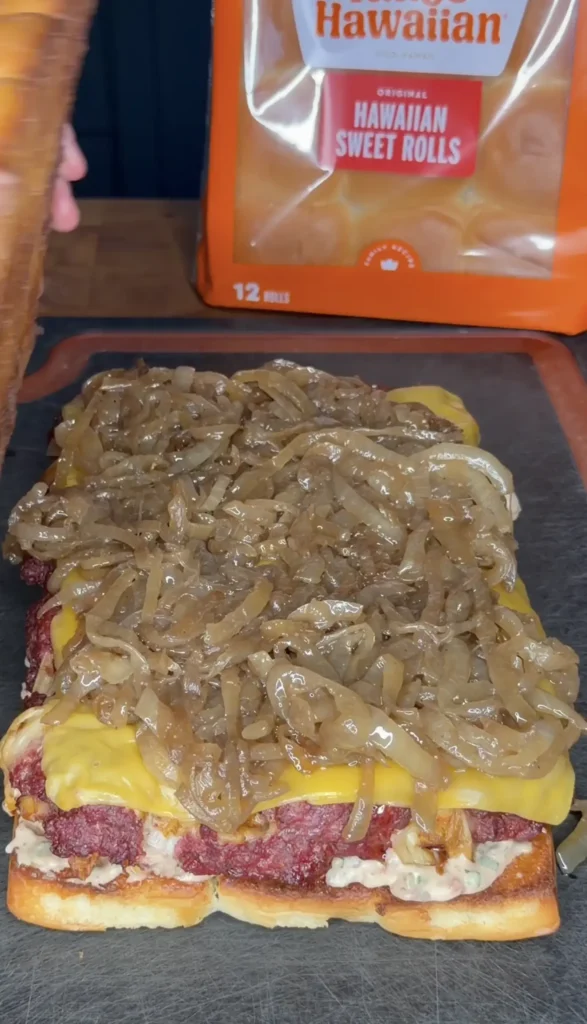
Carefully transfer the smoked beef sheet from the wire rack onto the bottom layer of Hawaiian rolls. It should fit almost perfectly. If the beef sheet is slightly larger, trim the edges. If slightly smaller, don’t worry. Close enough works.
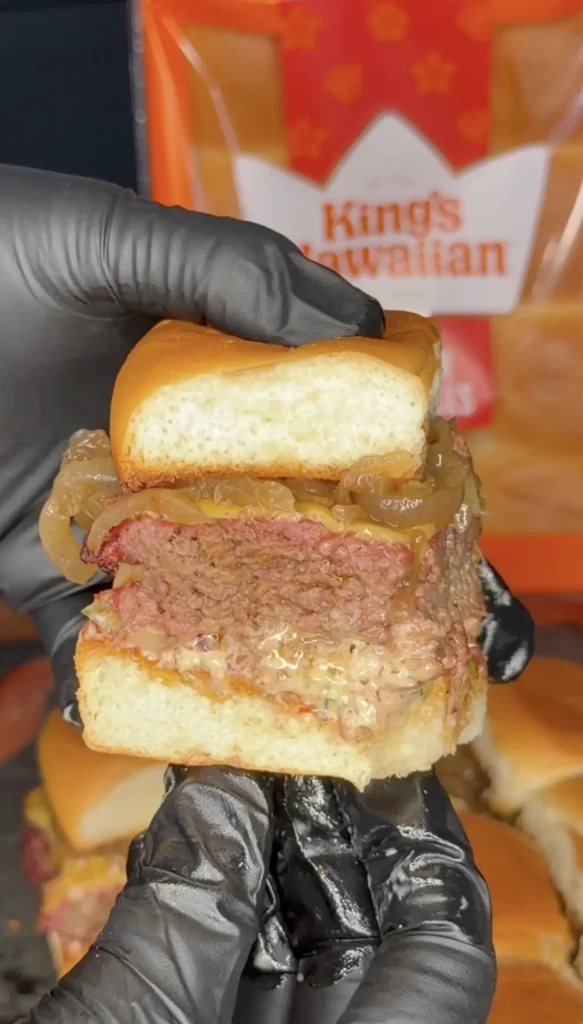
Layer 8 to 10 slices of American cheese over the beef. You want full coverage. Overlap slightly if needed. The cheese will melt and fill gaps.
Spread the caramelized onions evenly over the cheese. Use all the onions. Every slider should get some.
Spread the baconnaise evenly over the onions. Use about ¾ of the baconnaise. Reserve the remaining ¼ for serving on the side if desired.
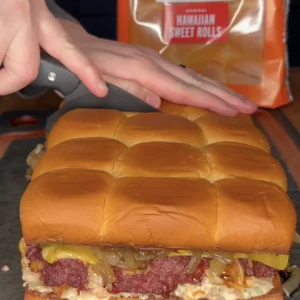
Place the top layer of Hawaiian rolls over the baconnaise. Press down gently to compress slightly.
Brush the tops of the rolls with the remaining melted butter (about 4 tablespoons). Sprinkle with BBQ rub or everything bagel seasoning.
Step 8: Smoke-Finish the Assembled Sliders
Increase the smoker temperature to 325°F to 350°F. Give it 10 minutes to come up to temperature.
Cover the pan of assembled sliders loosely with aluminum foil. Don’t let the foil touch the tops. Place the covered pan on the smoker.
Cook for 15 minutes covered. This heats everything through and starts melting the cheese without browning the tops too quickly.
Remove the foil. Continue cooking uncovered for 10 to 15 minutes. The cheese should be fully melted and bubbly. The roll tops should be golden brown. The beef should reach 160°F internal temperature for food safety.
Watch carefully during the uncovered phase. The buttered, seasoned tops can brown quickly. If they’re getting too dark, reduce temperature slightly or re-cover with foil.
Step 9: Rest, Slice, and Serve
Remove the sliders from the smoker when the tops are golden and cheese is melted. Let them rest in the pan for 8 to 10 minutes. This allows the cheese to set slightly. The sliders will be easier to cut and less likely to fall apart.
Using a sharp serrated knife, cut between the rolls to create 12 individual sliders. The beef sheet will cut cleanly if you let it rest properly.
Serve immediately while hot. Provide extra baconnaise on the side for dipping if desired. These smoked baconnaise sliders are best eaten within 20 to 30 minutes of finishing for maximum texture and temperature.
Smoked Baconnaise Sliders with Caramelized Onions
Equipment
- Smoker (Pellet, Offset, or Charcoal)
- Wire Cooling Rack
- Cast Iron Skillet
- 9×13 Foil Pan or Baking Dish
- Instant-Read Thermometer
Ingredients
For the Beef Patty
- 2 pounds ground beef 80/20
- 1 1/2 teaspoons kosher salt
- 1 teaspoon black pepper
- 1 teaspoon garlic powder
- 1 teaspoon onion powder
- 1/2 teaspoon smoked paprika optional
For the Baconnaise
- 1 cup mayonnaise
- 3/4 cup cooked bacon finely chopped
- 1 teaspoon Dijon mustard
- 1 teaspoon Worcestershire sauce
- 1/2 teaspoon black pepper
- 1 splash pickle juice optional
For the Caramelized Onions
- 3 yellow onions sliced thin
- 2 tablespoons butter
- 1 tablespoon olive oil
- salt pinch
For Assembly
- 1 package King’s Hawaiian Rolls 12 connected rolls
- 8-10 slices American cheese or cheddar
- 6 tablespoons butter melted
- BBQ rub or everything bagel seasoning
Instructions
- Caramelize onions: Preheat smoker to 275-300°F. In cast iron skillet on smoker, melt butter and olive oil. Add sliced onions and pinch of salt. Cook 45 to 60 minutes, stirring every 10 to 15 minutes, until jammy and golden brown. Set aside.
- Make baconnaise: Cook bacon until crispy, cool, and chop finely. Mix mayo, chopped bacon, Dijon mustard, Worcestershire sauce, black pepper, and pickle juice if using. Refrigerate until assembly.
- Form beef sheet: Place parchment on counter. Press 2 pounds ground beef into rectangle roughly 9×13 inches, about ¾ inch thick. Don’t pack tightly. Season both sides with salt, pepper, garlic powder, onion powder, and smoked paprika. Optional: refrigerate 20 minutes to firm up.
- Transfer to wire rack: Spray wire cooling rack with oil. Place rack over baking sheet. Slide beef sheet onto oiled rack.
- Smoke beef sheet: Preheat smoker to 225°F with hickory, pecan, or apple wood. Place rack with beef on smoker grates. Smoke 60 to 75 minutes until internal temp reaches 140-145°F. Optional: flip once at 40 minutes for even bark.
- Prepare rolls: Slice connected Hawaiian rolls horizontally, keeping all 12 connected. Place bottom layer in 9×13-inch foil pan. Brush with 2 tablespoons melted butter.
- Assemble sliders: Transfer smoked beef sheet onto bottom rolls. Layer cheese, caramelized onions, and baconnaise evenly over beef. Place top rolls over filling. Brush tops with remaining melted butter and sprinkle with BBQ rub or seasoning.
- Finish sliders: Increase smoker to 325-350°F. Cover pan loosely with foil. Cook 15 minutes covered. Remove foil, cook 10 to 15 minutes uncovered until cheese is melted, tops are golden, and internal temp reaches 160°F.
- Rest and serve: Let rest 8 to 10 minutes. Cut into 12 individual sliders. Serve hot.
Notes
Frequently Asked Questions
Can You Make These Sliders Without a Smoker?
You can make these sliders in the oven at 375°F with excellent results. Form the beef sheet as directed and place it on an oiled wire rack over a baking sheet. Bake for 20 to 25 minutes until it reaches 160°F internal temperature.
Add 1 teaspoon liquid smoke to the beef when forming the sheet. This approximates smoke flavor. You can also use smoked paprika in the seasoning. The texture will be similar to smoked versions but the smoke flavor will be less pronounced.
Caramelize the onions on the stovetop in a large skillet over medium-low heat. The process is the same – butter, oil, onions, and 45 to 60 minutes of cooking with regular stirring. They won’t have smoke flavor but will still be sweet and delicious.
Assemble and finish the sliders the same way in the oven at 375°F. Cover for 15 minutes, then uncover for 10 to 15 minutes. The results are very good even without actual smoking.
Why Is the Wire Rack Method Better Than Direct Grate Placement?
The wire rack allows smoke to circulate completely around the beef sheet. Direct grate placement creates contact points where the beef touches metal. These contact points don’t get smoke exposure. They steam instead of smoke, creating pale, soft bottom instead of bark.
The rack also prevents the beef from sitting in its own drippings. When meat sits in rendered fat and juices, it braises rather than smokes. The texture becomes soft and steamed. The rack elevates the beef so drippings fall away into the pan below.
Heat distribution is more even with the rack method. Direct contact with grates creates hot spots that can overcook while other areas stay undercooked. The air gap from the rack allows heat to flow evenly around the entire beef sheet.
The rack also makes handling easier. Transferring a large, thin sheet of ground beef is challenging with spatulas. The rack provides stable support. You transport the entire rack without worrying about the beef sheet tearing or folding.
Can You Use Different Rolls Besides Hawaiian Rolls?
Brioche slider rolls work excellently as an alternative to Hawaiian rolls. They provide similar soft, slightly sweet texture. The butter-rich brioche complements the beef and baconnaise beautifully. Look for connected brioche rolls for easiest assembly.
Regular slider rolls or dinner rolls work but create different experience. They lack the sweetness of Hawaiian rolls. The texture is also less soft. If using regular rolls, brush them with honey butter before assembly to add some sweetness.
Potato rolls are another good option. They’re soft and slightly sweet like Hawaiian rolls. Martin’s Potato Rolls makes slider-sized options that work well. They hold up nicely to the beef and toppings.
Avoid crusty or artisan rolls. The hard crust doesn’t work well for sliders. You want soft rolls that compress slightly when you bite. The rolls should enhance the beef rather than requiring significant chewing effort.
How Do You Prevent the Beef Sheet from Cracking?
Refrigerating the formed beef sheet for 20 minutes before smoking firms it up and reduces cracking significantly. The cold temperature helps the meat hold its shape. The fat solidifies slightly. This creates more stable structure.
Don’t pack the beef too tightly when forming the sheet. Overworked, densely packed ground beef is more prone to cracking. Use light pressure to shape the rectangle. Loose packing creates tender texture and reduces cracking risk.
Handle the beef sheet gently when transferring to the rack. Use the parchment paper to help slide it. Quick, aggressive movements can cause cracks. Slow, steady transfer minimizes stress on the meat.
Some small cracks are normal and acceptable. They don’t affect flavor or final presentation. Once you layer cheese and toppings over the beef, minor cracks become invisible. Only worry about large cracks that compromise structural integrity.
Can You Make Baconnaise Ahead of Time?
Baconnaise actually improves when made 1 to 2 days ahead. The flavors meld as it sits. The bacon pieces hydrate slightly in the mayo. The seasonings distribute more evenly. Day-old baconnaise from the refrigerator tastes better than freshly made.
Store it in an airtight container in the refrigerator. It keeps for up to 5 days but is best used within 3 days for optimal bacon texture. The bacon can become slightly softer after prolonged storage but still tastes good.
Stir the baconnaise before using if it has separated slightly. The bacon fat can rise to the top during storage. A quick stir redistributes everything. The consistency should remain smooth and spreadable.
Making baconnaise ahead saves significant time on cooking day. You can prep it alongside caramelized onions days before your event. This leaves you with just smoking the beef and assembling on the actual day.
What Internal Temperature Should the Beef Sheet Reach?
The beef sheet should reach 140°F to 145°F after the initial smoking phase at 225°F. This isn’t the final temperature. The beef continues cooking during the finishing phase when you assemble and bake the sliders.
The final internal temperature after assembly and finishing at 325°F to 350°F should be 160°F minimum for food safety. Ground beef requires 160°F to eliminate harmful bacteria. Use an instant-read thermometer to verify.
Insert the thermometer into the thickest part of the beef sheet. Avoid edges which cook faster. The center of the sheet is the most accurate measurement point. Check multiple spots to ensure even cooking.
Some carryover cooking occurs during the rest period. If you pull the sliders at 155°F to 158°F, they’ll likely reach 160°F during the 8 to 10 minute rest. This prevents overcooking while ensuring food safety.
Can You Freeze These Sliders?
You can freeze the smoked beef sheet before assembly for up to 3 months. Wrap it tightly in plastic wrap, then aluminum foil. Label with the date. Thaw overnight in the refrigerator before assembling sliders.
Freezing assembled sliders is not recommended. The Hawaiian rolls become soggy when frozen and thawed. The cheese texture changes. The caramelized onions release moisture. The final product is significantly inferior to fresh sliders.
For best results, freeze components separately. Freeze the smoked beef sheet, make fresh baconnaise, and use fresh rolls when ready to serve. This hybrid approach provides convenience without compromising quality.
Leftover assembled sliders can be refrigerated for up to 2 days but don’t freeze well. Reheat refrigerated sliders in a 300°F oven covered with foil for 15 minutes. They won’t be as crispy as fresh but still taste good.
What Wood Flavors Work Best for Beef Sliders?
Hickory provides classic BBQ smoke flavor that works excellently with beef. It’s strong enough to complement beef without overwhelming. Hickory creates the traditional “BBQ” taste people expect. Most pitmasters consider it the gold standard for beef smoking.
Pecan offers slightly milder, nuttier smoke than hickory. It’s in the same family but less aggressive. Pecan works well if you find hickory too strong or if you want the beef and baconnaise flavors to shine more prominently.
Apple wood creates mild, slightly sweet smoke. It’s the lightest option. Apple works well for people new to smoking or those who prefer subtle smoke flavor. The sweetness complements the Hawaiian rolls nicely.
Avoid mesquite for these sliders. Mesquite produces very strong, almost harsh smoke. It can overpower the delicate balance of beef, bacon mayo, and caramelized onions. Save mesquite for larger beef cuts like brisket that can handle intense smoke.
How Do You Get Even Cheese Coverage on Sliders?
Use 8 to 10 slices of cheese arranged in a single layer over the beef sheet. Overlap the slices slightly so there are no gaps. The cheese will melt and flow to fill small gaps, but starting with good coverage ensures even distribution.
American cheese melts the most evenly because it contains emulsifiers. These create smooth, uniform melt without separation. Cheddar works but can become slightly grainy or oily if overheated. Sharp cheddar has better flavor but less perfect melt.
For best coverage, break cheese slices into smaller pieces and arrange them like a puzzle. This gives you more control than trying to cover the entire beef sheet with whole slices. Smaller pieces conform better to the beef sheet dimensions.
The covering and steaming phase (15 minutes covered with foil) helps cheese melt evenly. The trapped steam creates humid environment. The cheese softens uniformly before the uncovered browning phase.
Can You Double This Recipe for Larger Crowds?
Doubling the recipe works well for larger crowds. Make two separate beef sheets rather than one giant sheet. Each sheet should match the dimensions of one package of Hawaiian rolls. Two smaller sheets are easier to handle than one massive sheet.
Smoke both beef sheets simultaneously on separate wire racks. Most smokers have room for two racks. The cooking time remains the same – 60 to 75 minutes at 225°F. Just monitor both sheets to ensure even cooking.
For the finishing phase, you’ll need two 9×13-inch pans. Assemble each batch separately. You can cook both pans at the same time at 325°F to 350°F if your smoker or oven has space. Otherwise, cook one batch, hold it warm, then cook the second.
Double the baconnaise and caramelized onion recipes accordingly. These components scale easily. Make them in larger batches ahead of time. This actually saves effort compared to making multiple small batches.