The Ultimate Smoked Ham Recipe Collection
The Ultimate Smoked Ham Recipe Collection: 4 Amazing Methods for Perfect Results
When it comes to holiday meals and special celebrations, few dishes command attention like a smoked ham recipe. Whether you’re planning Easter dinner, Christmas lunch, or just want to create something spectacular for Sunday supper, smoked ham delivers impressive results that feed a crowd and create lasting memories.
But here’s what most people don’t realize—ham isn’t just one recipe. It’s a versatile cut that responds beautifully to different flavor profiles, glazes, and smoking techniques. This comprehensive guide features four exceptional smoked ham recipes, each with its own unique character and approach. From tangy honey mustard glazes to sweet brown sugar coatings, tropical pineapple bourbon combinations to traditional multi-day brined preparations—you’ll discover the perfect method for any occasion.
Every recipe in this collection transforms an ordinary ham into something extraordinary. The low and slow smoking process infuses deep flavor while keeping everything incredibly moist. The glazes caramelize into sticky, flavorful coatings that make every slice irresistible. Whether you’re using a pre-cooked spiral ham for convenience or brining a raw ham for maximum flavor control, these recipes deliver consistent, crowd-pleasing results.
Let’s explore four incredible ways to smoke ham and find the perfect recipe for your next celebration.
Why Smoked Ham Is Perfect for Holidays and Gatherings
Before diving into the recipes, let’s talk about what makes smoked ham such an ideal choice for feeding groups and celebrating special occasions.
Feeds a Crowd Efficiently A single ham can easily feed 12-20 people depending on size, making it one of the most cost-effective proteins for large gatherings. Unlike turkey where you’re fighting with limited oven space and precise timing, ham is forgiving and straightforward. You’re not carving around complicated bone structures or worrying about dry breast meat—just slice and serve.
Works with Your Schedule Most ham recipes use pre-cooked spiral hams, which means you’re really just heating and glazing rather than cooking from raw. This significantly reduces active cooking time and eliminates food safety concerns. Even the traditional holiday ham that requires brining can be prepped days in advance, leaving you free to focus on other dishes on the actual holiday.
Naturally Moist and Forgiving Ham’s higher fat content and the way it’s processed means it stays moist even if you slightly overcook it. This is huge for home cooks who might be nervous about smoking meat. Unlike lean proteins that dry out quickly, ham has built-in insurance against overcooking. The fat bastes the meat as it renders, keeping everything juicy.
Leftovers Are a Blessing Leftover ham isn’t just edible—it’s actually exciting. Ham sandwiches, ham and bean soup, ham fried rice, eggs benedict with ham, ham and cheese quiche—the possibilities are endless. Many people actually prefer buying a larger ham specifically for the leftovers. You’re essentially cooking once and eating well for a week.
Smoking Adds Depth While oven-baked ham is perfectly fine, smoking elevates it to another level entirely. The wood smoke penetrates the meat and mingles with the glaze, creating layers of flavor you simply can’t achieve in an oven. The combination of smoke, sweet glazes, and caramelization on the exterior creates something truly special.
Impressive with Minimal Effort Ham looks impressive on a table—it’s a substantial centerpiece that signals celebration and abundance. But unlike prime rib or whole turkeys that require significant skill and attention, ham is actually quite easy to execute well. You’re mostly just maintaining temperature and applying glaze. The ham does most of the work itself.
Understanding Ham Types and Preparation
Not all hams are created equal, and understanding what you’re working with helps you choose the right recipe.
Pre-Cooked Spiral Ham This is what most people buy for holidays. It’s already fully cooked, pre-sliced in a spiral pattern, and just needs to be heated to 140°F and glazed. Three of the four recipes in this collection (Honey Mustard, Brown Sugar Honey, and Pineapple Bourbon) work with pre-cooked spiral hams. These are the quickest and easiest option—you’re really just adding smoke flavor and glaze.
Raw/Green Ham This is uncured, uncooked pork that requires full cooking and often brining. The Holiday Ham Recipe uses this type. Raw ham gives you complete control over flavor and seasoning, but it requires significantly more time and preparation. You’re looking at 3-5 days of brining, plus smoking time. The payoff is incredible flavor and the satisfaction of doing it all from scratch.
Bone-In vs. Boneless Bone-in hams have better flavor because the bone adds richness as everything cooks. They’re also more impressive for presentation. Boneless hams are easier to carve and often cheaper, but they can be a bit drier. All these recipes work with either type, though bone-in is preferred when possible.
Size Matters Plan on ½ to ¾ pound of bone-in ham per person. A 7-8 pound ham feeds 10-12 people. A 10-12 pound ham feeds 14-18 people. If you want leftovers (and you should), go on the higher end of these estimates.
Recipe #1: Honey Mustard Smoked Ham (Tangy & Sweet)
View Full Recipe: Honey Mustard Smoked Ham
This recipe delivers the perfect balance of tangy mustard and sweet honey with an optional kick of heat. It’s ideal for anyone who loves bold, forward flavors and wants their ham to make a statement. The glaze builds up in layers, creating a sticky, caramelized coating that’s absolutely irresistible.
What Makes This Recipe Special
The honey mustard glaze here isn’t subtle—it’s robust and flavorful. Orange juice, brown sugar, honey, yellow mustard, Dijon mustard, Worcestershire sauce, and optional cayenne pepper come together to create a glaze that hits every note: sweet, tangy, spicy, and savory. You brush it on every 45 minutes during smoking, and each layer caramelizes on top of the last, building incredible depth.
This recipe is specifically designed for pellet smokers, which maintain that perfect 250°F temperature consistently. The steady heat ensures the glaze sets properly without burning, while the wood smoke (apple or cherry work great) adds a subtle background note that doesn’t compete with the bold glaze flavors.
Who This Recipe Is For
Perfect for anyone who loves honey mustard anything—if you’re the type who orders honey mustard chicken or dips everything in honey mustard sauce, this ham will be your new favorite. It’s also great for people who want their holiday ham to taste distinctly different from traditional versions. This isn’t your grandmother’s ham—it’s bold and modern.
The recipe also works beautifully if you’re planning to make ham sandwiches with leftovers. The honey mustard flavor is already built in, so your sandwiches basically make themselves. Layer the smoked ham on rolls with Swiss cheese, pickles, and you’re done.
Key Highlights
- Orange juice-based honey mustard glaze
- Optional cayenne for heat lovers
- Layers of glaze every 45 minutes
- Cooking time: 2.5-3 hours at 250°F
- Perfect for pellet grills
- Makes incredible sandwiches with leftovers
Pro Tips for Success
Make the glaze while the ham smokes during that first hour. This gives you time to get the consistency right. The glaze should coat the back of a spoon—if it’s too thin, simmer it longer to reduce and thicken. If it’s too thick, add a splash more orange juice.
Don’t skip the resting period after smoking. Let the ham rest for 15-20 minutes before carving. This allows the glaze to set and the juices to redistribute. If you carve immediately, all that glaze will run off onto your cutting board instead of staying on the ham.
Use a quality sweet heat BBQ rub as your base seasoning before applying the glaze. This creates another layer of flavor underneath the honey mustard. The rub should have brown sugar in it to help with caramelization.
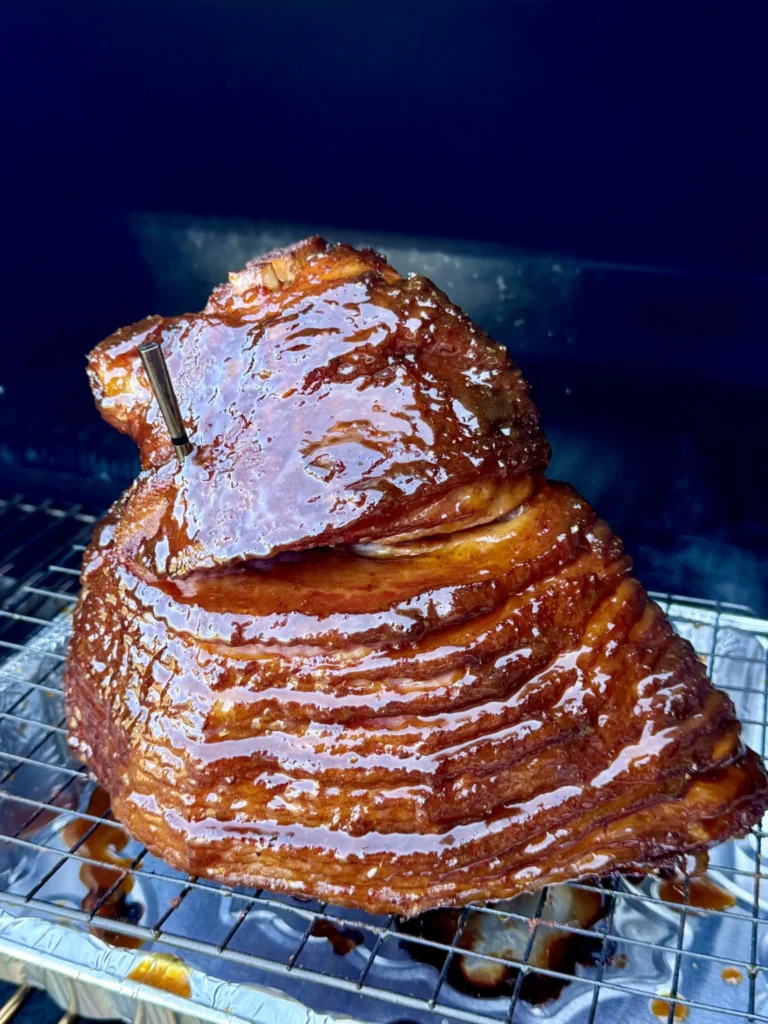
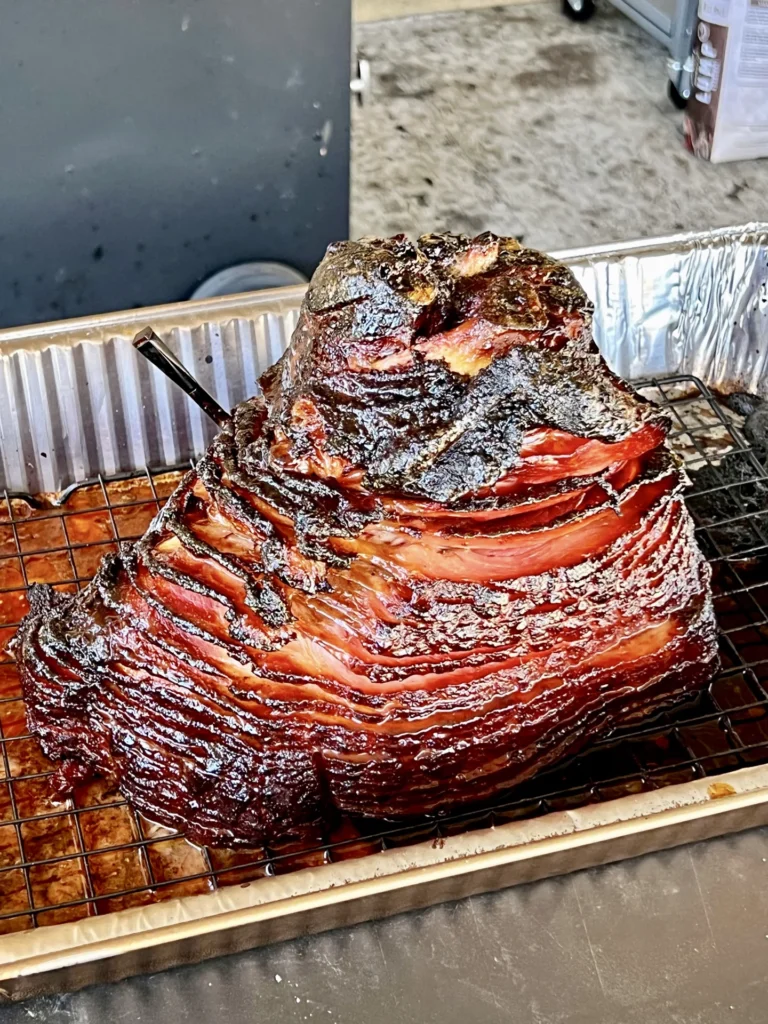
Recipe #2: Brown Sugar Honey Glazed Ham (Classic Sweet)
View Full Recipe: Brown Sugar Honey Glazed Ham
This is the recipe for people who love classic sweet glazed ham but want to take it up a notch with smoke flavor. The brown sugar and honey create a deeply caramelized, candy-like coating that glistens on the ham. It’s familiar enough for traditionalists but elevated enough to impress.
What Makes This Recipe Special
The glaze combines brown sugar, honey, Dijon mustard, apple cider vinegar, ground cloves, and cinnamon into something that tastes like liquid holiday magic. The spices add warmth and complexity without being overpowering. The apple cider vinegar cuts through the sweetness just enough to keep it balanced.
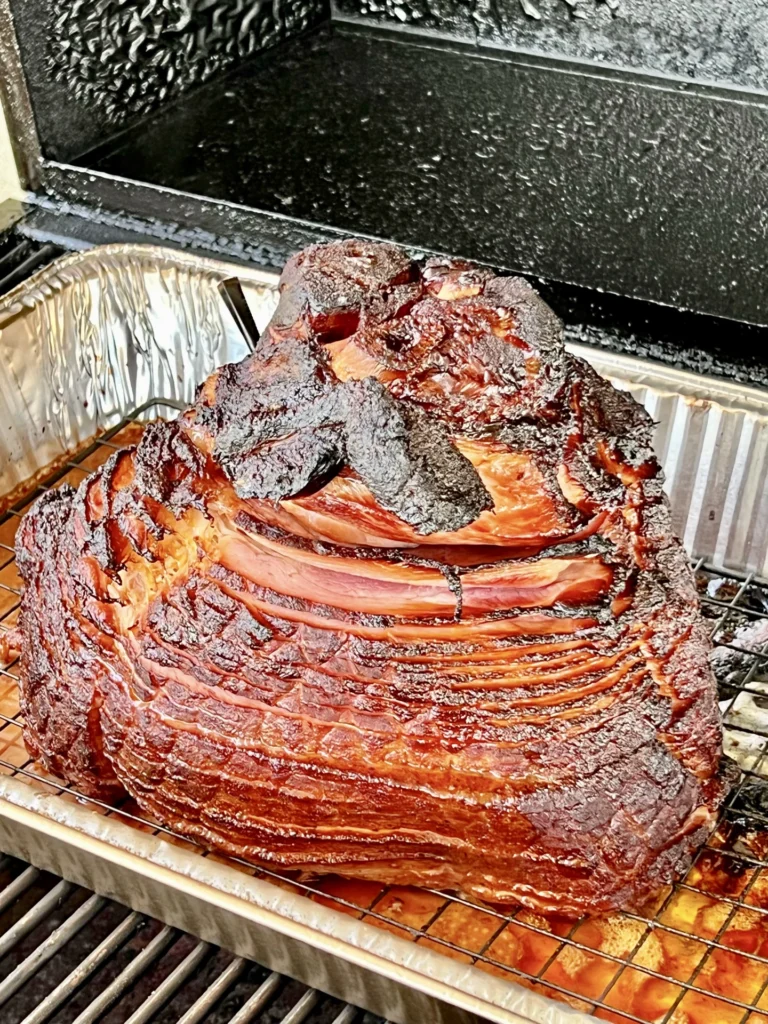
Here’s a unique twist—this recipe uses Sriracha as the binder before applying the dry rub. It adds a subtle underlying heat that most people can’t quite identify but makes the overall flavor more interesting. It’s not spicy-hot, just warm and complex. The ham also smokes on a wire rack set in an aluminum pan filled with Honeycrisp apple juice, which creates steam and adds another layer of apple flavor.
Who This Recipe Is For
This is your go-to if you want a crowd-pleasing ham that appeals to everyone from kids to grandparents. The flavors are familiar and comforting—sweet, slightly spiced, with that classic holiday ham character. It’s what people expect from holiday ham, just better.
It’s also ideal if you’re serving the ham as part of a traditional holiday spread with all the classic sides. The sweet glaze pairs perfectly with savory sides like green bean casserole, mashed potatoes, and dinner rolls. Everything works together harmoniously.
Key Highlights
- Classic brown sugar and honey glaze with warm spices
- Sriracha binder adds subtle complexity
- Apple juice in the pan creates moisture and flavor
- Cooking time: approximately 2-3 hours at 300°F
- Beautiful caramelized finish
- Universally loved flavor profile
Pro Tips for Success
Make sure to simmer the glaze for the full time specified—6 minutes at medium heat, then 15 more minutes at lower heat. This cooking time allows the flavors to meld together and the glaze to thicken properly. If you rush this step, the glaze will be thin and won’t coat the ham correctly.
Apply the glaze when the ham hits 130°F internal temperature, not before. If you glaze too early, the sugar can burn before the ham finishes cooking. Wait until the last 15-20 minutes to apply the glaze, and you’ll get perfect caramelization without any burnt spots.
Use applewood for smoking—its mild, sweet smoke complements the brown sugar and honey perfectly. Hickory or mesquite would be too strong and would overpower the delicate glaze flavors.
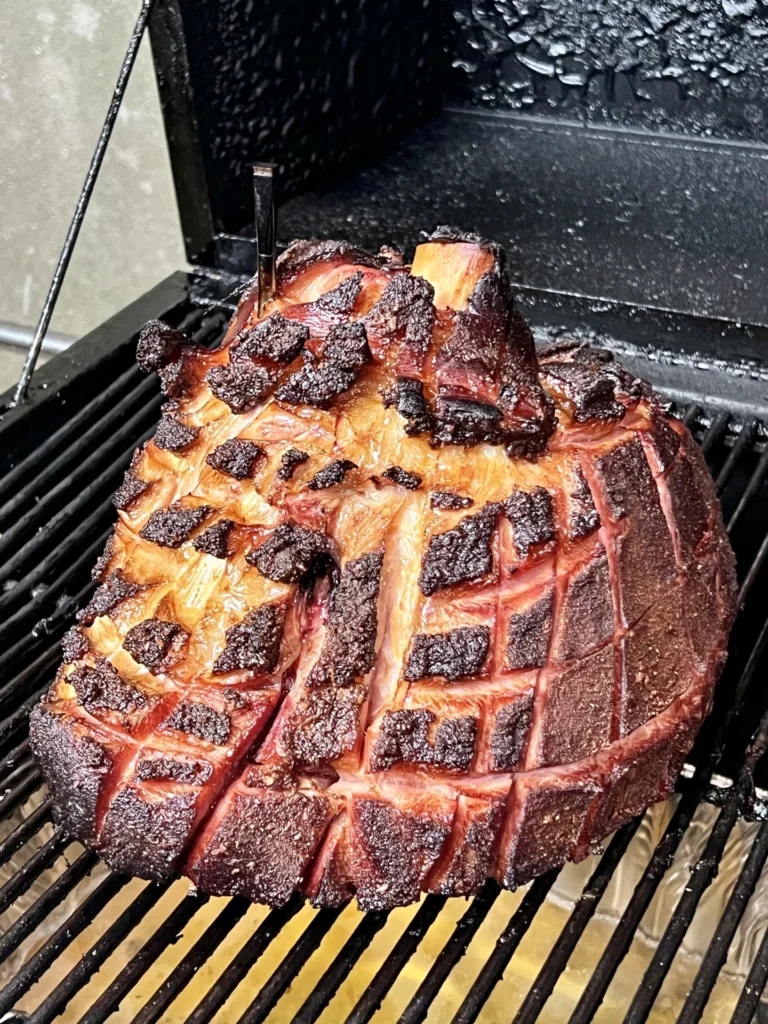
Recipe #3: Pineapple Bourbon Glazed Ham (Tropical & Bold)
View Full Recipe: Pineapple Bourbon Glazed Ham
If you want your ham to transport everyone to a tropical paradise while still delivering that sophisticated bourbon kick, this is your recipe. The combination of sweet pineapple and rich bourbon creates a glaze that’s both fun and refined. It’s a showstopper that generates conversation.
What Makes This Recipe Special Pineapple and ham is a classic pairing (hello, vintage cookbooks with pineapple rings), but this recipe modernizes it completely. Instead of just sticking pineapple slices on the ham, you’re creating a glaze with pineapple juice, brown sugar, bourbon, and spices that penetrates and caramelizes beautifully. The bourbon adds depth and a slight burn that keeps the sweetness from being cloying.
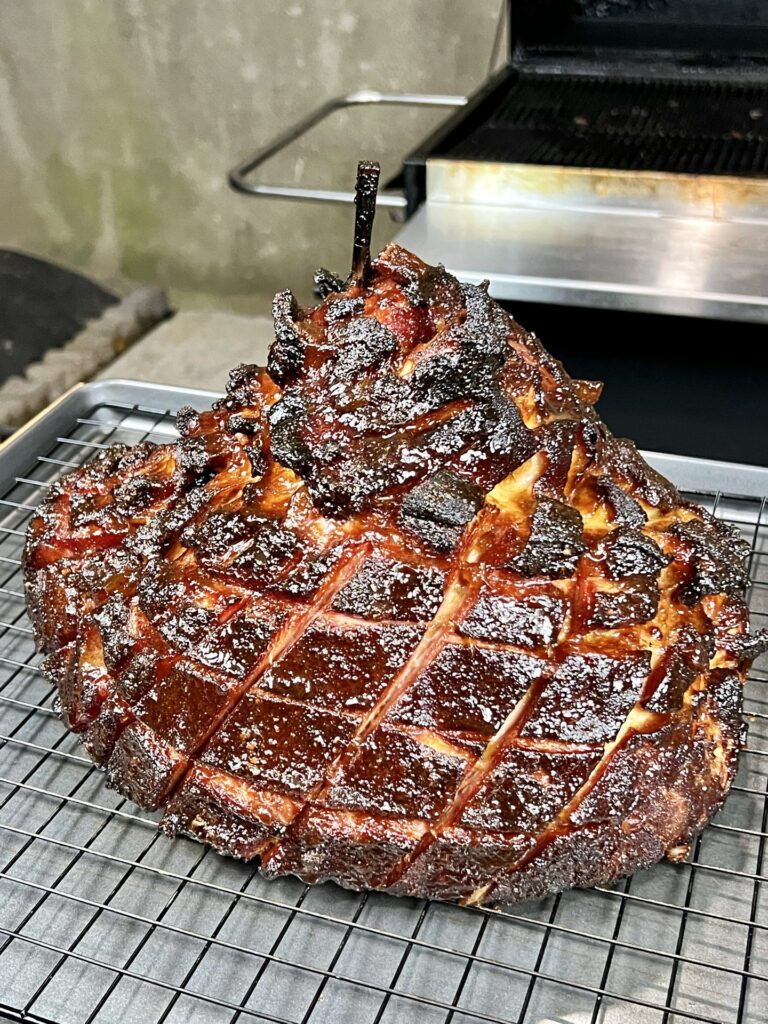
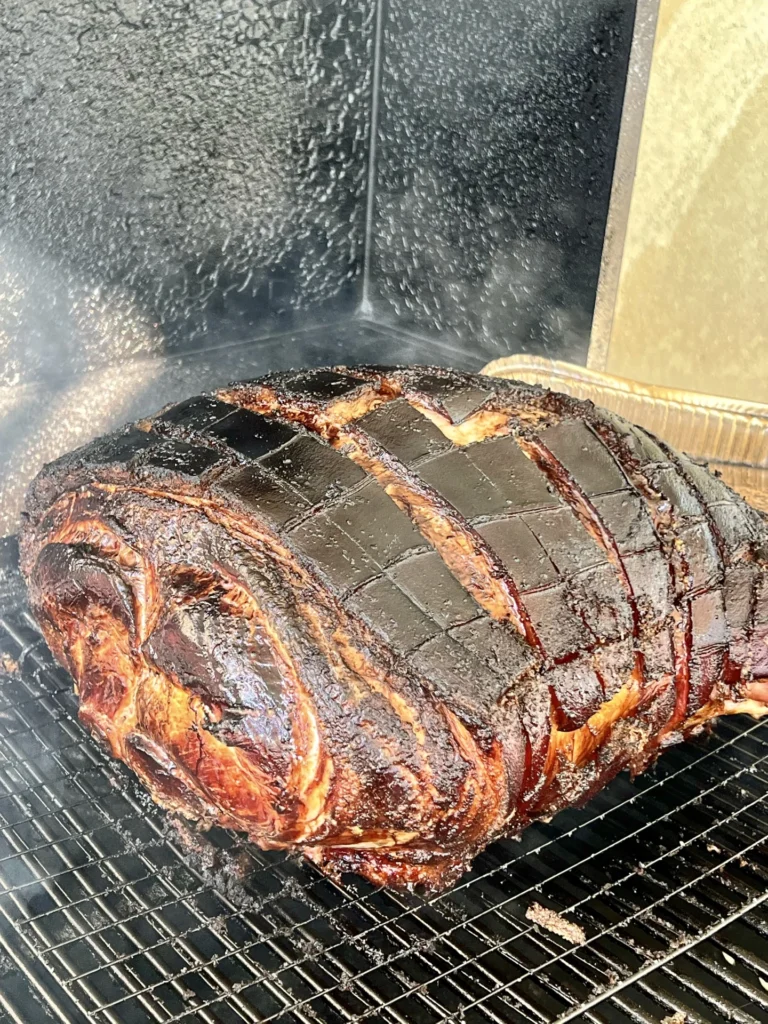
The ham is scored in a crosshatch or diamond pattern before glazing, which serves multiple purposes. The scoring creates more surface area for the glaze to penetrate, allows fat to render out more easily, and creates a stunning visual pattern when the glaze caramelizes. It’s functional and beautiful.
Who This Recipe Is For
Perfect for people who want to break from tradition and try something different. If you’re the type who gets bored with the same holiday menu every year, this pineapple bourbon ham will scratch that itch for something new. It’s also great for non-traditional holiday celebrations or casual gatherings where you want impressive food without stuffiness.
Bourbon lovers will especially appreciate this recipe. The bourbon flavor is noticeable but not overwhelming—it adds complexity and warmth rather than making the ham taste like you’re eating a cocktail.
Key Highlights
- Pineapple and bourbon glaze with brown sugar
- Crosshatch scoring for better penetration and presentation
- Mustard binder with pork seasoning base
- Cooking time: 2-3 hours at 300-325°F
- Unique flavor that stands out from traditional hams
- Works on pellet grills or smokers
Pro Tips for Success
Score the ham deeply enough to cut through the fat layer but not so deep that you’re cutting into the meat itself. About ¼ inch deep is perfect. The crosshatch pattern should create diamond shapes about 1-2 inches across.
Let the seasoned ham rest for 20-30 minutes before it goes on the smoker. This gives the mustard binder and pork seasoning time to start working on the meat. The flavors will be more pronounced in the finished ham.
Place a drip pan with 3 cups of water under the ham during smoking. This catches the rendered fat (preventing flare-ups) and creates humidity in the smoker, which helps keep the ham moist and allows the smoke to penetrate better.
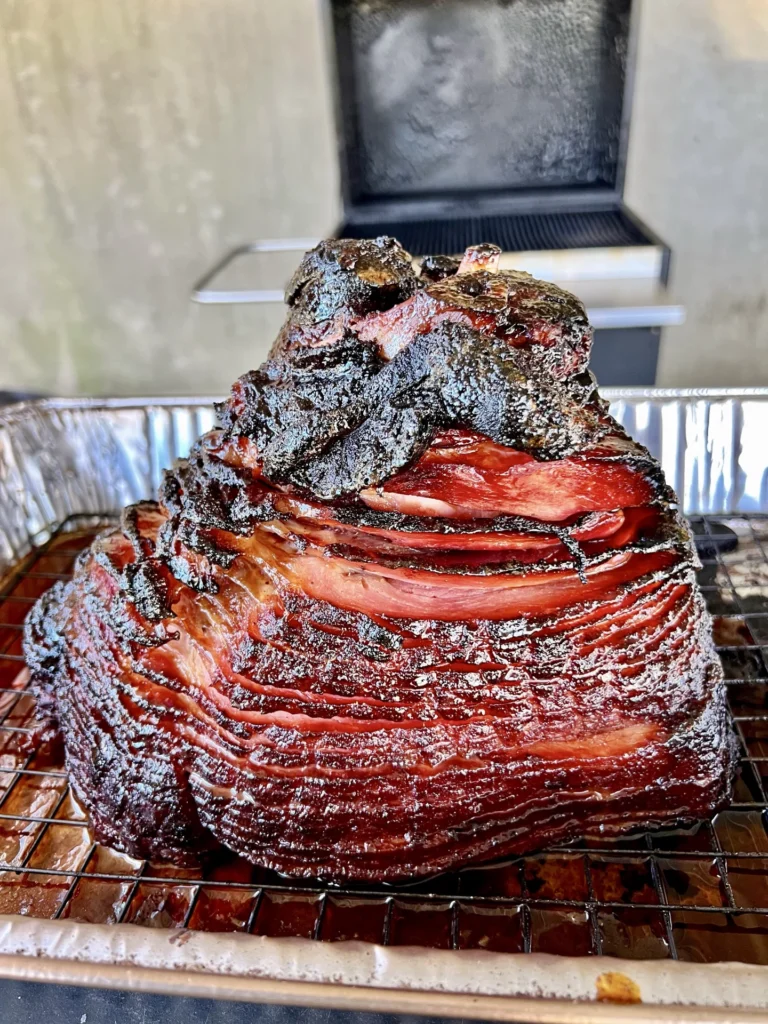
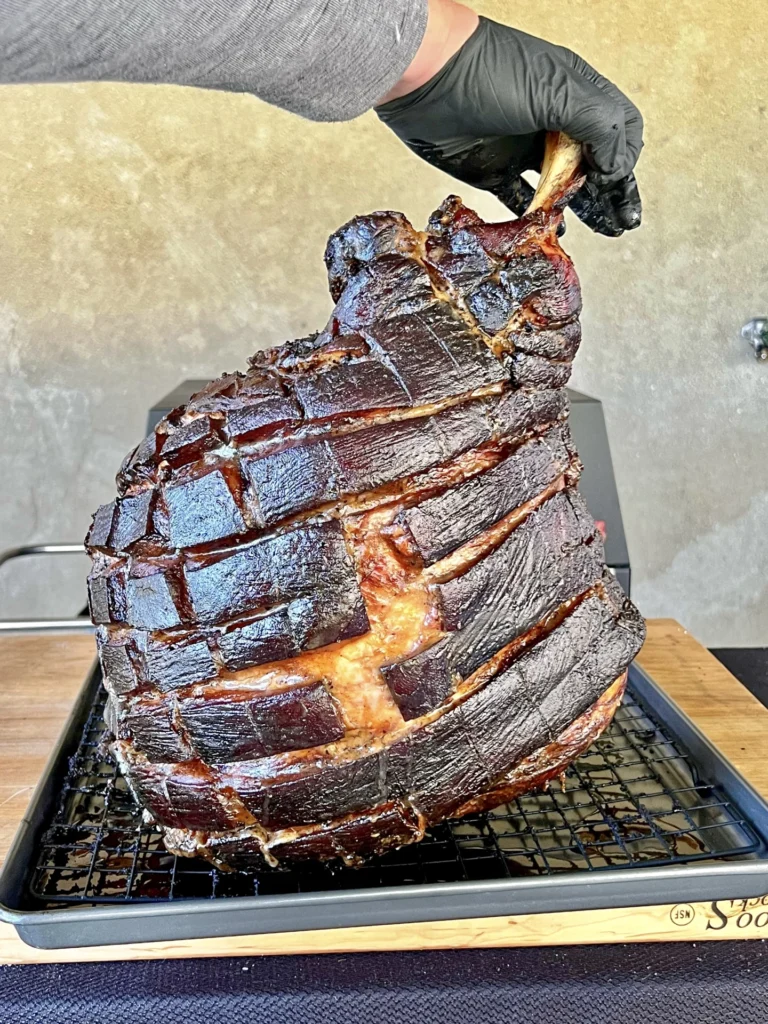
Recipe #4: Holiday Ham Recipe (Traditional Brined)
View Full Recipe: Holiday Ham Recipe
This is the most involved recipe in the collection, and it’s for serious ham enthusiasts who want to go all-in on flavor and tradition. You’re starting with a raw ham, creating a custom spice brine from scratch, brining for three days, salt-curing the skin, then smoking with apple wood. It’s a project, but the results are absolutely spectacular.
What Makes This Recipe Special
Everything about this recipe is done from scratch. You toast whole spices (cardamom, fennel, rosemary, peppercorns, bay leaves, cinnamon) in a cast iron skillet to release their oils, then simmer them with celery seed, salt, and sugar to create a complex brine. The ham soaks in this aromatic brine for three full days in a cooler with ice.
After brining, you score the skin, coat it with vinegar and salt, then let it cure in the fridge for 12-24 hours. This creates an incredible crust on the exterior. The final smoking with apple wood produces a ham with layers upon layers of flavor—the toasted spices from the brine, the cured exterior, and the subtle apple smoke all working together.
Who This Recipe Is For
This recipe is for people who love the process as much as the result. If you’re someone who gets excited about multi-day projects and traditional techniques, this will be incredibly satisfying. It’s also perfect for major holidays where you want to create something truly special that honors tradition.
This is your recipe if you’ve already made smoked ham several times and want to level up. It requires more time, attention, and technique than the other recipes, but it delivers the most complex and sophisticated flavors. Your family will remember this ham.
Key Highlights
- Completely from scratch with raw ham
- 3-day brine with toasted whole spices
- Salt-cured skin creates incredible crust
- Apple wood smoke for clean, subtle flavor
- Cooking time: varies by size, plan for 4-6 hours at 250°F
- Most traditional and complex flavor profile
Pro Tips for Success Keep the ham cold during the entire 3-day brining process. You need to add ice to the cooler daily to maintain proper temperature. If the brine gets too warm, bacteria can grow. Keep it sealed from air exposure and check the temperature regularly.
Don’t rush the toasting of the spices. Those 4-6 minutes in the cast iron skillet are crucial for developing flavor. You should smell the spices becoming aromatic. If you skip this step or undercook it, the brine won’t have the same depth.
After smoking, let the ham rest for at least 30 minutes before carving. This is even more important with a raw ham than with pre-cooked hams because the meat needs time to relax and retain its juices. Cutting too early will result in dry slices.
Choosing the Right Recipe for Your Occasion
With four distinct approaches, here’s how to decide which ham recipe fits your needs:
For Quick Holiday Prep (Least Time-Intensive): Choose Recipe #1 (Honey Mustard) or Recipe #2 (Brown Sugar Honey). Both use pre-cooked spiral hams and take 2-3 hours total. Perfect when you’re managing multiple dishes and need something reliable.
For Crowd-Pleasing Classic Flavors: Go with Recipe #2 (Brown Sugar Honey Glazed Ham). The sweet, spiced glaze is universally loved and pairs well with traditional holiday sides.
For Something Different and Memorable: Pick Recipe #3 (Pineapple Bourbon Glazed Ham). The tropical-meets-bourbon flavor profile stands out and generates conversation.
For Maximum Flavor and Traditional Technique: Select Recipe #4 (Holiday Ham Recipe). If you have 5 days total (3 days brining, 1 day curing, 1 day smoking), this delivers the most complex and rewarding results.
For Sandwich-Focused Leftovers: Choose Recipe #1 (Honey Mustard Smoked Ham). The flavor profile is perfect for sandwiches and the recipe even includes sandwich suggestions.
Essential Equipment for Smoking Ham
Regardless of which recipe you choose, you’ll need:
Smoker or Pellet Grill Any smoker works—pellet grill, offset smoker, charcoal smoker, or electric smoker. Pellet grills are easiest because they maintain consistent temperature. Recipes #1 and #3 are specifically designed for pellet grills but work on any smoker. Recipe #4 is more traditional and works beautifully on charcoal or offset smokers.
Reliable Meat Thermometer Essential for knowing when your ham is done. Pre-cooked hams need to reach 140°F, raw hams need 145°F. An instant-read thermometer is fine, but a wireless probe thermometer lets you monitor without opening the smoker.
Basting Brush You’ll be applying glaze multiple times during smoking. A silicone basting brush is ideal because it’s heat-resistant and easy to clean. Have at least one, preferably two so you can rotate while one is being cleaned.
Aluminum Pan and Wire Rack Several recipes call for smoking the ham on a wire rack set in an aluminum pan. This setup catches drippings, prevents flare-ups, and in some recipes, holds liquid (apple juice, water) that creates steam and adds moisture.
Large Cooler (for Recipe #4 only) If you’re making the traditional brined ham, you’ll need a large cooler to hold the ham and brine for three days. Make sure it’s food-safe and can maintain cold temperatures with ice.
Wood Selection Guide
The wood you use affects the final flavor:
Apple Wood Mild, slightly sweet smoke that works beautifully with all four recipes. It’s the most versatile option for ham because it enhances without overpowering. Particularly good for Recipe #2 (Brown Sugar Honey) and Recipe #4 (Holiday Ham).
Cherry Wood Similar to apple but with a slightly richer, more complex sweetness. Great for Recipe #1 (Honey Mustard) and Recipe #3 (Pineapple Bourbon) where you want the smoke to add depth without competing with bold glazes.
Pecan Wood Nutty and slightly stronger than apple or cherry. Works well for Recipe #4 (Holiday Ham) if you want more pronounced smoke flavor with that traditional brined ham.
Hickory Wood Strong, bacon-like smoke. Generally too heavy for most hams—it can overpower the glaze and make everything taste like barbecue. Only use hickory if you really love aggressive smoke flavor and are okay with it dominating.
Avoid Mesquite Too strong and can make ham taste bitter. Mesquite is best saved for beef, not pork.
Common Ham Smoking Mistakes to Avoid
Even with detailed recipes, watch out for these pitfalls:
Applying Glaze Too Early If you glaze too early in the smoking process, the sugar will burn before the ham finishes heating through. Most recipes specify when to start glazing (usually after the first hour or when the ham reaches a certain internal temp). Follow these guidelines precisely.
Not Scoring Pre-Glazed Hams The skin on ham can be tough and fatty. Scoring it (cutting a crosshatch pattern into the surface) allows glaze to penetrate, fat to render out, and creates a more tender exterior. Don’t skip this step.
Using Too High Temperature Ham should be smoked at 250-325°F depending on the recipe. Higher temps will dry it out and cause glazes to burn. Lower temps take forever and can make the exterior rubbery. Stay in the recommended range for each recipe.
Forgetting to Pat the Ham Dry Moisture on the surface prevents rubs and glazes from adhering properly. After removing the ham from packaging (or brine), pat it completely dry with paper towels before proceeding.
Not Using a Drip Pan Ham releases a lot of fat as it smokes. Without a drip pan, this fat drips onto hot coals or heating elements and causes flare-ups, smoke issues, and potential fires. Always use a drip pan underneath the ham.
Skipping the Rest Period After smoking, let the ham rest for 15-30 minutes before carving. This allows the glaze to set and juices to redistribute. Cutting immediately results in messy slicing and the glaze running off.
Glazing Techniques That Make a Difference
Getting the glaze right separates good ham from great ham:
Layer It Gradually Don’t apply all your glaze at once. Most recipes call for multiple applications every 30-45 minutes. Each thin layer caramelizes before you add the next, building incredible depth. One thick coat just runs off or burns.
Brush, Don’t Pour Use a basting brush to apply glaze evenly rather than pouring it over the ham. Brushing gives you control and ensures even coverage. Pour the glaze into a bowl first so you’re not contaminating your entire batch by dipping the brush directly into the saucepan.
Save Some Glaze for Serving Set aside ¼ to ½ cup of glaze before you start basting. This reserved glaze stays clean and can be served alongside the ham for people who want extra. The glaze you’ve been brushing on the ham has been exposed to raw/partially cooked ham and shouldn’t be used as a serving sauce.
Let It Caramelize The glaze needs time between applications to caramelize and set. If you’re applying it too frequently, each layer just washes away the previous one. Stick to the timing specified in each recipe—usually 30-45 minute intervals.
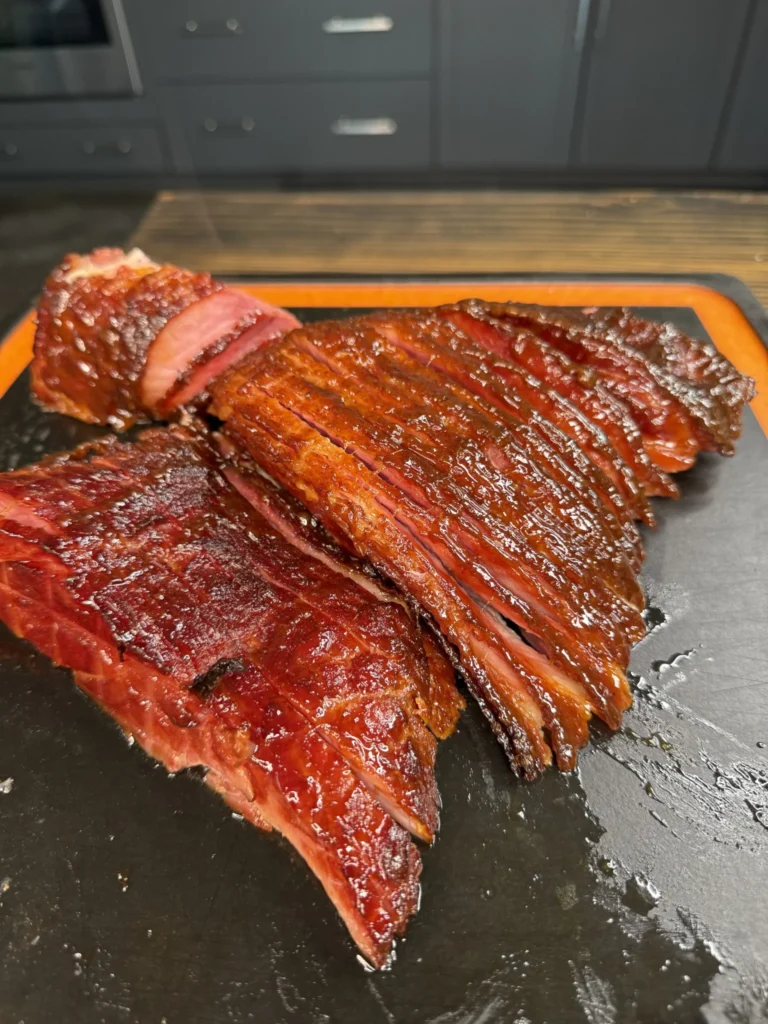
Carving and Serving Your Smoked Ham
After all that work, you want to present it properly:
Let It Rest First This bears repeating because it’s so important. Rest for 15-30 minutes after removing from the smoker. The ham should still be hot when you serve it, but it needs this resting time for the juices to stabilize.
Spiral Ham Carving If you used a pre-sliced spiral ham, you can simply pull the slices apart after it’s smoked and glazed. Run a knife along the bone at the bottom to release the slices, then separate them with tongs or a fork. It’s the easiest carving job you’ll ever have.
Whole Ham Carving For non-spiral hams, start by cutting around the bone to separate the meat. Then slice perpendicular to the bone in ¼ to ½-inch thick slices. Work your way around the ham, creating even slices. A sharp carving knife makes this much easier.
Save the Bone Don’t throw away that ham bone! It’s liquid gold for making ham and bean soup, split pea soup, or adding flavor to greens. Wrap it well and freeze it for up to 3 months. One ham bone makes multiple pots of soup.
Presentation Matters Arrange the sliced ham on a large platter with the prettiest, most glazed slices on top. Garnish with fresh herbs (rosemary or thyme) and orange or pineapple slices depending on which recipe you used. Drizzle any accumulated juices over the top.
Storing and Using Leftover Ham
Ham leftovers are a gift that keeps giving:
Storage Wrap leftover ham tightly in plastic wrap or aluminum foil, or store in airtight containers. Properly stored ham lasts 5-7 days in the refrigerator. For longer storage, freeze in portion-sized packages for up to 3 months.
Reheating The best way to reheat ham without drying it out is low and slow in the oven. Place slices in a baking dish, add a splash of water or apple juice, cover with foil, and heat at 275°F until warmed through. Microwave works in a pinch but can make the ham rubbery.
Leftover Ideas
- Ham and cheese omelets or frittatas
- Ham sandwiches (hot or cold)
- Ham fried rice
- Split pea soup with the ham bone
- Ham and bean soup
- Chopped ham in mac and cheese
- Ham and cheese quiche
- Ham salad
- Breakfast hash with potatoes and ham
- Ham and gruyere croissants
Frequently Asked Questions
Can I use a boneless ham for these recipes? Yes, all four recipes work with boneless ham, though bone-in has better flavor. Boneless hams may cook slightly faster, so start checking internal temperature 30 minutes earlier than the recipe suggests.
Do I need to soak a pre-cooked ham before smoking? No, pre-cooked spiral hams don’t need soaking. You’re just heating them through and adding glaze. Only the raw ham in Recipe #4 requires brining.
What if my ham is already glazed when I buy it? Rinse off the pre-applied glaze under cold water and pat the ham dry. Then proceed with your chosen recipe. Store-bought glazes are usually not great quality anyway—your homemade glaze will be much better.
Can I smoke a ham in advance and reheat it? Yes, though it’s best fresh. If you must cook ahead, smoke the ham completely, let it cool, then refrigerate. Reheat in a 275°F oven covered with foil. The texture won’t be quite as good as fresh, but it still works.
How do I know when the ham is done? Pre-cooked hams need to reach 140°F internal temperature. Raw hams need 145°F. Always use a meat thermometer—don’t rely on time estimates.
Can these recipes be baked in the oven instead of smoked? Yes, but you’ll lose the smoke flavor that makes these recipes special. If you must use an oven, follow the same temperature and glazing instructions. The ham will be good but not as complex.
What’s the best ham to buy for smoking? For Recipes #1, #2, and #3, buy a quality bone-in spiral-cut ham from a butcher or specialty market rather than a basic grocery store ham. For Recipe #4, ask your butcher for a raw, uncured ham—you may need to special order this.
Why did my glaze burn? Either the smoker temperature was too high, you applied the glaze too early, or you didn’t apply it in thin enough layers. Make sure to stay within the temperature range specified and follow the timing for glaze application.
Conclusion: Your Perfect Smoked Ham Awaits
Whether you’re drawn to the tangy boldness of Recipe #1’s honey mustard glaze, the classic sweetness of Recipe #2’s brown sugar honey, the tropical sophistication of Recipe #3’s pineapple bourbon, or the traditional complexity of Recipe #4’s brined and cured ham—you now have four proven methods for smoking spectacular ham.
Each recipe represents a different philosophy and flavor profile, but they all share the same foundation: quality ingredients, proper technique, and the transformative power of smoke. Choose the recipe that matches your time commitment, flavor preferences, and occasion, then follow the detailed instructions in the full recipe posts.
The beauty of having multiple recipes is that you can explore different approaches over time. Maybe you start with the straightforward honey mustard ham for Easter, try the brown sugar version for Christmas, experiment with pineapple bourbon for a summer celebration, and tackle the traditional brined ham for a major milestone holiday.
Smoked ham brings people together. It anchors holiday tables, feeds celebrations, and creates memories. When you pull a beautifully glazed, aromatic ham off your smoker, you’re not just serving dinner—you’re creating an experience that your family and friends will remember and request year after year.
So fire up your smoker, choose your recipe, select your wood, and get ready to create something spectacular. These recipes have been tested and perfected to deliver outstanding results every single time. All you need to do is follow the instructions, trust the process, and enjoy the praise you’re about to receive.
Ready to get started? Click through to the full recipe posts:
- Honey Mustard Smoked Ham
- Brown Sugar Honey Glazed Ham
- Pineapple Bourbon Glazed Ham
- Holiday Ham Recipe
Happy smoking, and enjoy every delicious, juicy bite of your perfect smoked ham!
If you’re looking for more recipes , click the link! Check out all of our grilling recipes here for more steak, seafood, and BBQ favorites that are perfect for your next cookout.
COMMON ITEMS USED IN THESE RECIPES
Hasty Bake Charcoal Grill and Smoker
Knitted Gloves
Food Processor
Cast Iron Skillet
Meater +
Upgrade Your Meat Game with Grill Nation x Linz Heritage Angus
If you really want to take your grilling and cooking to the next level, you need to check out our collaboration with Linz Heritage Angus. We’ve partnered with them to bring you some of the best beef you can get your hands on.
Linz Heritage Angus isn’t your typical grocery store meat. These guys are the real deal – they raise their cattle the right way, and you can taste the difference in every bite. We’re talking about beef that’s been dry-aged to perfection, with marbling that makes your mouth water just looking at it.
Check out these premium cuts that’ll change how you think about beef:
Premium Ribeye Steaks – Perfect for special occasions
Dry-Aged Beef Selection – Take your grilling to the next level
Ground Beef & Burger Blends – The foundation of great BBQ