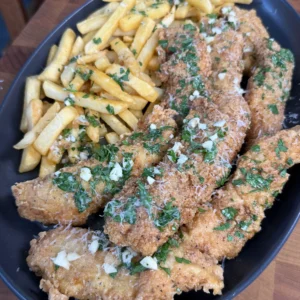
Garlic Parmesan Chicken Tenders
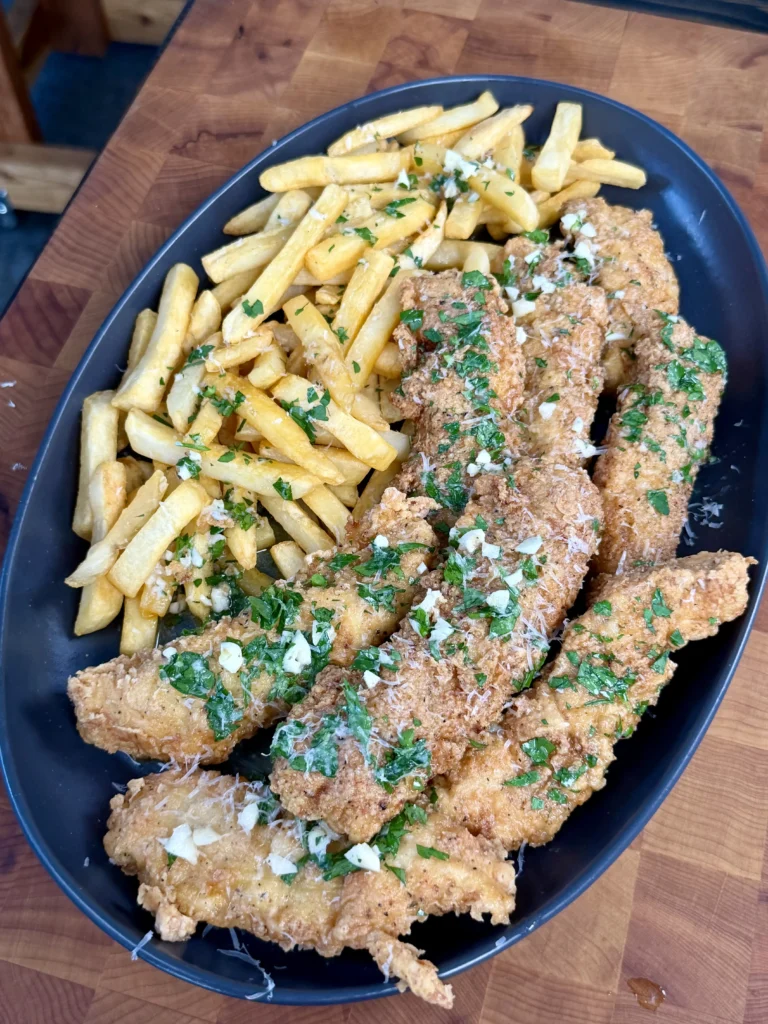
Crispy garlic Parmesan chicken tenders are breaded chicken breast strips coated in panko breadcrumbs and fried until golden brown. You season the chicken with salt, garlic powder, and black pepper. Then you dredge each strip through seasoned flour, beaten eggs, and panko breadcrumbs in that order. The chicken fries in 350°F oil for 6 to 8 minutes until crispy and cooked through. After frying, you toss the hot tenders in melted garlic Parmesan butter made with fresh garlic, parsley, and grated Parmesan. The result is restaurant-quality chicken with crunchy exterior and juicy interior, coated in rich garlic butter.
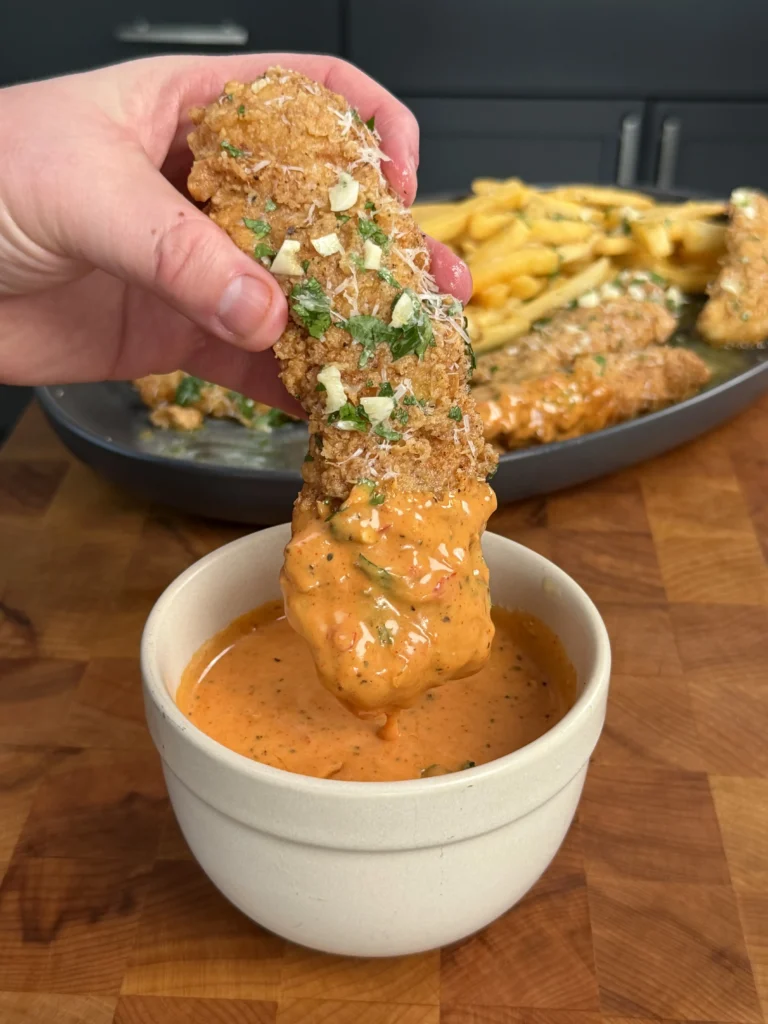
The whole process takes about 30 minutes from start to finish. The three-step breading creates ultra-crispy coating that stays crunchy even after tossing in butter. The garlic Parmesan butter adds intense flavor without making the breading soggy. These panko chicken tenders serve 4 people and work perfectly as an appetizer, main dish, or game day snack. Serve them with the spicy mayo-based dipping sauce for extra flavor.
Why Using Panko Creates Crispier Chicken Than Regular Breadcrumbs
Panko breadcrumbs produce significantly crispier coating than standard breadcrumbs. Panko consists of flaky, irregularly shaped crumbs made from crustless white bread. Regular breadcrumbs are finely ground and uniform. The larger, flakier panko pieces create more surface area and air pockets when they fry.
These air pockets allow oil to penetrate and create multiple layers of crunch. Regular breadcrumbs pack densely and form a single compact layer. They absorb less oil and don’t develop the same textural contrast. Panko stays lighter and more delicate even after frying.
The irregular shape of panko also helps it adhere to chicken better. The flakes interlock and create a shaggy coating that doesn’t fall off during frying. Fine breadcrumbs can slide off or form bald spots. Panko grips the egg wash and builds substantial armor around each tender.
Japanese panko specifically works best for this recipe. It’s lighter and airier than Italian-style breadcrumbs. You can find it in most grocery stores in the Asian or baking aisle. Plain panko is ideal. Seasoned panko contains salt and herbs that might compete with your garlic Parmesan butter.
For maximum crispiness, use fresh panko. Stale panko that’s been open for months loses its structure. It compacts and behaves more like regular breadcrumbs. Fresh panko from a newly opened bag provides the lightest, crunchiest results.
How the Three-Step Breading Process Works
The flour-egg-panko breading sequence is essential for crispy chicken tenders. Each layer serves a specific purpose. Skipping steps or changing the order produces inferior results. Understanding why each layer matters helps you execute the technique properly.
Seasoned flour goes first. The dry flour coating absorbs surface moisture from the chicken. Wet chicken won’t hold breading. The flour creates a dry foundation that the egg can grip. Season the flour with salt, garlic powder, and black pepper so every layer has flavor.
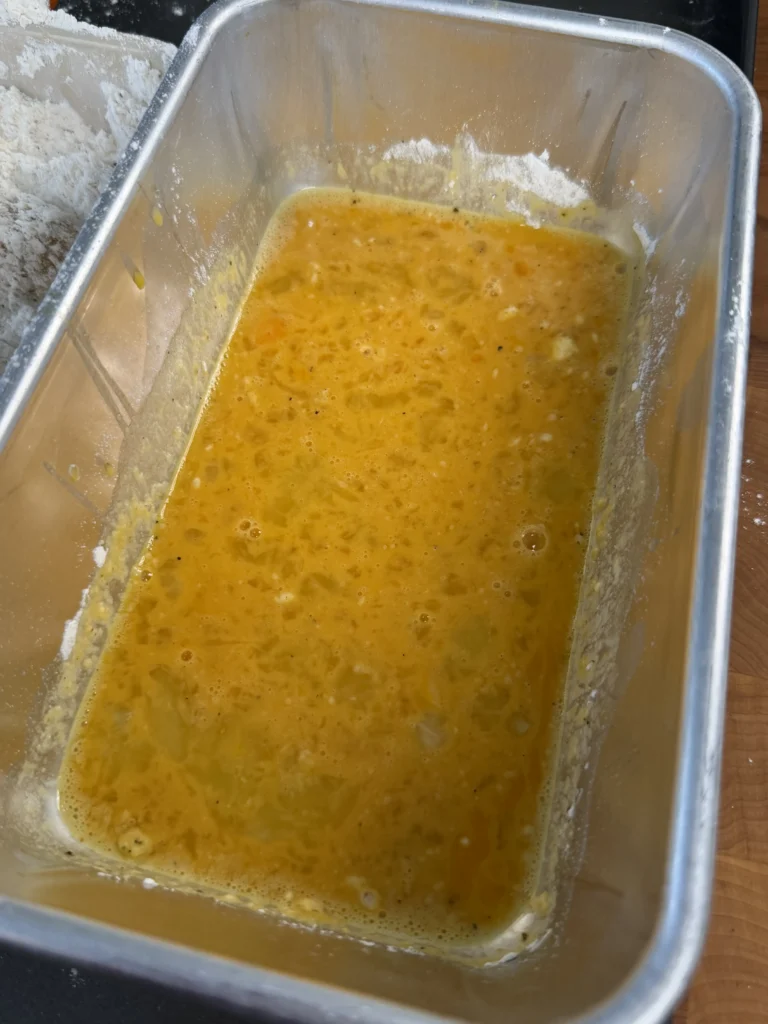
Beaten eggs come second. The egg wash acts as glue between the flour and panko. Egg proteins coagulate when they hit hot oil. This creates a binding layer that locks the panko in place. Without egg, the panko falls off during frying. The egg also adds richness and helps brown the coating.
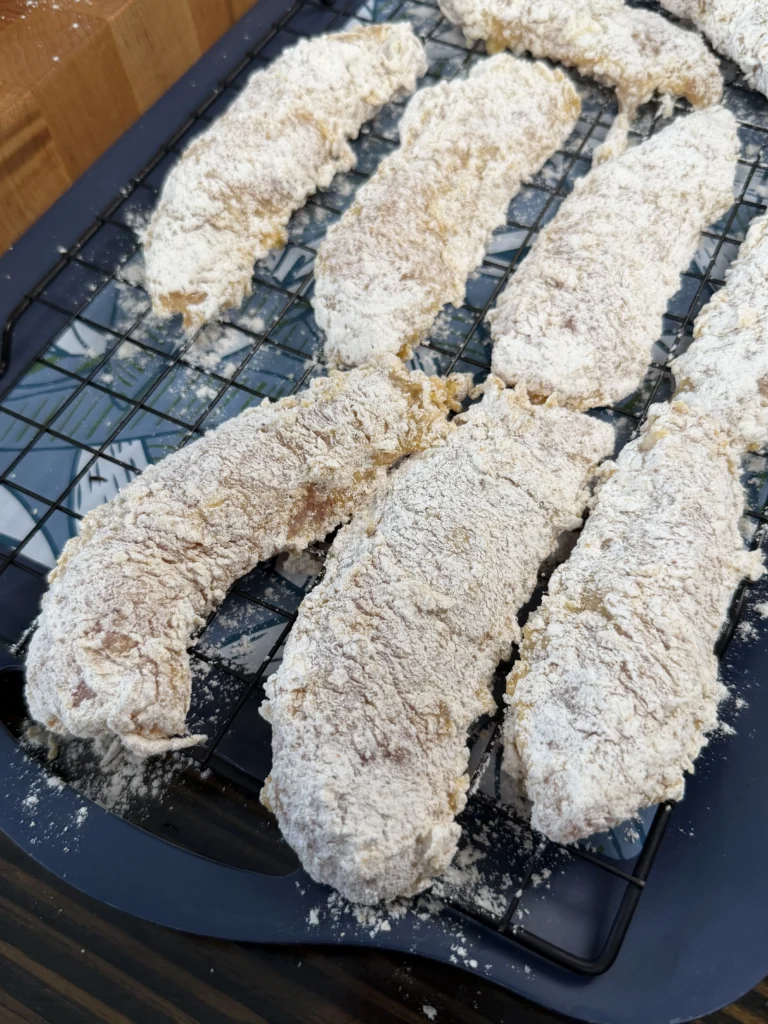
Panko breadcrumbs finish the sequence. They press into the egg-coated chicken and create the outer armor. The egg holds them in place while they fry. As the chicken cooks, the egg sets and the panko crisps. This creates the golden, crunchy shell that makes fried chicken irresistible.
Press the panko firmly onto each tender. Don’t just drop the chicken in the breadcrumbs. Use your hands to pack the panko onto all surfaces. This ensures complete coverage with no bare spots. Bare spots turn rubbery instead of crispy.
Let breaded chicken rest for 5 to 10 minutes before frying. This allows the coating to set and adhere better. The flour absorbs more moisture from the chicken. The egg wash becomes tackier. The panko bonds more firmly. This resting period significantly reduces breading loss during frying.
What Oil Temperature Produces Golden Brown Chicken?

Fry garlic Parmesan chicken at 350°F for perfect golden brown color and crispy texture. This temperature is hot enough to crisp the panko quickly without burning it. Lower temperatures around 325°F make greasy chicken. Higher temperatures above 375°F burn the coating before the chicken cooks through.
At 350°F, the panko browns in 6 to 8 minutes. The chicken reaches 165°F internally in the same timeframe. This synchronization is critical. If the coating browns before the meat cooks, you end up with burnt breading and raw interior. If the meat cooks before the coating browns, you get pale, soggy breading.
Use a deep-fry or candy thermometer to monitor oil temperature. Don’t guess. Oil that looks hot might only be 275°F. Visual cues are unreliable. Insert the thermometer probe into the oil between batches. Adjust the heat as needed to maintain 350°F.
Use neutral oil with high smoke point. Vegetable, canola, or peanut oil all work well. They can handle 350°F without smoking or breaking down. Olive oil smokes at lower temperatures. It also adds flavor that competes with the garlic Parmesan butter.
Fill your pot or deep fryer with at least 2 inches of oil. The chicken needs to be mostly submerged. Shallow oil requires flipping and creates uneven browning. Deep oil surrounds the chicken and cooks it uniformly. Use a heavy pot or Dutch oven. Thin pots don’t hold temperature well.
How to Make Restaurant-Style Spicy Dipping Sauce
The spicy mayo sauce elevates these chicken tenders from good to exceptional. The base is mayonnaise which provides creamy richness. Ketchup adds sweetness and color. Chili sauce brings heat. Dijon mustard contributes tang. The combination creates complex flavor that complements crispy chicken perfectly.
Start with half a cup of mayonnaise. Use real mayonnaise, not Miracle Whip. Miracle Whip is sweeter and thinner. It doesn’t have the same richness. Duke’s or Hellmann’s work great. Japanese Kewpie mayo is even better if you have it. The umami depth elevates the sauce.
Add 2 tablespoons of ketchup. This provides sweetness and tomato flavor. It also gives the sauce a light pink color. Too much ketchup makes it taste like thousand island dressing. Two tablespoons is the right balance.
Chili sauce adds the heat. Start with 1 tablespoon. Taste and add more if you want it spicier. Sriracha works perfectly. Frank’s RedHot, Cholula, or your favorite hot sauce also work. Different chili sauces create different flavor profiles. Sriracha is garlicky. Frank’s is vinegary. Choose based on preference.
Half a tablespoon of Dijon mustard adds tang without overpowering. Yellow mustard is too sharp. Dijon is smooth and sophisticated. It also helps emulsify the sauce so it stays creamy.
Season with salt, smoked paprika, garlic powder, and black pepper. The smoked paprika adds depth without heat. It reinforces the savory notes. Garlic powder ties into the garlic Parmesan on the chicken. Black pepper adds subtle spice.
Whisk everything together until smooth. Taste and adjust. Need more heat? Add chili sauce. Too spicy? Add more mayo. Too bland? Add salt or garlic powder. The sauce should taste bold. It’s competing with intensely flavored chicken.
Garlic Parmesan Chicken Tenders
Crispy Panko Coating with Garlic Butter Sauce
Ingredients
The Chicken
- 2 lbs chicken breast, cut into strips
- Salt to taste
- 1 tablespoon garlic powder
- 1 teaspoon black pepper powder
- Oil for frying
Dry Batter
- 2 cups all-purpose flour
- Salt to taste
- 1 tablespoon garlic powder
- 1 teaspoon black pepper
The Egg Mixture
- 3 eggs, beaten
Breadcrumb Coating
- 2 cups panko breadcrumbs
Garlic Parmesan Butter
- ½ cup butter
- 4-5 cloves fresh garlic, finely chopped
- 2 tablespoons freshly chopped parsley
- 1 cup Parmesan cheese, freshly grated
The Sauce
- ½ cup mayonnaise
- 2 tablespoons ketchup
- 1-2 tablespoons chili sauce (adjust to taste)
- ½ tablespoon Dijon mustard
- Salt to taste
- 1 teaspoon smoked paprika powder
- 1 tablespoon garlic powder
- 1 teaspoon black pepper powder
Keep one hand dry and one hand wet during breading. Use your dry hand for flour and panko, wet hand for eggs. This prevents clumping and keeps the breading process clean and efficient.
Step-by-Step Instructions
Step 1: Season and Prep the Chicken
Cut 2 pounds of chicken breast into strips about 1 inch wide and 4 inches long. Try to make them uniform size so they cook evenly. Place the strips in a large bowl.
Season the chicken with salt to taste, 1 tablespoon of garlic powder, and 1 teaspoon of black pepper powder. Toss with your hands until every strip is coated. Let it sit while you set up the breading station. This allows the seasonings to penetrate the meat.
Step 2: Set Up the Breading Station
Prepare three shallow dishes or pie plates for your breading station. Arrange them in a line from left to right.
First dish – Seasoned Flour: Combine 2 cups of all-purpose flour with salt to taste, 1 tablespoon of garlic powder, and 1 teaspoon of black pepper. Whisk together until evenly mixed.
Second dish – Egg Wash: Crack 3 eggs into the dish. Beat them with a fork until the whites and yolks are completely combined. The mixture should be uniform yellow with no streaks.
Third dish – Panko: Pour 2 cups of panko breadcrumbs into the dish. Leave them plain for now. Don’t add any seasonings to the panko.
Place a clean plate or wire rack at the end of the line for finished breaded chicken.
Step 3: Bread the Chicken Tenders
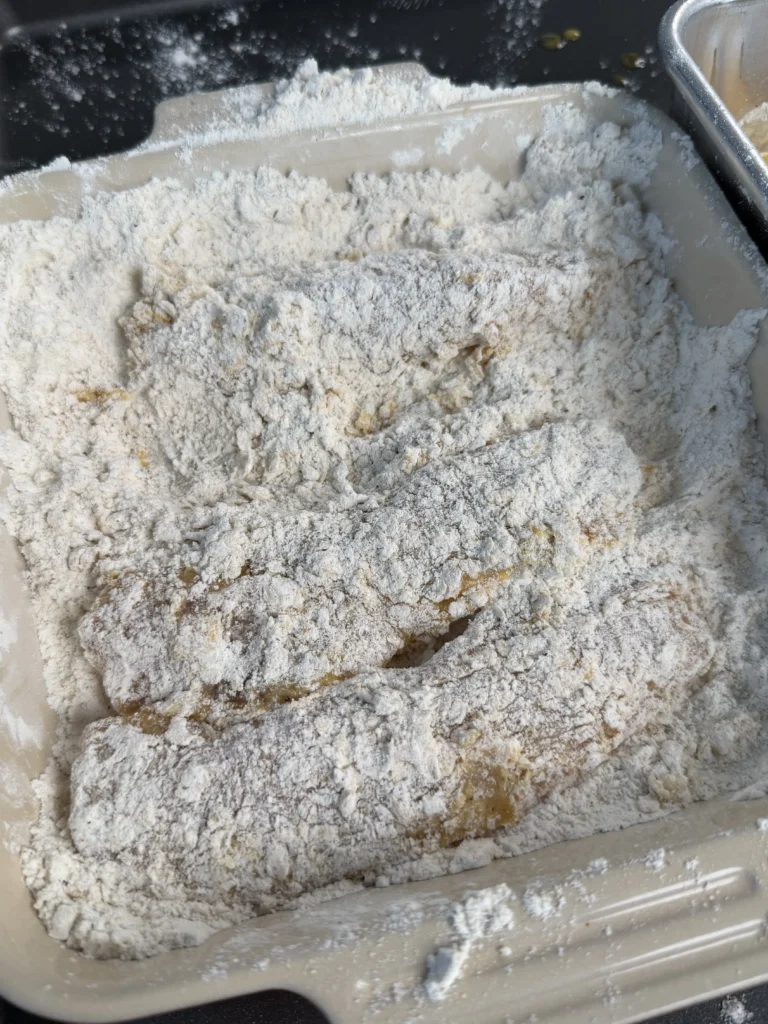
Take one seasoned chicken strip. Dredge it through the flour, coating all sides. Shake off excess flour. Too much flour creates thick, pasty coating.
Dip the floured chicken into the beaten eggs. Turn it to coat completely. Let excess egg drip off. Too much egg makes the breading slide off.
Press the chicken into the panko breadcrumbs. Use your hands to pack panko onto all surfaces. Make sure there are no bare spots. The panko should completely cover the chicken. Place the breaded tender on the clean plate.
Repeat with remaining chicken strips. Use one hand for dry ingredients (flour and panko) and the other hand for wet (egg). This prevents your fingers from getting clumped with breading.
Let the breaded chicken rest for 5 to 10 minutes before frying. This allows the coating to set and adhere better.
Step 4: Heat the Frying Oil
Pour oil into a large, heavy pot or Dutch oven to a depth of 2 to 3 inches. Use vegetable, canola, or peanut oil. Attach a deep-fry thermometer to the side of the pot. The probe should be submerged in oil but not touching the bottom.
Heat the oil over medium-high heat. Monitor the temperature as it climbs. You want it to reach exactly 350°F. This takes 8 to 12 minutes depending on your stove.
When the oil reaches 350°F, reduce the heat slightly. You want to maintain this temperature throughout frying. Don’t let it get hotter or the coating will burn.
Step 5: Fry the Chicken Tenders
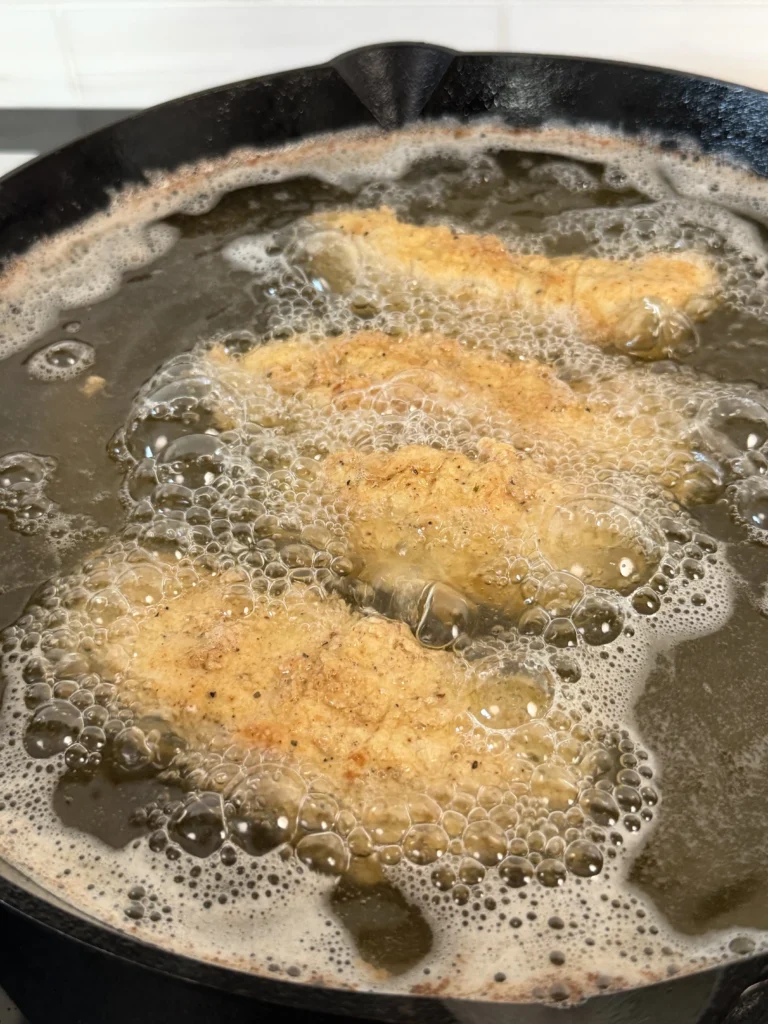
Carefully lower 3 to 4 breaded chicken tenders into the hot oil using tongs or a slotted spoon. Don’t drop them or they’ll splash. Don’t overcrowd the pot. Too many pieces drop the oil temperature dramatically.
Fry for 6 to 8 minutes, turning once halfway through. The chicken should be deep golden brown and crispy. The internal temperature should reach 165°F. Use an instant-read thermometer to check if you’re unsure.
Remove the fried tenders with a slotted spoon or spider. Let excess oil drip off. Place them on a paper towel-lined plate to drain briefly. Don’t let them sit too long or they get soggy. Move to the next step quickly.
Wait for the oil to return to 350°F before frying the next batch. This takes 1 to 2 minutes. Check the thermometer. Frying at the wrong temperature produces poor results.
Step 6: Make the Garlic Parmesan Butter
While the chicken fries, make the garlic Parmesan butter. Melt half a cup of butter in a small saucepan over low heat. Add 4 to 5 cloves of finely chopped fresh garlic. Cook for 1 to 2 minutes until fragrant. Don’t let the garlic brown.
Remove from heat. Stir in 2 tablespoons of freshly chopped parsley and 1 cup of freshly grated Parmesan cheese. Mix until the cheese starts to melt into the butter. The mixture should be thick and fragrant.
Pour this garlic Parmesan butter into a large mixing bowl. Keep it ready for the fried chicken.
Step 7: Toss in Garlic Parmesan Butter
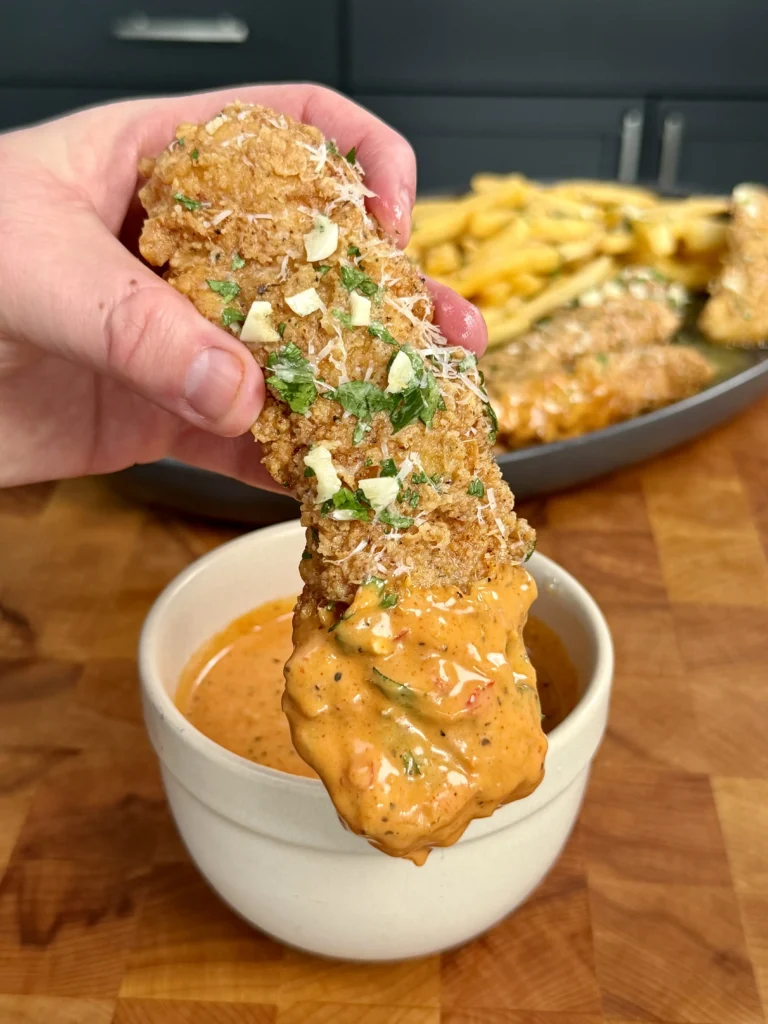
As soon as each batch of chicken comes out of the fryer, add it to the bowl with garlic Parmesan butter. While the chicken is still piping hot, toss it with tongs. Coat every piece thoroughly with the butter mixture.
The heat from the fried chicken melts the butter and helps it coat evenly. Work quickly. Cold chicken won’t absorb the butter properly. The butter might seize and clump instead of flowing smoothly.
Continue until all the chicken is fried and tossed in garlic butter. Transfer the coated tenders to a serving platter. Spoon any remaining butter from the bowl over the top.
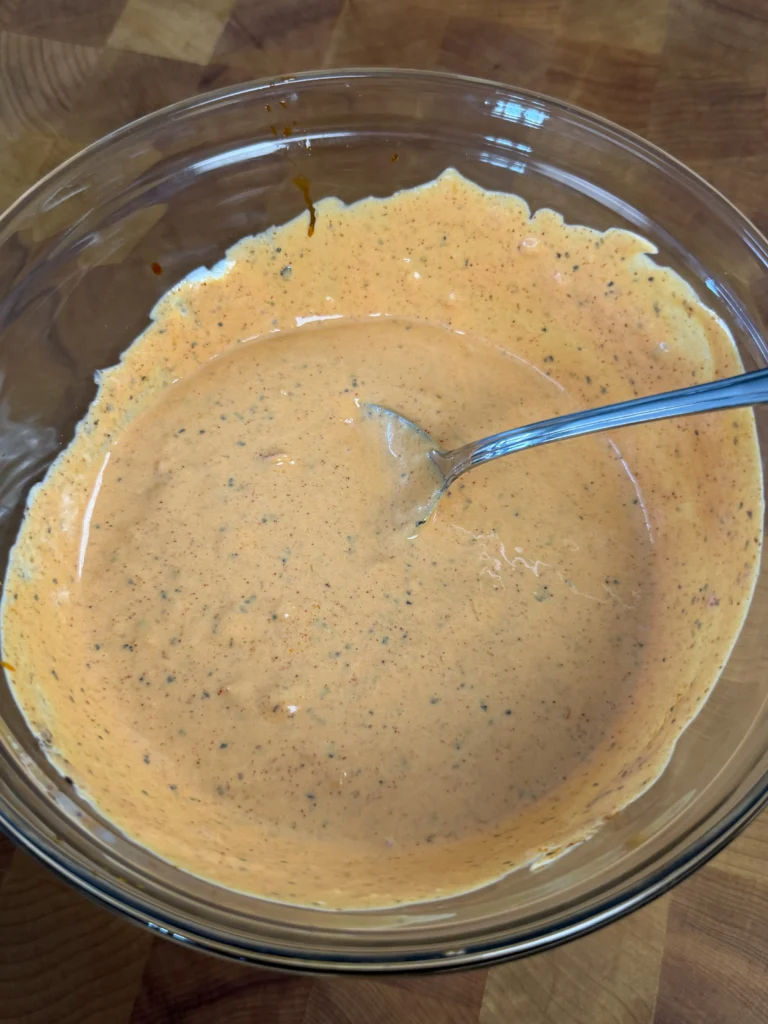
Step 8: Make the Dipping Sauce and Serve
Make the dipping sauce by whisking together half a cup of mayonnaise, 2 tablespoons of ketchup, 1 to 2 tablespoons of chili sauce, and half a tablespoon of Dijon mustard in a small bowl. Season with salt to taste, 1 teaspoon of smoked paprika, 1 tablespoon of garlic powder, and 1 teaspoon of black pepper powder. Mix until smooth.
Serve the garlic Parmesan chicken tenders immediately while hot and crispy. Provide the spicy mayo sauce on the side for dipping. Garnish with extra chopped parsley and grated Parmesan if desired.
Crispy Garlic Parmesan Chicken Tenders
Ingredients
The Chicken:
- 2 lbs chicken breast cut into strips
- Salt to taste
- 1 tablespoon garlic powder
- 1 teaspoon black pepper powder
- Oil for frying
Dry Batter:
- 2 cups all-purpose flour
- Salt to taste
- 1 tablespoon garlic powder
- 1 teaspoon black pepper
- For the Egg Mixture:
- 3 eggs beaten
- For the Breadcrumb Coating:
- 2 cups panko breadcrumbs
Garlic Parmesan Butter:
- ½ cup butter
- 4-5 cloves fresh garlic finely chopped
- 2 tablespoons freshly chopped parsley
- 1 cup Parmesan cheese freshly grated
The Sauce:
- ½ cup mayonnaise
- 2 tablespoons ketchup
- 1-2 tablespoons chili sauce
- ½ tablespoon Dijon mustard
- Salt to taste
- 1 teaspoon smoked paprika
- 1 tablespoon garlic powder
- 1 teaspoon black pepper powder
Instructions
- Cut chicken breasts into 1-inch strips. Season with salt, garlic powder, and black pepper. Mix well and set aside.
- Set up breading station with three dishes: seasoned flour (flour, salt, garlic powder, pepper), beaten eggs, and panko breadcrumbs.
- Dredge each chicken strip in flour, then egg, then panko. Press panko firmly to coat completely. Let rest 5-10 minutes.
- Heat 2-3 inches of oil in heavy pot to 350°F. Maintain this temperature throughout frying.
- Fry chicken in batches of 3-4 pieces for 6-8 minutes, turning once, until golden brown and internal temperature reaches 165°F. Drain briefly on paper towels.
- Make garlic Parmesan butter by melting butter, cooking garlic until fragrant, then stirring in parsley and Parmesan. Pour into large bowl.
- Toss hot fried chicken in garlic Parmesan butter immediately until completely coated.
- Make dipping sauce by whisking together mayo, ketchup, chili sauce, Dijon, and seasonings. Serve chicken hot with sauce on the side.
Notes
Frequently Asked Questions
Can I Bake These Chicken Tenders Instead of Frying?
You can bake garlic Parmesan chicken tenders at 425°F for a healthier version. Spray a wire rack with cooking spray and place it on a baking sheet. Bread the chicken as directed. Spray the breaded tenders with cooking spray on all sides. This helps them crisp without deep frying.
Bake for 18 to 22 minutes, flipping once halfway through. The chicken should reach 165°F internally and the coating should be golden brown. The texture won’t be quite as crispy as fried but it’s still very good.
For extra crispiness when baking, toast the panko first. Spread it on a baking sheet and bake at 350°F for 5 to 7 minutes, stirring occasionally. The pre-toasted panko browns better during the short baking time.
Air frying also works excellently. Preheat the air fryer to 400°F. Spray breaded chicken with oil. Air fry in a single layer for 10 to 12 minutes, flipping halfway. The coating gets crispy and the chicken stays juicy.
Toss the baked or air-fried chicken in garlic Parmesan butter just like the fried version. The butter coating works the same way regardless of cooking method.
What Can I Serve with Garlic Parmesan Chicken Tenders?
Crispy chicken tenders pair well with various sides. French fries are classic. The double-fried potatoes match the chicken’s crispiness. Sweet potato fries provide contrast with their natural sweetness against the savory chicken.
Coleslaw adds crunch and freshness. The cool, creamy slaw cuts through the rich garlic butter. Make a simple vinegar-based slaw or creamy version. Both work well.
Mac and cheese is indulgent but popular. The creamy pasta complements the crispy chicken. Kids especially love this combination. Garlic bread also works, reinforcing the garlic theme.
For lighter options, serve with a green salad. Simple mixed greens with vinaigrette balance the fried chicken. Roasted vegetables like broccoli, Brussels sprouts, or green beans add nutrition.
Corn on the cob, baked beans, or potato salad all work for casual meals. These chicken tenders are versatile. They work as appetizers with just the dipping sauce or as a main course with substantial sides.
How Do I Store and Reheat Leftover Chicken Tenders?
Store leftover garlic Parmesan chicken in an airtight container in the refrigerator for up to 3 days. Let it cool completely before storing. Don’t stack the pieces tightly or they’ll steam and get soggy. Layer them with parchment paper between if possible.
For longer storage, freeze the fried chicken without the garlic butter coating. Let it cool completely. Place pieces in a single layer on a baking sheet. Freeze until solid, about 2 hours. Transfer to freezer bags. Frozen chicken keeps for 2 months. Thaw in the refrigerator overnight before reheating.
To reheat and maintain crispiness, use the oven. Preheat to 375°F. Place chicken on a wire rack over a baking sheet. Heat for 10 to 12 minutes until hot and crispy. The rack allows air circulation so the bottom doesn’t get soggy.
Air fryer reheating works great too. Heat at 350°F for 5 to 7 minutes. The chicken gets crispy again without drying out.
Avoid microwaving if possible. The microwave steams the chicken and ruins the crispy coating. If you must microwave, use low power and heat in short intervals. Place on a paper towel to absorb moisture.
Refresh the garlic Parmesan butter when reheating. Make a fresh small batch and toss the reheated chicken. This revives the flavor and makes leftovers taste freshly made.
Can I Use Chicken Thighs Instead of Breasts?
Chicken thighs work excellently for crispy chicken tenders. They’re juicier and more flavorful than breasts. The extra fat keeps them moist during frying. They’re also more forgiving if you slightly overcook them.
Cut boneless, skinless thighs into strips similar to breast meat. They’ll be slightly thicker and less uniform. This is fine. Just ensure all pieces are roughly the same size for even cooking.
Thighs may take 1 to 2 minutes longer to cook than breasts. They’re denser and fattier. Check the internal temperature. Pull them at 175°F instead of 165°F. The higher temperature renders more fat and makes them more tender.
The breading process is identical for thighs. The garlic Parmesan butter works the same way. Some people actually prefer thighs for this recipe since they’re richer and stand up better to the bold garlic flavor.
You can also mix thighs and breasts if you want variety. Just separate them and cook batches separately since cooking times differ slightly.
What Type of Parmesan Should I Use?
Use real Parmigiano-Reggiano or high-quality aged Parmesan for best results. Grate it fresh from a block. Pre-grated Parmesan from a can or plastic tub tastes inferior. It contains cellulose to prevent clumping. This affects texture and melting.
Real Parmesan has complex, nutty flavor with crystalline texture. It melts partially in the hot butter and coats the chicken beautifully. The cheese should be aged at least 12 months. Longer aging creates more intense flavor.
Grate the Parmesan using the small holes on a box grater or a Microplane. Fine shreds melt better than large shreds. They also distribute more evenly over the chicken.
You’ll use 1 cup of grated Parmesan which is about 3 to 4 ounces by weight. This sounds like a lot but you need it. The large amount creates noticeable cheese flavor coating each tender.
Pecorino Romano works as a substitute. It’s saltier and sharper than Parmesan. Reduce the added salt if using Pecorino. A blend of half Parmesan and half Pecorino provides intense flavor.
Avoid domestic “Parmesan” that’s not aged properly. It’s bland and rubbery. Spend a bit more on real imported Parmigiano-Reggiano. The difference is dramatic.
If you’re looking for more recipes like this recipe, click the link! Check out all of our grilling recipes here for more steak, seafood, and BBQ favorites that are perfect for your next cookout.
COMMON ITEMS USED IN THESE RECIPES
Hasty Bake Charcoal Grill and Smoker
Knitted Gloves
Food Processor
Cast Iron Skillet
Meater +
Upgrade Your Meat Game with Grill Nation x Linz Heritage Angus
If you really want to take your grilling and cooking to the next level, you need to check out our collaboration with Linz Heritage Angus. We’ve partnered with them to bring you some of the best beef you can get your hands on.
Linz Heritage Angus isn’t your typical grocery store meat. These guys are the real deal – they raise their cattle the right way, and you can taste the difference in every bite. We’re talking about beef that’s been dry-aged to perfection, with marbling that makes your mouth water just looking at it.
Check out these premium cuts that’ll change how you think about beef:
Premium Ribeye Steaks – Perfect for special occasions
Dry-Aged Beef Selection – Take your grilling to the next level
Ground Beef & Burger Blends – The foundation of great BBQ